Saturday, November 28, 2015

Glitter Blast Wedding Vases

For a winter wedding we did our own glittered table decor, 
with the help of the Dollar Store, Elmer's glue and 
LOTS of silver glitter!


Did you know you can order these vases from the Dollar Store by the case? 
Did you know you can order the 
glass candle holders from the Dollar Store by the case?
You can! 
It makes wedding decor so easy to do and budget friendly!


If you are gluing the glass candlesticks to the vases, 
use E6000 and let them dry overnight. 
Wash and dry the vases and clean the outside surfaces
 with rubbing alcohol. Doing this makes the glue stick evenly.


We set up a production line and got to work.
 First brush the bottom half of each vase with white glue. 
Be generous and cover them thickly. It dries clear!
 Then liberally sprinkle the glitter over each vase, 
being sure you do it over newspaper or some other temporary cover. 

Trust me on this, 
you don't want the glue and glitter sticking to your dining room table!


Let all your glittered glassware dry overnight.


Good thing we had cardboard and craft paper covering the table! But we also had Goo Gone! adhesive remover handy to clean the wood tabletop if things got out of hand.


These turned out so pretty for this winter wedding!

White and Silver and Gold Decor On My Baker's Rack

LOTS of photos to this post!

I love to restyle my baker's rack several times a year. I don't have a fireplace or mantel and this is what I have, so I make the best of it.

First I shop the house.....


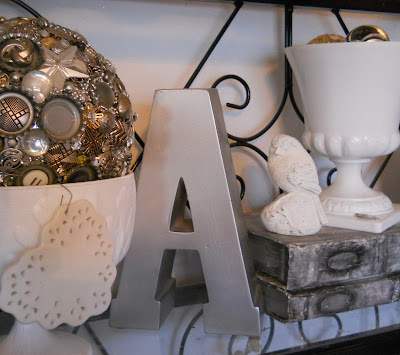
I grab several of my "a" shapes and add them. 
Then I add some of the silver and gold damask books I've restyled to look old and vintage.


The lighted lantern with wax paper frosted glass always stays on the top shelf. 

Here's the DIY.

The metal tree has been repainted many times for weddings, Christmas and birthdays. This time it is white.


I also collect framed mirrors. This round one is perfect for the space. I added a mercury glass owl and glittery skeleton key with a pair of glass candlesticks. I made the primitive star garland from tea stained card stock.


I did not realize how many milk glass pieces I have until I started putting this together.
The book page covered "a" is one of my favorites! Here is how it was made...


More milk glass and the silvery blingy decor ball 
that is one my first blog diy projects from five years ago.


Spray paint for the bird cage and ribbed vase made them perfect for this display.


A cereal cardboard "A" covered with glitter scrapbook paper turned out so cool! A weathered whitewashed birdhouse sits on a restyled damask book.
Here's how it was made...


I love how this white and silver and gold display turned out. 

NEXT, my autumn decor baker's rack!

DIY Faux Leaves Table Runner


There's no deal as good as a Dollar Store deal....
case in point, these fake leaves that come in a pack of fifty.


I buy a couple of packs a year just to use for my autumn decorating.
So this year when I decided to make a burlap and faux leaf 
table runner, I had everything I needed.


I cut a piece of burlap textured fabric 48" long x 12" wide and set out my array of fake leaves.
I also cut a stack of maple leaves out of old book pages and
 hot glued them to the edges of the runner fabric.


This was so super easy and fast and fun to do!


I added the book page maple leaves every few inches for textural interest.


I added a trailing triangular edge of leaves at each end of the runner to 
extend the length. We need it for our table when it is stretched out to its full eight foot length.


Along with this pretty brocade leaf tablecloth, this runner is a perfect simple touch of autumn color.

Water Bottle Turned Halloween Potion Bottle

I've seen so many potion bottles in stores and online,
 I wondered if I could make one of my own.

Turns out I can!

I started with a tall plastic water bottle....

...and ended up with THIS!

This was a fun project and really easy to do. The end product really 
looks like it was complicated, but it is not.


I gave the slick plastic some texture by using white glue to attach pieces of crumpled tissue paper. I kept the wrinkles intact as I glued to make it look like a vintage glass bottle.

Then I painted it in three shades of green craft paint and blended them together randomly.
I crashed my stash for Halloween print napkins and tissues and used white glue to attach them.
Then I added black cut outs in a spooky vintage theme including the raven, owl, climbing roses, curlicues and an old lamp post plus iron fences.


I used the cork stopper from a champagne bottle and added jute twine and torn black chiffon at the neck. Also in my stash I found the random lace trims, beads, charms and a skeleton key, which I painted to look old and vintage.


For a final finishing touch I added bright glitter in black and green in random places and sealed the whole bottle with clear acrylic sealer.

Finally I called it done and took a step back.


Look! You'd never know this started out as a plastic water bottle. This was fun to do and the final result is awesome!

Now I'm looking at all sorts of drink bottles with a new eye...including those cobalt blue beer bottles.

I'll post with new ones as I finish them!

For My Craft Room...Tiny Vintage Ladies Ashtrays

I found these tiny hand ashtrays at the local thrift store. They're a throwback to a smoking culture from decades ago.


Times have certainly changed!

But I couldn't resist the price or their vintage style so I grabbed them up.


Now I use them for holding beads....


...and buttons....


...that I sew to the middle of the fabric rosettes I use
 in so many of my Etsy shop projects.

They make me smile, they were certainly inexpensive enough and they add a certain vintage style to my beading projects.

Not bad for a total expenditure of .50 cents!

Save Beautiful Bottles with Wrapped Twine

I'm a bit of a blue fanatic. Especially cobalt blue (see blog header!)


When we discovered a wine we liked came in these beautiful blue bottles I couldn't bear to let them go.


So started restyling them with twine and burlap for a rustic and colorful look....right up my alley!


So I've put the word out to family and friends to save their blue bottles for me.
With hot glue and jute twine and some burlap scraps, these wine bottles are now upscale decor for my dining table.


I love the contrast of the rough twine and wood with the rich blue.


This table decor almost makes itself!


Add a tray and some greenery from the yard and a mix of unadorned bottles and you have a simple, colorful and beautiful display.

Autumn Garlands on a Brass and Glass Chandelier


The Welding Man loves this chandelier. 

So.

I am nothing if not creative and also flexible in terms of decor. Here's what I did.


I got the original idea from Martha years ago....
and with Dollar Store garlands it's not expensive at all!
Over the years I've accumulated LOADS of Dollar Store and thrift store autumn garlands and pick the best of them for this chandelier upstyle.

Here's an easy shortcut to get this look.


This year instead of winding the garlands around the light, I wrapped a large 20" wide embroidery hoop with four or five garlands, plus flowers and mini pumpkins. Once it was fluffy and full I used florist wire to attach it to the chandelier.


Oooh aaaah! The Welding Man is happy and so am I. Win win!

And because I used the embroidery hoop trick this year, it is super simple to take apart so I can decorate for Christmas.

Like this....

I'll be posting the DIY soon!


Tuesday, November 3, 2015

DIY A Pretty Map Planter

Sometimes an idea comes from nowhere, sometimes from a photo on Pinterest or even a magazine article. I'm always looking for unique ways to create things I'll actually use.

And sometimes "necessity is the mother of invention." 

In this case I needed a plant pot for a kitchen houseplant and I did not want to go buy something new. So I rummaged in my stash and found.....


exterior formula Mod Podge  and an old National Geographic map. Wheels are turning!


Here's the right size planter I retrieved from my garden shed stash. This has real possibilities! I cleaned it up and sanded it a bit for some "tooth" so the paper would stick.


Ooh aah! I really like how the colors show up! I wonder how the exterior grade Mod Podge will do on a planter even if it is inside?


Well, I'm going to find out, aren't I? This looks so unique and it is perfect for my kitchen window.

I chose to put this view on the front side and made my cuts and corrections on the backside, on the best plains of Russia. I am sure someone can make a political statement out of that action ;o) In this case the backside adjustments worked perfectly!

UPDATE-

This little planter pot has been in the window for several months and the Mod Podge is holding up extremely well, tolerating the moisture and shedding any over watering like it is actually plastic. 

I just love the colorful graphics of the map and I KNOW that no one else has a planter like this. Plus I didn't spend any money. That's a win win in my book!


Saturday, October 3, 2015

Book Page Leaves And Fall Garlands


Loving your fall garlands but ready for a bit of a refresh? Add book page leaves to punch them up with great texture and neutral color. It's easy!


I am always on the lookout for autumn leaf garlands at thrift stores and yard sales. And there is always the Dollar Store! Then I add leaves cut from book pages to give them a little extra decor kick. You probably have everything you need on hand already. 


Here's how to do it...


Make a template from one of the garland leaves. We used cereal box cardboard. Trace the leaves on pages of a book you don't mind using. We used a 25 cent paperback that was ruined by water on one corner.

You can layer the pages and cut up to six pages at a time. Use a smaller pair of scissors, such as manicure scissors, for this task. It makes it easier!


Use a glue stick on one leaf. Add a long 8" stem of florist wire then glue a second leaf on top. Putting glue on the second leaf helps to make a secure bond.


Add your leaves to your garland, twisting the florist wire around and around the existing garland for a good hold. Curve your leaves just a bit. The wire inside them helps hold the curve and makes them look more pleasing then just flat leaf shapes.


See how the book page printing gives interesting texture to the colorful garland? I like this alot!


I love the way the new book leaves punch up this garland.


For beautiful table decor use a garland as a runner and add other book page accents. So pretty!


They look great against my muslin curtains. But then I couldn't leave well enough alone and so I added....


twinkly lights!

Ooh aah.

This is a fun and easy project. Plus, cheap. 

Try it out!

I'll be joining these fun linky parties. Drop on by!

Book Page Christmas DIY

Most of you have figured out I am a color freak with an obsession  for turquoise, red and cobalt blue.  However, I also obsess about ...