Wednesday, November 10, 2021

Shabby Chic Basket Ornaments

I made these miniature shabby chic Christmas ornaments this year and they came out so pretty!

Guess what I used to make the little baskets?

Toilet paper rolls!!

Yup. These mini basket ornies came from these plain old tubes!


Yes, I sprayed these tubes with a soap and bleach solution and let them dry before I used them.

I crashed my stash for all kinds of smalls and neat laces and trims for this project. If you are anything like me you have LOADS of little items that would be the right size for these little ornaments.


Cut each tube in half and hot glue the bottom edge shut. I use a bulldog clamp to hold the edges together while it cools.


Use your adhesive of choice to cover the tube with wrapping paper, fabric or what have you. I am using Dollar Store wrapping paper with scrap lace around the top. Use a tiny hole punch on each side of the top. Cut a bit of florist or craft wire about 8 to 10 inches long and wrap it around a pencil, paintbrush handle or small dowel to make curls. Attach to your basket at each side.

I hot glued fiberfill inside so all the decor items would perch right at the top of the basket. You could also use crumpled tissue. Now for some fun!!

Using hot glue, start embellishing your little basket. I am no minimalist, so you can see I like to stuff them FULL.


Such a fun project! 

These are pretty on the tree, or as gift toppers or even small gifts for a group.

PLUS, you can make them in any theme!

I've made these for Christmas gifts and for my Etsy shop. Think of the possibilities for St. Valentine's Day, or a baby shower, or a themed birthday.

So many neat ideas, I want to try them ALL.

Sunday, October 10, 2021

Melted Shot Glasses = Pretty Wind Chimes/Suncatchers

                                                        Yes, you read that right. 
                            Melted shot glasses can be used to make pretty wind chimes!

  Or, suncatchers, as one "helpful" commenter wrote. "These are not true CHIMES."

                                     Tomato, tomahto, but I understand the distinction. 

                  Ahem. They're fun and easy to make and look so pretty when they're done.


                             The look almost like glass and they have a merry plastic clink to them. 
                                                           And they sure are pretty!

                     
                                     I got the plastic shot glasses at our local Dollar Tree. 
                                                        I bought all the colors!
                     Using an old cupcake pan I put two or three glasses in each cupcake hole.


                                  We used the OUTSIDE oven in The Welding Man's shop. 

THE MELTING PLASTING OFF GASES SOME SMELLY FUMES. USE AN OUTDOOR
                   OVEN  OR BARBECUE, DO NOT DO THIS IN YOUR KITCHEN111

               I set the temp at 250 F and checked them often to assess how the melting progressed.
                                                     I think it took less than 10 minutes.


                                       Here is how the glasses looked before and after melting.


                                   Once they were cool I flipped them out on my work table. No, they 
                                                  did NOT stick to the pan.

We used a small drill bit to make holes in each disc using an electric drill. Then strung them up using chains and rings from other Dollar Tree items. The plastic thingy at the top was in my craft room, I                                                                        don't know what it was before.


                                            This turned out so pretty and was so easy to do!

                          I see online that this can be done with the larger thing plastic drink cups too. 
                                                 I will have to try that and write about it.

Monday, September 6, 2021

Recycle Pallet Boards and Nursery Pots To Make Neat Planters

This is one of my favorite garden DIY projects! 

We first made these five years ago and they are still going strong all year long in our garden.

It is cheap, fairly easy to do and gives me the BIG planters pots I want for my yard.

We noticed the big pile of empty tree pots at our local nursery and bought
 a couple of 15 gallon size for $6 each. 

We already had a pile of boards from dismantled pallets,
 so already this project is right up my alley...

CHEAP!


Here are the finished planters. 

I LOVE the different shades of the used boards and the rough grain. 
These nursery pots have a generous lip around the top which make
 the finished planters look neat.
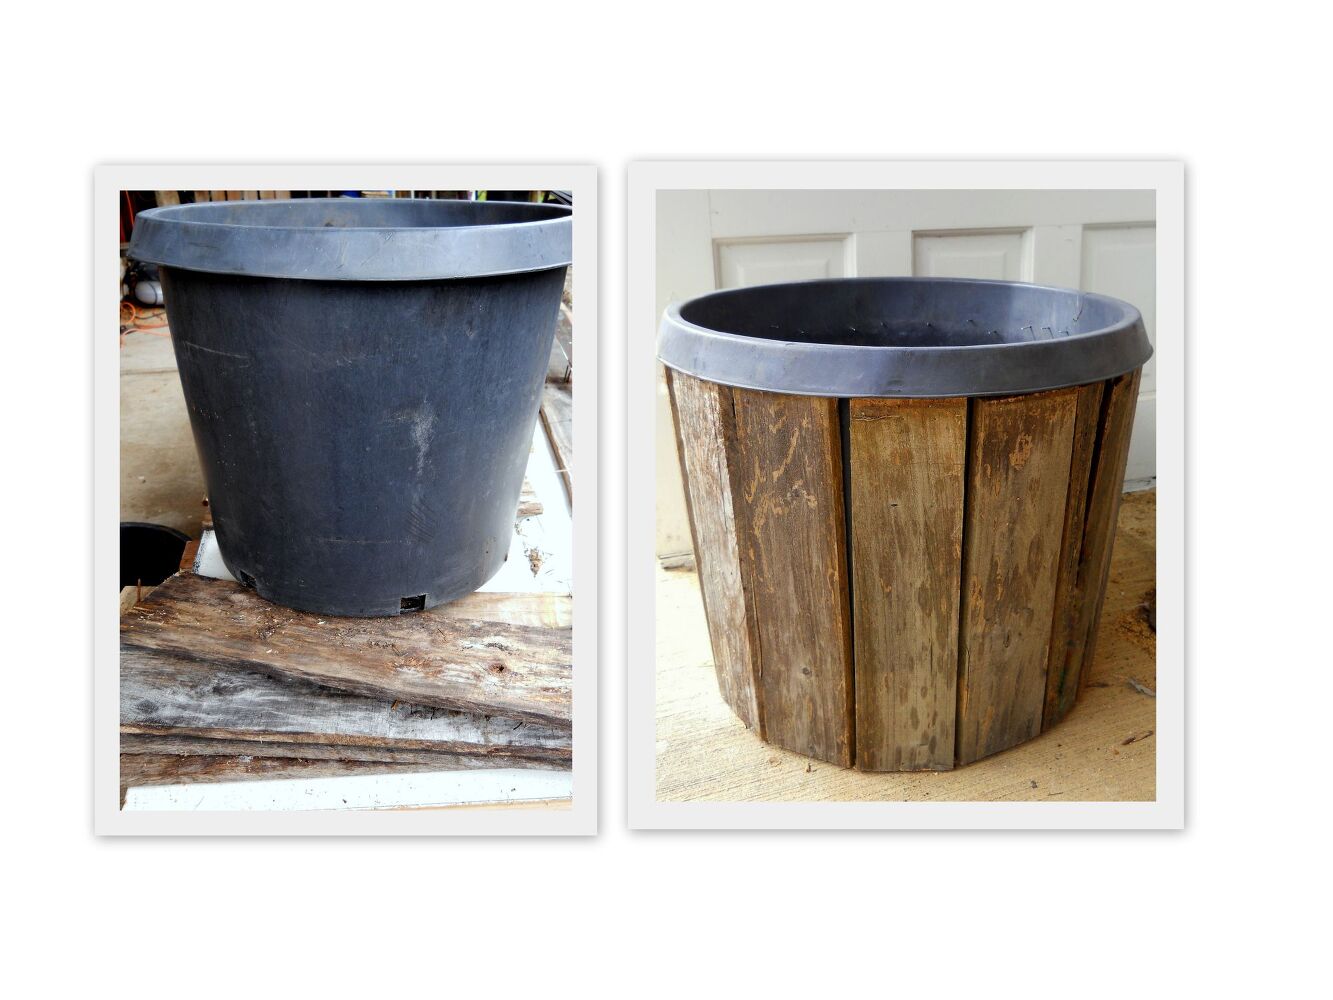
Before....and after!

pallet wood planter project, container gardening, gardening, pallet, repurposing upcycling

The Welding Man trimmed each board to fit and we attached them
 with our handy nail gun using brads.

The nail gun runs on a small air compressor. 

It's one of my favorite tools for projects like this.


Just look at the neat colors and wood grain!


pallet wood planter project, container gardening, gardening, pallet, repurposing upcycling

Sarlac Pit?

Here's how the brads look once the boards are attached. 

We used long ones so they would penetrate all the way thru and
 give us a generous length to bend down inside the planter. 

We used a block of wood and a pair of needle nose pliers for this part. 


This is the largest tree pot we've redone.

 It is 22 gallon, I believe, and it holds a full size rose bush aand two Walkers Low Catmint plants. 

We dry brushed it withour house trim paint and added a 
mitered board frame around the top for a nice finishing touch.

<script async src="https://pagead2.googlesyndication.com/pagead/js/adsbygoogle.js?client=ca-pub-1048645992991686"
     crossorigin="anonymous"></script>

Cracked Mirror To Painting Makeover

Broken Mirror to Painting Save

What do you do with a FOUR FOOT wide cracked mirror?

I saved this totally cool cracked mirror in its AWESOME frame
 with spray paint,tissue paper, Mod Podge, craft paint and clear sealer.

Read on to learn the details.
I

I started out with a beautifully framed mirror but ended up
 with this painting. How in the world did that happen?

It started out as a $9 Goodwill find with a gorgeous frame and a cracked  mirror.
 Four foot long and two and a half feet wide, it was perfect for our art wall, I thought.

What to do? The frame was still good. Why not turn it into a painting instead?
 Can't fix the mirror so I figured why not cover it up?

I turned to my tried and true method for covering up and adding texture.....crumpled tissue paper and mod podge! I taped the crack on front and back with clear packing tape.

 See how the tissue has dried to a nice pearly opaque textured finish?
 I spray painted the frame with Walnut Brown, Leather Brown
 and a bit of black dry brushing.


Time to paint!

 I knew I wanted something as a vivid blue focal point, so I began layering shades
 of blue, lavender, teal, purple and black around a white circle. There is also a
bit of pink and dark green in there. The crumpled tissue really
grabbed the paint and gave this a nice interesting texture.
 I knew I wanted a branch with a nest and some eggs and
here is how it ended up.

I like it!

 I even used my favorite new paint tool, a Deco Color paint pen, to add some of the finer details.
 The Welding Man likes it too. And you know what?
 If I get tired of this I can always repaint it as something else.
 I'm adaptable that way.

Here's a close up of the nest with four eggs since we have four kids. Sure, they're all grown and flown now but since we've moved we all live in the same town, how cool is that? We see them all so often that our empty nest isn't really empty after all!

Now I have to rearrange our living room art wall to make it fit.


Lovin' how this cracked mirror with the beautiful frame will look up there!

Tuesday, May 25, 2021

Paint Pen and River Rocks, Gotta Love Them!


One of the best things about our family vacation spot is the private swimming hole
 with its wonderful  sandy beach in the curve of the nicely landscaped yard. 
 The weather was perfect, the house was excellent
 and the swimming hole was fantastic.


I spent lots of time on the water and sitting in the sun with a book, 
and then I remembered I brought a paint pen to try out.

I usually use acrylic paints and paint brushes for these projects
 but this paint pen won me over!


The biggest rock is 5" across and the smallest (the skull rock) is about 2" tall.
 Once they are sealed with clear acrylic, the subtle colors of the stones brighten up
 and make the black paint really stand out.

 We left one rock with our hosts as a thank you gift. They loved it!

Now I'm thinking of taking a bigger rock and painting our address on it 
then using a paint pen to dress it up with some swirls and curlicues. 
 How easy would it be to really do a fancy paint job on a pumpkin for Halloween? 

 And what about a tree design on a table runner or a pillow?


I'll be bringing paint pens with me on vacation from now on!

Tuesday, April 27, 2021

Rustic Pebble Table From a Five Gallon Bucket

I wanted a couple of small side tables for our deck and decided to make them out of what we had on hand, which includes five gallon buckets, recycled pallet boards and Dollar Store pebbles.


Here's a link to the first bucket table I made with a blingy top of beautiful glass gems from the Dollar Store. I like it but it seems too...fancy for our front deck.


So I knew I wanted to make something a bit more rustic and farm style. 
Back to the stash of five gallon buckets I go and add more salvaged pallet boards.
 Our nail gun makes this part quick and easy.
I put five nails in each board then bent them down for safety.


Our local Dollar Store has these bags of pretty polished pebbles in stock all year long. This project took two bags since I picked thru them for flatter stones. I added larger flat stones from our gravel garden paths and used silicone to attached them to a thrift store microwave plate. I think the plate cost $1.35 and I also got a discount!


I put a blob of silicone about the size of small cookie on the plate, then smooshed the pebbles one by one into the blob, giving each of them a twist to seat them in the silicone. The silicone dries clear and looks like the pebbles are sitting in water when you are done.

I really really really like the rustic look and country charm of this version of my bucket table!


The warm wood and colorful stones are just a natural pairing and with the silicone 
they look like they are floating in water. LOVE IT!


Perfect for a nice morning cuppa before the day heats up. I am liking this little 
table more and more as I keep looking at it.


 So here's the first version of my five gallon bucket table with blingy 
Dollar Store glass gems. I like this one too!


Plus, just like the other table, this pebble table is totally weatherproof 
so it can stay out side all year if I want. And the cost? Minimal.
Here is the breakdown....

five gallon bucket on hand 
reclaimed pallet boards on hand
one tube of  silicone caulking $2.97
2 bags of Dollar Store polished pebbles $2 total

2 hours of time with our nail gun and then with a caulking gun.

The silicone sets up quickly and after an overnight wait this little table is
 ready for use anywhere outside. 

I call this a win win!

Monday, April 19, 2021

Repainted Dollar Store Butterflies

I just couldn't leave well enough alone...so I repainted these metal butterflies for my garden!


Before.......................................and after.


I found these metal butterfly stakes at the local Dollar Store and immediately made plans to repaint them for my garden.


I used two colors of spray paint to give me more of a turquoise color to complement our front deck.


Using a fine paint brush I followed the contours of the stamped metal. I added the tiny vein details to each wing then added some white dots. You can see the veins in this close up but not so much when it's outside in the yard. I also added a bit of glitter paint.


Wow! I love the pop of color against the bright green. Notice you can't really see the glitter when it's outside. But in my colorful colorful garden this blue butterfly really holds it own!

And here is the Monarch version of my Dollar Store butterflies. What a fun project this has turned out to be!


Book Page Christmas DIY

Most of you have figured out I am a color freak with an obsession  for turquoise, red and cobalt blue.  However, I also obsess about ...