Monday, November 21, 2011

Make Do Kitchen Island

Here is the realtor's pic of our kitchen before we moved in. Yes, it is full of real wood golden oak goodness. That means they will be easy to paint at some future point, yes? Creamy vanilla white in my dreams!

You see we have a generous open space right in the middle of the work triangle. After several family gatherings I told the Welding Man I wanted an island for the Thanksgiving fest to give me more prep space and also improve traffic flow for a buffet line.


The discussion is ongoing for the permanent fixture. But for a tryout we came up with this solution....


The two ancient, solid walnut nightstands we have kept around for decades. Back to back they make a 21" x 35" worktop, almost the size as my hoped for island.

We had a snack and movie night last week and tried it out. It really is convenient and well placed and a good size.

I threw an old tablecloth over it to disguise it's origins. Sorta.


As part of the ongoing discussions/negotiations, the Welding Man wants to put a top on the nightstands and call it good. That might work. But I can also picture a farm table type island, with a shelf (or two) underneath and a more open look. Altho the nightstands have storage built in. But they need to be painted.

With Thanksgiving looming ahead, we're going to give this a workout and come up with a compromise we both like. After 40+ years of marriage, compromise is the name of the game, baby!

Have a great Thanksgiving celebration and take a moment to savor the blessings in your life. I sure hope your day includes lots of laughter and tasty food.

Bless you all.


Posted by Picasa

Monday, November 14, 2011

3 Quick & Easy Decor Projects

I decided to put these three projects in one post, because I am rarin' to move on to my Christmas blogging. Can you say gifts and decor and great ideas?

Project 1-Here are the spooky Halloween branches from our front deck. By the end of a wild and windy week they were looking shabby and tired. But no problem!

Dollar Store clearance sale, two packs of fake leaves for a dollar. Score!
I took the cobwebs and bat garland off the branches and straightened them up in the urn with florist foam and duct tape. The urn, by the way, was a clearance item at Kmart for $1.66!! I added the leaves with hot glue and.......

...voila! Now it is a colorful vertical accent in the corner of the living room. I like it alot. And when I switch to Christmas decor, a blast of my heat gun will loosen those leaves so I can add snowflakes, etc. A bit of fabric draped at the base hides the foam and duct tape.

Project 2-This project uses a Dollar Store vine wreath and satiny fabric in fall colors. I made oversize rosette flowers, two and a half to three inches across.

I wanted them bigger so I could use less of them. I love the shiny sheen of the fabric against the two cream muslin rosettes.

Hot glue is my friend. Way way back in the sixties I would have wired all this stuff in place.Thrift store leaf bunches are the perfect touch, but not too many so the twiggy wreath can show through.

Project 3-Here's a quick way to dress up and display your pumpkins, real and fake. Taking more of those Dollar Store leaves, hot glue them around the rim of a candlestick, of glass, metal or wood.

Or, glue the fake leaves around the bottom of your pumpkin. This gives it a nice ruff of color.

Perch your pumpkins on the candlesticks for a colorful display. Here they are on my baker's rack, all switched over from my black and white Halloween. I added gold berry picks and propped it on the top shelf, along with a bunch of leaves in a spray painted bottle and my silver button blingy decor ball.


I'll be switching this all over to Christmas decor right after Thanksgiving. I'm wondering if I can pull off a black, white and silver Christmas theme on this rack. I guess we'll all find out!

I'll be linking up to the fun parties in my sidebar. Come check them out and join the fun!


Posted by Picasa

Saturday, November 12, 2011

So Thankful!

Last year at this time we lived in a beautiful place with a gorgeous view. And every winter looked like this....

Align CenterIt was a gorgeous place with snow every winter. And power outages whenever the snow topped two inches, and frozen water pipes, and a snowed in driveway and a long drive to the hospital for my surgery, chemotherapy and radiation. We lived there 25 years so we knew how to cope, but when I got sick, this became the biggest problem for us......


...we lived far away from our kids and grandkids and had to drive over a 3800' pass to go visit them. This was the highway just before Thanksgiving of last year. Even with studded tires, that frozen snow and ice was treacherous.

Can you see the long icicles on the rocks? That's as close as I wanted to get to them, and I was NOT getting out of the car!

Posted by Picasa
Yeah, it was a long, hazardous drive but totally worth it. And we did it again at Christmas, usually in deeper snow. Or our family drove over to see us. For years.


Hello, ladies! The men are all in the other room.

Now we live in the same town as our kids and grandkids. My sisters still have a bit of a drive but no one has to cope with that snowy mountain anymore. By the Grace of God, we sold our old home and moved here very close to our family. We see them every week and plan some great holiday celebrations this year.

So thankful and counting our blessings. Yes, we are.


Book Page Leaf Garlands


Here is an easy project that turns out great, and you can probably do it with stuff you have on hand. I use old book pages for alot of things but this is one of my favorites. I add leaf cutouts from old books to Dollar Store garlands and really kick up their style factor.

Using a leaf pattern traced from a real life, a fake leaf or online, simply trace the shape onto a printed page of an old book. With good, sharp scissors you can cut through about six pages at a time. Here you see one size leaf we cut to add to the garland.

And here's a smaller size. Please excuse the painty, gluey crafting hands! Use a glue stick on one leaf, add a length of florist or craft wire, then put another leaf on top. You can make as many as you like, it's easy peasy and they look so cool. I believe Pottery Barn had some similar leaves a few years back for a very pretty price.

Just use the wire to twist the leaves into the garland. Here is one garland we made last year. I love the way the book page leaves "cool down" the vibrant colors of the garland. You can add as many as you wish and the wires let you "fluff" them any way you want for a fuller look.


Here they are with another more muted garland. This was for the long stair banister in my daughter's country style house. I love the way they look!

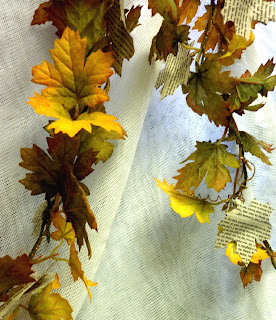
Here is a garland of oak leaves hung on a muslin curtain. Such a complement to the colorful leaves and the creamy colored muslin.

Posted by Picasa
And here is one, paired with my primitive star garland, that I've looped around my entry way mirror. I really like the way the book page leaves look with all the vibrant hues!

And here's a shot of a garland used in a Thanksgiving tablescape. Add a few book paged balls and some glass ware and you have a stylish and colorful centerpiece.

Try it, you'll like it! If you make something using book page leaves, please let me know. Link back! Attach a pic! I'd love to see them.

Friday, November 11, 2011

Lighted Autumn Hurricane

I scored this gigantic glass hurricane at a yard sale for $2. It is 20" tall and 8" across at the belly with a wooden base. I love it's size and how I can dress it up all year long. Plus, $2!! That still makes me grin.


Last spring I filled it with vine balls, book page decor balls, driftwood, monkey's knots, pine cones and my favorite green glitter dragonfly. I LOVE how it looked with a few of my cobalt glass pieces.


So this fall I restyled it for Autumn. Now it is a lighted accent to my Thanksgiving decorating. I like it. I like it alot!


I grabbed a garland and a short string of 50 lights from my stash....both Dollar Store buys from years past. I twined them together and stuffed them into the glass. The problem was, they all fell to the bottom and left the top of the glass empty.

The Welding Man suggested that I put a piece of dowel inside to support the garland, so here's what I came up with. To disguise the dowel I covered it with an Autumn leaf print napkin cut into strips. A bit of hot glue at the top and bottom kept the paper in place. We threaded it through the garland and used florist wire to hold it at the top. Then we plugged it in and I am pleased as punch at the way it looks!


Here it is at the corner of my "bookcase in lieu of a mantel" with my Thankful wreath, my faux stained glass mirror, my oak family tree painting and another, smaller, unlit hurricane. It really brightens up that corner and is a beautiful night light. I checked it often for too much heat from the lights and it is safe, just warm.

Now I'm thinking that smaller hurricane needs lights, too. I can put it in the corner of the living room with my Autumn tree branches. And for Christmas I'm thinking silver balls and ornaments and pine cones and a bit of greenery, all lit up!

I'll be joining the blog parties on my sidebar, come along and link up! There is a wealth of creative projects out there!

http://ivyandelephants.blogspot.com/2014/09/up-in-smoke-again.html?utm_source=Friends+of+Ivy+%26+Elephants&utm_campaign=c40032f638-Up+in+Smoke+Again&utm_medium=email&utm_term=0_a51593f650-c40032f638-42477

http://www.playpartypin.com/2014/09/weekend-re-treat-link-party-86.html
Posted by Picasa

Sunday, November 6, 2011

Post It Note Christmas Flowers

Here are the simple book page ornaments we've made for our little tabletop trees, including a punched paper snowflake garland, Mod Podged balls and these pretty little origami flowers. I love the look of a vintage black and white Christmas with all these elements.


For cheap and easy Christmas decor, you can't go wrong with recycled book pages. One of my favorite projects are these book page flowers.

I call them Post It Note Flowers because they work up beautifully using a 3" x 3" square of paper, so in a leap of naming logic there ya go. They are really origami kusadama flowers and they've been around forever. I'll give you a link to an origami website at the end of this post in case my instructions lead you hopelessly astray. ; 0 )

Start with a post it note or any size of paper as long as it is perfectly square. IF YOU USE post it notes, you will start with the gummy side at the bottom right and gently separate the layers if they become stuck. I LOVE these in hot pink, but I don't have any paper that color right now.
Fold bottom to top, then sides in to form a diamond, then fold each side out from the middle.
Unfold each side "wing" so it looks like a kite, then fold the top of these side kites inwards so now you will have a middle kite shape with matching side triangles. Fold each triangle once inwards.
Roll into a cone and hot glue the two folded sides in the middle. You need at least five to form a flower shape, tho I have seen them with more. Hot glue all the cones together and don't worry if you have a little gap in the center, even real flowers have a little opening in their middle.


We've made ours out of vintage dictionary pages to go along with our simple white Christmas theme.

And the Live, Laugh, Love ornaments? Simply book pages cut into small rectangles then Mod Podged onto Christmas balls. I hand wrote the words on each ball with a Pigma pen, then sealed them all with clear acrylic. You could also use a Cricut or Silhouette for the words, or print them and cut them out to match the book pages and Mod Podge them on. Simple, pretty and inexpensive. We like!

Here is a link to a real origami website with great instructions and lots of samples for these pretty flowers...

http://www.cutoutandkeep.net/projects/origami_kusadama_flowers

I'll be joining the parties on my sidebar. Come join the fun and see the neat projects posted this week!

Friday, November 4, 2011

Recyled Halloween Wreath

Even as Halloween ended and the decorations came down, I knew I wanted a bit of color for the Thanksgiving season. I dove into my stash of autumn colored silks and took another look at the wreath I spray painted black for Halloween. I came up with this.....


I love how it looks on my blue door! The colors against the black really pop.

Here's how it looked for Halloween, properly dark and spooky and fun. Perfect for the season.

I took some real miniature pumpkins and put them on skewers, then hot glued them in place amongst the black roses. A few silk flowers and fall leaves later and voila, the finished wreath! I love the off center design with the "breathing room" on the rest of the unadorned wreath.


Not only do I love how it looks, it cost me nothing but a $1 for the 3 pumpkins and a few minutes' time. After Thanksgiving I'll switch it over to Christmas, still using the black wreath as a base. I've got some colorful ideas for THAT design and I'll post the finished wreath here.

And now I'm thinking....what could I do for Valentine's Day with that black wreath as a starting point? Easter? Mother's Day? Just what I love, a creative challenge. Check back to see this black wreath in all of it's disguises.

I'll be linking up to the parties on my sidebar. Come visit and be amazed at the creativity out there in blogland.

Tuesday, November 1, 2011

Muslin and Burlap Towel Decor

I've said before, I'll pretty much put rosettes on anything, and here I go again. I embellished this pretty blue guest towel and LOVE how it looks, especially with the sand colored towel hanging with it for subtle contrast.


I got this 2 pack of hand towels because the color is gorgeous. It is more blue than green, a really nice shade of turquoise. I knew that burlap and muslin would look great combined with this vivid color.

I like it. I like it alot!


And since God is in the details, here is the way I finished the trims on the back. Simple, clean, elegant.

I pulled out some rosettes and buttons, dug into my bead stash and started having fun.


How pretty is this? The towels cost $1.50 apiece and I already had all the other supplies. Breaking it down dollarwise, the muslin and burlap actual cost was about 15 cents and the buttons and fabric rosettes add maybe another 15 cents to the total...so about $1.80 for a whole lot of decorative bang. I still have one more towel left, should I make it complementary to this one or go in a completely different direction? OR, should I go get more towels and have some fun? Decisions decisions. ;0)

I'll be linking to the fun parties in my sidebar, come join the fun and see what creative bloggers are writing about this week. There are TONS of wonderful ideas out there!

And look, a WHOLE MONTH of burlap inspired projects. Come check them out at Whisperwood Cottage....

Book Page Christmas DIY

Most of you have figured out I am a color freak with an obsession  for turquoise, red and cobalt blue.  However, I also obsess about ...