

It's Sunday, and I decided to do something fun and frivolous for my craft room. It started when we changed a light bulb in my overhead light and this was sitting on my work top.


Hmmm, I don't want to just hang this back up there. I wonder if hot glue will hold string on glass?

This curvy red chandelier is going up there eventually, once The Welding Man checks if it needs rewired and makes sure it is safe. $7 at a thrift store, baby! It will be perfect when it's done.

With all the book page recycling I've used in my craft studio, I decided to make a temporary chandelier using a circle punch. I knew I'd need at least 450 circles, so I made 500. I could do 5 pages at a time and get 7 circles from each set of pages, so this did not take long at all.

I also used this gorgeous butterfly punch and made about 50 of them out of heavier paper, since they have so many open spaces, the book pages are too fragile to use the way I planned.
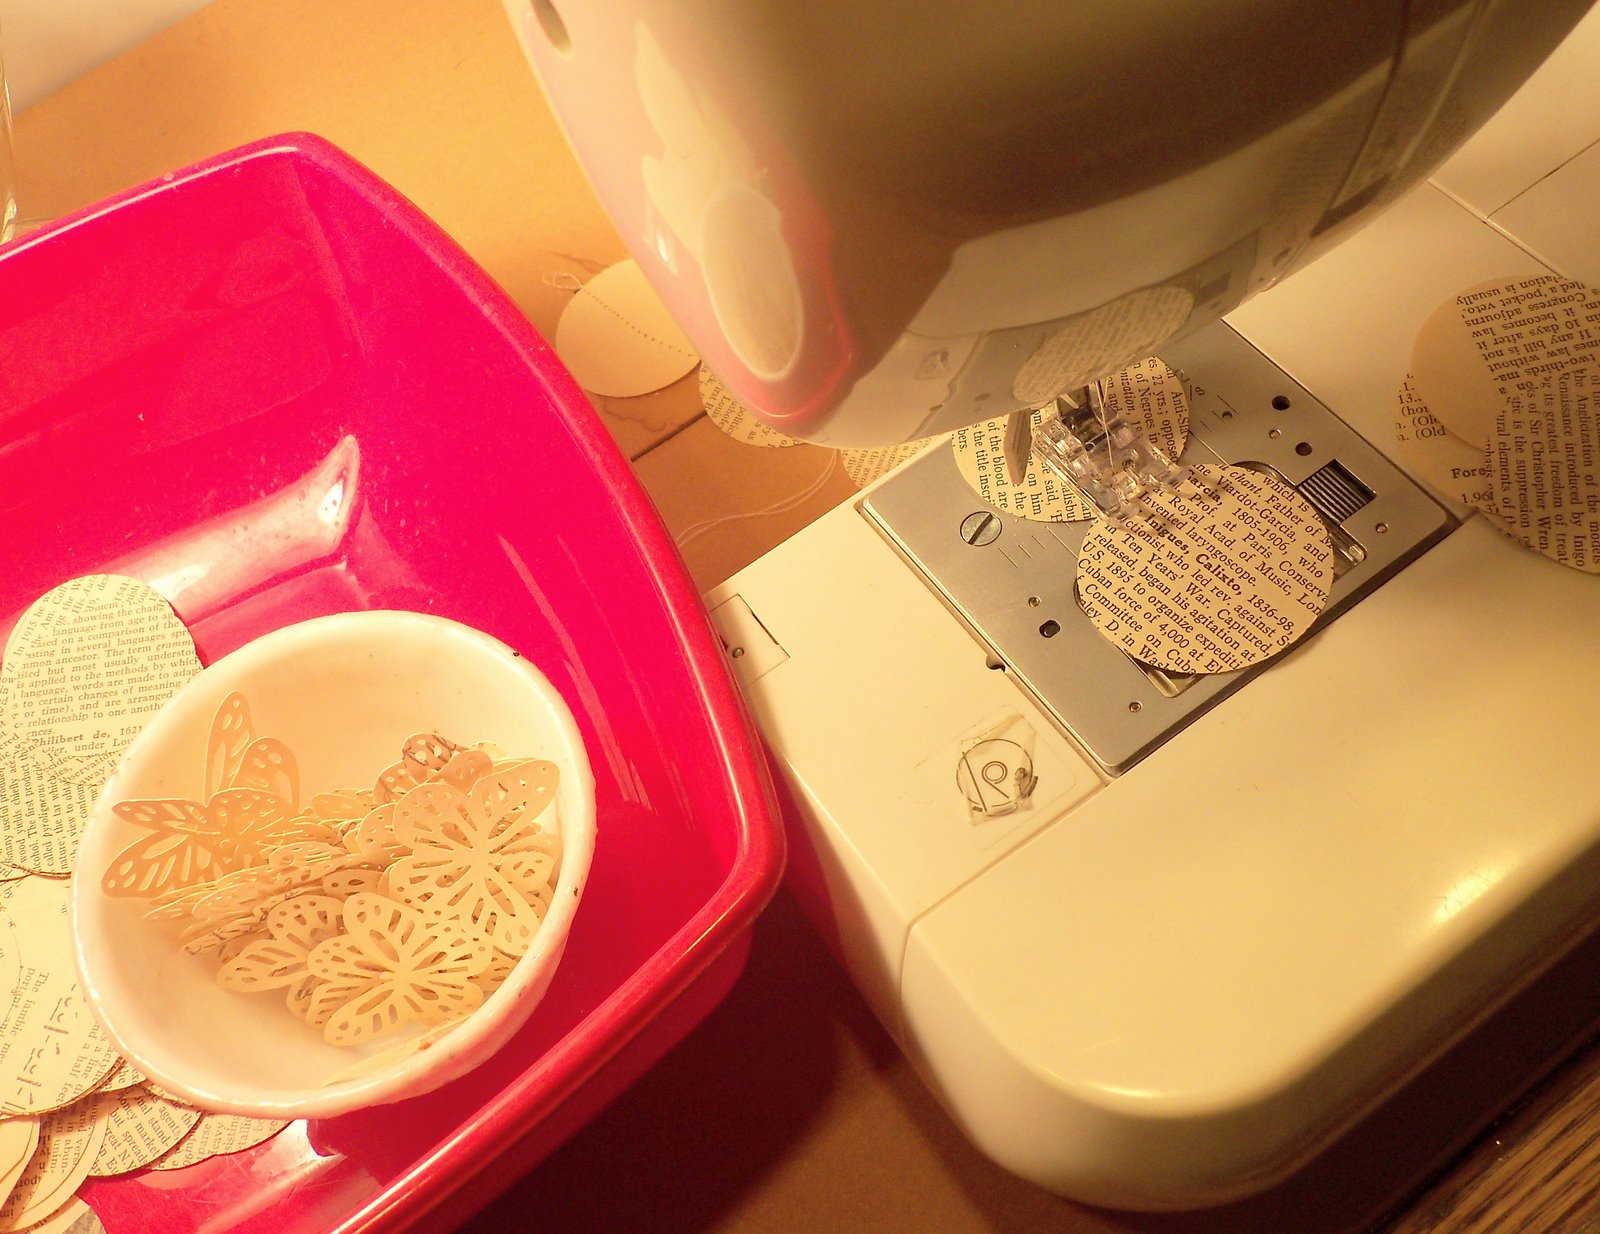
I sewed 12 circles and 1 butterfly together for each 18" long string.

A dot of hot glue holds the lightweight strings perfectly. If I ever want to return the glass shade to it's original condition, the glue pops off with a little help from my heat gun.

The book pages I used were very delicate, so this happened early on. I just used a glue stick on another circle and put it over the top, covering the tear and the thread.

The repair does not even show once all the strings are glued on. I sewed about a dozen strings and had to do alot of repairs. There had to be a better way.

So I changed tactics and laid out the circles and butterflies then stretched some crochet thread across them, securing them with dots of hot glue. A dot of hot glue on the string holds it down on the table and makes it easier to lay across the hot glue on the circles. This was just as fast and easy as sewing them together! Before lifting the string of circles up get rid of glue wisps with a heat gun.

Here are a sewn string and several glued strings side by side. I prefer the cleaner look of the glued strings.

And here is the chandelier put back in place over the light fixture. I like it. I like it alot!

I LOVE the random placement of the butterflies!
It diffuses the bright overhead light nicely without making the room feel dark or shadowy. I will try to get some shots in the daylight and see if it still makes me happy. I have a hunch it will! So that was fun, throwing away my "to do" list and creating something on a whim. Sometimes you just have to go for it!


I am totally going to try this! Thanks for sharing! I too never wanted to sew them all together! Seemed soo fussy glad to know there's a better way!
ReplyDeleteI love it! Lezlee
ReplyDeleteWow! That is creative!
ReplyDeleteThat is awesome! I love your chandelier! So creative and it looks pretty. I love the butterflies that you added...it makes you want to keep looking to see what else might be hidden! :) Love your blog...I'm a big fan of cobalt blue. I collected the Cobalt Moderntone depression glass at one time. I'm a new follower! I have a party on Wednesday's I'd love to have you share this and more if you want!
ReplyDeleteYou are invited to participate in my blog hop:
ReplyDeletehttp://juliejewels1.blogspot.com/2012/03/show-your-stuff-13-chocolate-cover.html
omgosh how creative ;). also love the name of your blog I have been buying old books at thrift stores for $0.50
ReplyDeleteThat is gorgeous!
ReplyDeleteVery lovely. I think I might need to do this somewhere...not sure where yet, but its too good not to use the idea somewhere!
ReplyDeleteVery cool!
ReplyDeleteCas x
Awesome! What a lot of work.
ReplyDeleteThat's clever. Very fun!
ReplyDeleteHappy Belated White Wednesday,
Judy
This is beautiful! I love the idea and it works perfectly and almost looks like a capiz shell piece from a distance. Visiting via Craft Envy.
ReplyDeleteThis turned out so cute...don't know why you would ever want to change it out!! Love the circle and the butterfly combo. I am featuring this on my site tonight!!
ReplyDeleteMaggie
www.thehellonheelshousewife.blogspot.com
Hi Ann,
ReplyDeleteI love this chandelier! Thanks for linking up to Share the Love Wednesday at Very Merry Vintage Style last week--this post will be featured on tonight's post! The post will go live at 4pm CST; stop by and pick up a "I've been featured" button!" Hope you'll be back often to link up. Have a great day--
Mary
this is gorgeous, I know exactly where I'd put one!
ReplyDeletemarissa
http://raegunwear.blogspot.com
This is so lovely! I would love to feature this on Reduce, Reuse, Upcycle. Feel free to stop by and grab a featured button. Thanks!
ReplyDeleteWow I like this easy and beautiful paper work. I will defiantly try this project at home. Its look so decent and lovely.
ReplyDeleteremote control car
this is a great idea! I've been wanting to do something like this myself but with wax paper! Love your blog!
ReplyDeleteYou have done amazing craft using books pages. I really like your Book Page Chandelier. Such a very nice creation from waste paper. It is also called waste from best.
ReplyDeletephotoshop courses sydney
You have very nicely use old books pages. Amazing Book Page Chandelier I really like this Book Page Chandelier. I also try to make this types of Book Page Chandelier.
ReplyDeletephotoshop courses
Well. that's super fun!! I guess you can make all sorts of things out of books!!! Love it!! And so happy that you linked up!
ReplyDeleteThis is absolutely amazing. Visiting from Tip Junkie and pinning too!
ReplyDeleteBeauuuutiful! patsy
ReplyDeleteI have been saving styrofoam containers thinking I would figure out what to do with them eventually! Thanks for an idea burst.
ReplyDeleteCan you tell me how you attached the string to your light cover?
ReplyDeleteOh MAN, I thought I showed a photo of that part. After all the strings were finished I just hot glued them to the inside edge of the glass cover so they hung down on the outside. None of them have fallen off and this still looks pretty cool!
Deleteyes does have the cadiz feel of one of my mobiles ... love this idea; would be fun to spray with pearl glaze for a "shell" feel too. thanx for the hint to affix the cord to the table with a dab of hot glue!
ReplyDelete