Friday, May 25, 2012

Clever and Pretty Craft Containers....


...using Dollar Store adhesive shelf vinyl (or, contact paper).


In my craft studio I use lots of black and white prints along with recycled book pages and the colors red and turquoise. This is my happy, creative place!


A year ago for my ladder shelf I covered one box with Dollar Store contact paper in a neat black and white print. I had enough to do a few boxes but when I went back to the store they didn't have it anymore. Bummer. I kept checking back and finally this week they had it in stock again. Score!


I had been using this unadorned creamer container to corral the scraps on my work table, but with the new contact paper I styled it up, baby!


Oooh aaah!


And of course I didn't stop there. From left to right...the creamer can, a Starbucks bottle, an alfredo sauce jar and a mayonnaise bottle. Don't they look pretty with that contact paper and some lace and rosettes?


These bright red coffee containers were perfect for my studio, except for those ugly, pesky labels. With my Dollar Store contact paper I jazzed them up in a hurry. I have some more jars and bottles and even a vase and possibly a metal coffee can....good thing I bought an extra roll of contact paper.

I love it when I find a design element that works so well for my decor and it makes the already practical containers pretty, too. And it's cheap! Can't beat that.

Gotta link this up to the fun parties in my sidebar. Come visit and link up, too. It's a fun and creative way to spend some time!

Save That Sweatshirt With Paint


I love my zippered hoody sweatshirts and wear one almost every day. Unfortunately, that means they are going to get stained with paint and sometimes bleach. So what to do? Paint a design on them to hide the mess and style 'em up at the same time!


Yup, this black one had white and blue paint AND bleach spots on it. No problem! I added the script and the dotted design and saved it.


And my grandson gives me his sweatshirts as he outgrows them. This dark grey one had a cool design that was almost worn out. This is what it looks like now that I've rescued it with paint.


And here is what it looked like before I worked on it. The light grey design was almost gone and it just looked worn out and grungy. Tho I understand, grunge is the new black, according to my grandson. Lol!


I used Patio Paint in silver metallic. See where I've started free form painting the cross design? Patio Paint metallics are the absolute shiniest craft paint out there and with a bit of fabric medium work perfectly for this project and others. The metallics come in gold, copper and silver and I love their durable shine!

Here is the front detail repainted. Love this!


On back I added curlicues and a flower, plus I redid some lettering to read "Mom." I didn't go for perfect coverage and kept the paint a bit blotchy as I worked on the design. I really like how it's come out and the silver really picks up the light!


On the black sweatshirt I used this pre cut stencil and chose which phrases and words I wanted. I added fabric medium to the plain white craft paint and pounced it on with a makeup sponge. Easy peasy!

And here is the link to the stencil page at  The Crafters Workshop, the company which makes this fun stencil. They have LOTS of cool designs.

http://thecraftersworkshop.com/The_Crafters_Workshop/New_Products.html


This says, "Art is just another way of expressing our innermost thoughts." Down the left sleeve I stenciled "today," "yesterday" and "tomorrow." I hope you can see the blue highlights I added to "Art." Then I added dotted swirls in white and blue plus some free form fireworks type flowers on the front and pockets. I really like how this design came out! Best of all, you can't see the bleach or paint stains on this sweatshirt anymore! :o)

UPDATE...I just washed this black sweatshirt with my regular laundry. I zipped it up and turned it inside out  and just let her rip, figuring if it held up to a normal wash it would be okay. It came out of the dryer unscathed and the paint is even a bit softer to the touch after laundering. Gotta love that.

Now I'm thinking of doing this to a new sweatshirt and see just what designs I can come up with. I remember way back when guys used lace to stencil designs on their cars. What if I did that on a sweatshirt using layered laces and appliques? Hmmm, now my brain is working on more ideas.

I'll be linking up to the parties in my sidebar. Come visit and join up. You'll have a fun time!

Saturday, May 5, 2012

Birthday Gift in a Deli Tray


The family knows when birthdays roll around they are going to get a hand made gift. They even request what they want. And May is chock full of gifting occasions, with birthdays for my three girls (Christy, Kelly and Katy) and my younger sister (Dianne)...plus Mother's Day. Buying gifts for everyone would be hard on the wallet!

So, for my daughter, Kelly, the scrapbooking, cardmaking, senior and prom photo taking impresario of the family, I knew that scrapbook embellishments and trims would be the perfect gift. Also, she asked for them :o)


I started out making ribbon and fabric rosettes with hot glue on punched card stock circles. I even made a few with scraps from a Tiffany blue bridesmaid dress I sewed for her a few years back.

I usually hand sew all my rosettes but since these were for scrapping and card making, hot gluing was fast and easy. Also, fun!


I made LOTS of rosettes.


And I made more!

Then I made yo yos, and melted fabric flowers and twine discs and a twine daisy and ruffles out of crepe paper and strips of fabric and even some white satin roses like the 37 I sewed for her wedding dress 20 years ago. Why 37? Because even tho the pattern called for 50 rolled satin roses, I stopped at 37...because that's a lot of rolled satin roses and I was pooped, that's why.

The dress, by the way, was GORGEOUS. You never even noticed it had fewer flowers. That's the story and we're all stickin' to it.


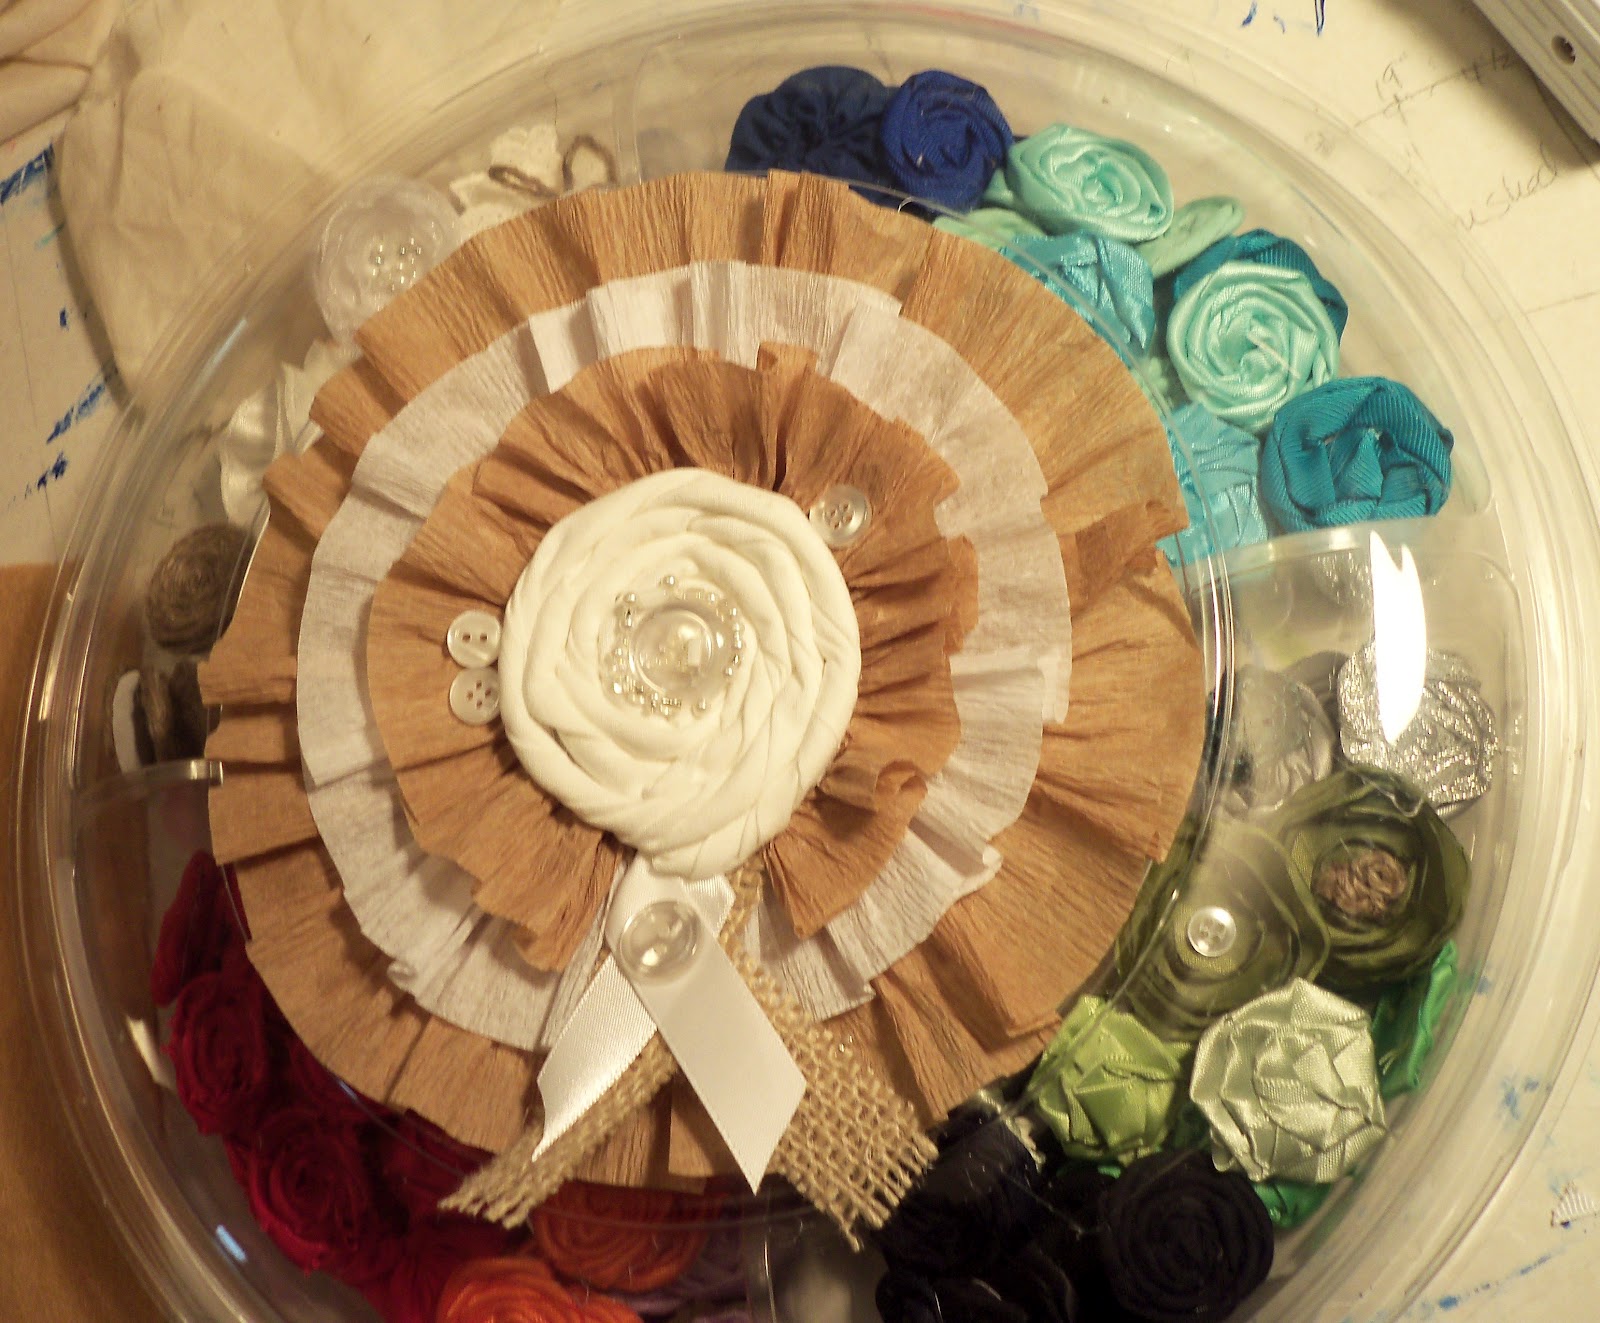
Then I was casting about for a cool way to package these cool flowers and trims. I tried putting them in a big jar but it looked cluttered and chaotic. Part of the impact of a good gift is PRESENTATION, baby! Then I remembered this clear plastic deli tray I'd saved from a family picnic. SCORE!


I must have loaded and reloaded and rearranged that deli tray four or five times. I put the ruffled trims in the center with a package of flat lace tied with twine as a divider. It was twice this full when I got everything arranged just so.


I snapped the dome top in place and realized I had to cover the printed label. So with a bit more ruffled crepe paper and a rolled rosette with a button and bead center and more buttons around edges and a bit of burlap and a satin ribbon...okay, time to stop!

Does anyone else have that small problem? Lol


And here's something sweet. Here are two extra melty edge and beaded flowers that Insanely Creative Christy made for Prom. Whose Prom? Kelly's daughter, Rebecca's, Prom.

Becca wanted to wear that same bridesmaid dress I made for her mother, with a few additions. Like sheer caplet tulle straps. And lacing up the back. AND melty edge and beaded flowers made by her Aunt Christy!


Memories and nostalgia win in our family every time! The dress came out nicely and Rebecca loved the family story that came with it.

And Kelly? After she was done smiling and weeping over her daughter's first Prom and ripping into her Deli Tray birthday present, she went straight to work on this....


The Prom layout from Christy's daughter's Senior Year in 2010. It's not done yet, she says. She's got the ruffled crepe paper trim in place and that rolled satin rose and the kickin' pic of those beautiful girls....

And since today is National Scrapbooking Day, she's got lots of plans for the rest of her birthday gift. Ahem, "Her Deli Tray Birthday Gift!"

So what have you repurposed for a special occasion? Cake platter, jewelry box, recycled mailing boxes, pizza box? Come on ladies, tell!

I'm posting on the link parties in my sidebar, come visit and share some creative love.


Thursday, April 26, 2012

Nightstands Turned Kitchen Island...Really!


Here it is, the latest project that's eaten my time between life's usual craziness and necessary business...a "new" kitchen island made from our old (circa 1971) nightstands.


Yup, we made this from two nightstands!

Inside I covered a wooden box and the inside of the island in red checked craft paper. The Welding Man installed the old drawer pulls for towel hangers on both sides. I love recycling the hardware from vintage furniture and these work great!We had a BBQ for over 2 dozen people this last weekend (plus a couple of big family dinners for 14 the week before) and this island has turned to be a most excellent addition to our busy kitchen.


Here's our messy kitchen with that big empty space between the sink and the stove. Additional work space is always good, and I wanted a serving bar for our buffet style family dinners.


I saw this photo of a dresser restyled into an island and the wheels in my head started turning....


So last Thanksgiving we put our two nightstands back to back, threw a tablecloth over them and called it good.  The two of them together gave me a lower work surface for hand mixing and bread kneading so I knew they would work with a bit of tweaking. We also figured if I wanted it higher we could put chunky wood bun legs at each corner, but we did not have to. The cost to build a brand new country style island chalked up to about $130 so we decided the nightstands it had to be!


The rainy, cold Oregon spring  made outdoor work uncomfortable/impossible, so we set up in the dining room. I used an old oilcloth tablecloth under the nightstands and painted them blue with a grey wash, after cleaning and sanding them thoroughly.


The Welding man cut MDF (medium density fiberboard)  to fit the top. It passed inspection by our chocolate lab, Molly Brown. She's actually checking for food, lol! The Welding Man also cut shelving for the inside.


For the top surface I wanted something close to the color of the still serviceable linoleum floor. I had already added book pages to the side of a kitchen shelf and since I am all about book page recycling, you know what's coming next. What better way to use a way out of date Betty Crocker paper back cook book?


Here The Welding Man is spreading the Envirotex resin, a two part mix which was really affordable with a 40% off coupon at Michael's.  It takes 72 hours to cure. We poured it on a Tuesday and by Saturday it was totally serviceable. The Envirotex is commonly used for bar tops and wood crafts. We used it way back when on walnut and myrtle wood burl clocks. Hello, 80s! It is water and alcohol proof and cleans up nice and shiny.


Here's another angle taken before we added the drawer pull/towel holders. I like it. I like it alot!


Here you can see how the book pages and the linoleum are totally compatible color wise. Serendipity!


 I LOVE how this came out! The actual cost on this project was less than $40, with the money going to Envirotex and paint. We already had the nightstands, MDF, sand paper and brushes.

Making do with what we've got never looked so good. Now I've just got to get to my other "blue" project, the bargain priced buffet I got for $20. Just as soon as the weather gets nicer so I can work outside, because it's too big to put up on the dining table.

This was an easy project with minimal skills required. You would be surprised how easy projects can be once you break them down to component parts and a step by step "battle plan." Got a project you're holding off on? You can do it!

I'll be linking up to the parties in my sidebar. Come visit and check out the creativity!


Monday, April 16, 2012

Pretty Blue Glass Windowsill Project-Quick, Cheap and Easy

Do you ever look at something everyday and tell yourself you're going to fix it up or do something with it someday? I did that everyday with my kitchen windowsill. Something about the splotchy paint job, water stains and general untidiness made me "itch."


Trust me, I did NOT capture the true grunginess of this area. Even my beloved blue glass and house plants didn't do the trick. I stand here a dozen times a day and each time I would tell myself I would fix it up. Well, today I checked the clock and figured I could spare an hour for a little project to make this pretty.


 Ooooh aaaah! I like this alot! 

Now the unending Oregon spring rain isn't the only thing to look at from this window.


 Nice!
 I cut a piece of burlap to fit the space and took the glass bits out of the tall vase I had there originally. I hot glued the half marbles and sea glass and random glass pieces to the burlap then used a heat gun to tidy up all the wisps and strands.


Now when I am at my kitchen sink this area no longer annoys me. It actually makes me smile.


And the Welding Man put a shelf higher up in the window casing for more of my cobalt blue glass. This color soothes me and gives me a peaceful feeling, so the Welding Man, who is a survivor, puts up shelves where and when I want them. He is a smart (and nice) guy!

So, a wee bit of time and effort and no new cost at all, and I've added beauty and practicality to my kitchen. Gotta love that! What about you, do you have a small project that you could do quickly and cheaply that would lift your spirits everyday? Just do it!

I'll be adding this to the blog party links on my sidebar. Come visit and even join in the fun!

Saturday, March 31, 2012

Wish List...A Blue Buffet, Part 1.

I've been pining after a blue buffet for my dining room for awhile now. My "Blue" board on Pinterest is full of photos of awesome retro buffets redone in wonderful blue paint finishes. I Googled and sighed and pinned and kept planning what I would do with the perfect vintage CHEAP buffet when I found it.


Love this color. Cuz it's blue and it looks old. I'm a serious blue freak, let me tell you. But then, look at my blog header. Blue! Ahem.


The color, it makes me happy. I used turquoise blue in my craft room and with a bit of tweaking I could totally make this color work in my dining room. Le sigh.


 The Welding Man took a look at this photo and said, in his best husbandly manner, "That looks kind of cruddy." Yes, but it's blue and its vintage looking and is loaded with character! Like me! LOL!


And look what I found! A vintage 70s Mediterranean buffet for $20!!! 

The guys brought it home and I immediately started loading it up with all manner of decor items, cuz I am loving it. Yeah, that eclectic mix includes a genuine Poortvliet gnome (looks like The Welding Man), cobalt blue glassware, an Oriental teak chest,  retro wire fruit basket, galvanized tin lantern and an apothecary jar full of  orbs with family names. And a samurai sword. And a painted butterfly rock. And an earthenware vase. Ok, I'll stop now.

Hey, Pottery Barn I'm not.


It is beat up and exactly what I was looking for. Look at that retro detail! The shelves inside are solid and the doors are straight and tight. And soon, it will be BLUE. A nice denim blue with a touch of turquoise. And a bit of crackle (using Elmer's glue, of course), and some glazing, and sanding, and distressed edges. Maybe with a dark walnut top. Or not. And oil rubbed bronze fixtures (thanks to Krylon spray paint) and maybe a bit of  Mod Podged book pages on the inside because I'm just that excited about this project.

Does it need legs or not?  Still deciding.

Don't you love it when a plan comes together?

And one last comment by The Welding Man. "I like the way it looks right now!" Funny man, he knows I never leave anything well enough alone.

I'll post progress right here, so check back for part 2.

Mosaic Tile Window Sill

I'm intimidated by tile work. There, I said it! Maybe because I've seen some horrific DIY tile projects that made me cringe. I mean, how hard is it to follow a level chalk line? But I digress...ahem.

But smashed tile mosaic work? Ah, now THAT I can totally do. This was my first ever mosaic project and I totally loved the way it came out.


Ooh aah! This mosaic covered my ugly, grungy kitchen windowsill that had gotten the worst for wear over many years. I needed a good, cleanable surface that looked good for my houseplants! Because, ladies, I am seriously infatuated with my houseplants.

http://makethebestofthings.blogspot.com/2012/03/house-plant-fanatic.html


I bought 4" tiles in two colors and put them in a paper bag before breaking them up with a hammer. THIS IS IMPORTANT-breaking tile is like glass, it is sharp and dangerous and flies everywhere! Safety glasses are good, too. Next step-I marked the dimensions of the window sill on a bit of cardboard and laid out the pieces on the counter, right next to the kitchen window where I was working, so I could transfer each piece with no fuss.

I used tile adhesive to glue each piece in place. This does not set up quickly and gives you a bit of leeway to move things around. I made sure to use the edge pieces to line up with the front lip of the windowsill.


I waited overnight then spread the grout the next day. This will be messy (I wore latex gloves and used an old plastic spatula) but make sure you get in between each piece. At this point it will look horrible, but wait! Following the directions on the grout package, wipe off the excess with a damp sponge. You will see your project transform before your eyes. So cool and so satisfying!

Using the tile pieces with straight edges made adding the reed molding on the front easy peasy since everything was nicely lined up. I love how this came out!  But, alas, we left it behind when we moved into our new place, so I'll be doing this soon on my new kitchen window sill, now that I know how easy it is.

Plus, I've been seeing some very cool pebble mats out there in blog land and I just have to try making my own. Hmmm, a pebble mosaic window sill mosaic maybe? I'll be posting right here when I do either project!

Please join me at the linky parties on my sidebar. You never know what cool and creative ideas you'll find.
Posted by Picasa

Book Page Christmas DIY

Most of you have figured out I am a color freak with an obsession  for turquoise, red and cobalt blue.  However, I also obsess about ...