Showing posts with label Christmas decor. Show all posts

Monday, December 4, 2023

Stinkin' Cute Wine Cork Reindeer DIY


Pin It

Here is an oldie from 2012, but it's a goodie and one of my top Pins on Pinterest ever. 
They've even been featured in an annual Sainsbury's Christmas flyer in England!


Look! A tiny reindeer made from wine corks and twigs for your Holiday decor!


If you accumulate a lot of wine corks or keep running across them at yard sales and thrift stores, here's a nifty little project for the holidays that is so stinkin' cute and sort of easy, plus cheap. I make these little guys to go with my Santa dolls and while making them today I went ahead and took pictures of the process.


Here he is surrounded by the supplies for his creation. Wine corks, little twigs (some with forks) and round headed pins. You will also need a tool for cutting like a razor craft knife and wire cutters.


Punch four leg holes at a slight outward angle in the bottom of one cork for the twig legs. Use a nail or ice pick or whatever gives you the right size holes. The holes need only be about 1/4" deep. Cut four sorta matching twigs for the legs, about 2" long, using a razor knife or wire cutters like those shown.


Put a bit of hot glue in the hole or on the twigs and insert the twigs into the holes. You can press the sticks in with gentle pressure against your work surface or use a pair of pliers. Stand the body up and if any leg is out of whack trim it JUST A LITTLE with a knife or the wire cutters. If you take off too much you'll have to trim the other legs and then the first leg again and it will only end in tears, trust me on this.

BUT, if this happens you can use a heat gun or blow dryer to soften the glue and remove the sticks so you can start over with 4 new twig legs.


If your chosen head cork is too large, trim one end straight off with a razor knife til the proportion seems right. Do the same same punch-holes-trim-twigs-glue-in-holes for the tiny forked antlers and the neck twig. Notice the neck twig is angled, so punch your holes with that in mind.


Look! Teeny tiny super cute wine cork reindeer!


LOVE these little guys!

But wait, what are the push pins for? This little guy needs a red nose, of course. I snipped the pin off short then painted the ball bright red.


Then I added a bit of tiny green tinsel around his neck. Perfect. You can add more tiny trims like the bow on his brother in the top pic, or a tiny star, or a little bell.

How cute would these be on your mantel or even marching across your desktop at work?  And with just a bit of twine or fishing line in a loop and hot glued to his back, you have a cute tree ornament. They are not strong enough to be used as toys but for your Christmas decor, what could be easier or cuter? And now you have a nifty project to use all those wine corks you have in that glass jar!

Try it, you'll like it and be sure to enjoy yourself. Every time I make one of these little guys they make me smile. You will smile, too!

Friday, December 26, 2014

Glittery Silvery Snowflake Chandelier DIY

Ah, time for the wintry holiday season and bright Christmas decor. Also, another restyling of the brass and glass chandelier that the Welding Man loves.

Can't get rid of it so I decorate it to a fare thee well every chance I get. Forthwith, this year's pretty snowflake chandelier project.


With many thanks to the Dollar Store, thrift shops and yard sales for a nice variety of glittery snowflakes and faux icicles.

Here's how I redid it for fall, Halloween and Thanksgiving.
It's even prettier when it's all lit up. 


Purty!


When it's all decorated all pretty and shiny and glittery and silvery like this, I can totally forget that it's all brass and beveled glass.

Now I have to figure out how to decorate it for Valentine's Day!!!


Tuesday, December 20, 2011

Burlap Santa Claus

I am still getting my fine motor skills back after my breast cancer treatment, so sewing and painting have been on my list of skills I want to rebuild and maintain. Usually I make LOTS of Santas for my Etsy shop at this time of year, including from paper mache, but as I said, I'm still coming back.

That said, I am REALLY pleased with this primitive Santa Claus doll with an outfit and accessories made of burlap. Once I painted his face I knew he was a "go." He is my doll #921 and he made me smile. Of all the dolls I make, my Santas are my favorites!

He stands 20" tall and I had a great time putting all the details together.

I added burlap ruffles to a twig wreath and added one of my string angels and a tiny twig star. They are perfect together!

The jointed teddy bear in the stocking is golden plush and a tiny beauty. I buy them whenever I see them, they are the perfect size for my dolls. The stocking is white burlap trimmed with tan furry felt.


With his wired arms this Santa is totally poseable and he can hold small items. His hat is wired, too, so it can be twisted and turned.


Evidently a Santa in a burlap outfit is NOT a nutty idea, since this handsome guy sold in my Etsy shop in about a week! Really, burlap, who knew? I wish Christmas wasn't so close upon us because I'd make more of this style Santa if I had time. Perhaps I'll make one for practice and inventory and if he doesn't sell, well, he would look GREAT with my holiday decorations! I'll call that the plan, that's the ticket.

Thanks for checking my burlap Santa out. The world is a wide and interesting place, you never know which idea will please somebody out there.

Sunday, December 18, 2011

Teeny Tiny Wine Cork Reindeer


Pin It


Look! A tiny reindeer made from wine corks and twigs for your Holiday decor!

If you accumulate a lot of wine corks or keep running across them at yard sales and thrift stores, here's a nifty little project for the holidays that is so stinkin' cute and sort of easy, plus cheap. I make these little guys to go with my Santa dolls and while making them today I went ahead and took pictures of the process.


Here he is surrounded by the supplies for his creation. Wine corks, little twigs (some with forks) and round headed pins. You will also need a tool for cutting like a razor craft knife and wire cutters.


Punch four leg holes at a slight outward angle in the bottom of one cork for the twig legs. Use a nail or ice pick or whatever gives you the right size holes. The holes need only be about 1/4" deep. Cut four sorta matching twigs for the legs, about 2" long, using a razor knife or wire cutters like those shown.


Put a bit of hot glue in the hole or on the twigs and insert the twigs into the holes. You can press the sticks in with gentle pressure against your work surface or use a pair of pliers. Stand the body up and if any leg is out of whack trim it JUST A LITTLE with a knife or the wire cutters. If you take off too much you'll have to trim the other legs and then the first leg again and it will only end in tears, trust me on this.

BUT, if this happens you can use a heat gun or blow dryer to soften the glue and remove the sticks so you can start over with 4 new twig legs.


If your chosen head cork is too large, trim one end straight off with a razor knife til the proportion seems right. Do the same same punch-holes-trim-twigs-glue-in-holes for the tiny forked antlers and the neck twig. Notice the neck twig is angled, so punch your holes with that in mind.


                                          Look! Teeny tiny super cute wine cork reindeer!


LOVE these little guys!

But wait, what are the ball pins for? This little guy needs a red nose, of course. I snipped the pin off short then painted the ball bright red.

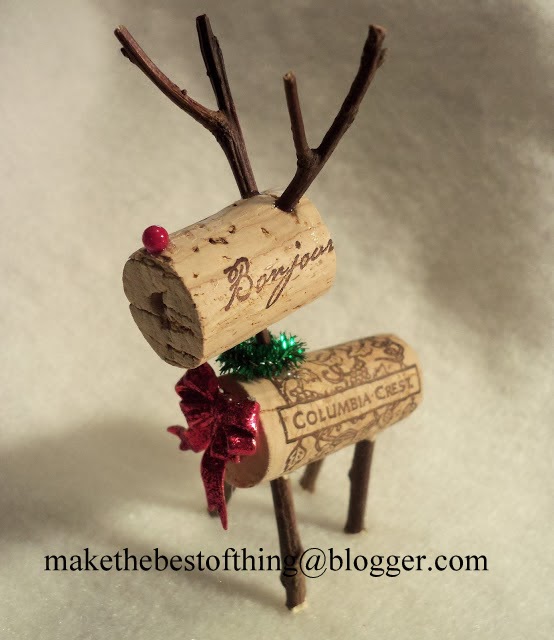

Then I added a bit of tiny green tinsel around his neck. Perfect. You can add more tiny trims like the bow on his brother in the top pic, or a tiny star, or a little bell.


They are great in a tabletop display or trooping across your mantle. They are not strong enough to be used as toys but for your Christmas decor, what could be easier or cuter? And now you have a nifty project to use all those wine corks you have in that glass jar.

I'll be posting this to the blog parties in my sidebar. Come join the fun!


Thursday, December 1, 2011

Snowflake Chandelier First Version

February 2014 update here.....
http://makethebestofthings.blogspot.com/2014/02/wintry-snowflake-chandelier-dollar.html

Our 90's era house came with this blingy brass and glass chandelier. Still serviceable but really dated. It will have to do until I find just the right, perfect, beautiful dining room chandelier.


So for October thru November I wrapped it in a double garland of colorful silk leaves, like so....

...and I really liked the way it looked, especially all lit up. Martha Stewart did something similar but with tea lights and real leaves. http://www.marthastewart.com/276216/pumpkin-chandeliers-autumn-wreath
Ok, hers is prettier, but mine won't catch on fire.
Then I found a bag of assorted snowflakes (including a snowflake garland) at Goodwill for 99 cents. Score!!

The big snowflakes hooked over the hanging glass and the mini snowflake garland was just the right length to drape nicely all the way around. Hmmmm, looks okay in the daylight. Then I turned on the light....

KAPOW!
Look at the beautiful, crystally, snowflakey chandelier!
I really really like it and so does The Welding Man. It looks like a big Christmas wedding cake hanging over the table! Or an alien mothership made out of icy crystals!

Ooh aah. With all the snowflake glitz and detail to fool the eye, it actually looks quite pretty.

Posted by Picasa
And I still have snowflakes left. I'll try hanging more around the bottom...or leave it like this? I can hardly wait to see it after dark.

And now, in 2014, here's the current look for this pretty snowflake chandelier....

I guess this means my holiday decorating is kicked into gear. I'll be posting about my favorite gifts and ornaments to make in the next few weeks, including a special request for making simple but pretty yarn angels.

I'll be joining the parties on my sidebar, too. Come check them out for some excellent and creative ideas!


Monday, December 13, 2010

I'm still here...with Christmas wreaths!

Yes, ladies, even chemo can't keep me away from the glue gun and all the Christmas balls I can get my hands on. So even with a bit of fatigue and nausea (British stiff upper lip and steely eyed glare goes here) I'm still decorating for Christmas with a plan and a schedule, starting with crashing my stash so I didn't have to spend more money and then making lots of wreaths.


My daughter, Insanely Creative Christy, made this gorgeous red yarn ball beauty for my counter top display area but we soon deemed it worthy of sale and moved it to our teeny tiny craft mall booth.

Where it joins a table top tree, my wooden spool yarn angels, Christy's creative clothespin sets (the ones on the shelf have chickadees and finches on them, so cute!) and her thread spool prim trees. Surrounding them all, my ruffled muslin garland. That's 8 feet of ruffly creamy goodness, so pretty!


Ahem, back to the wreaths. I made this red yarn ball beauty for the inside of our front door, reasoning that I wanted to see it more than I wanted the outside of the door to look good. I added satin covered balls, glass balls, beads and poinsettias before I said enough. Yeah, in wreaths I am no minimalist. I go for the gusto, baby!


This is the wreath I made to replace the craft booth wreath. Not quite as wonderful as Christy's wreath but full of color and texture and perfect for this empty spot at the end of my counter.


Which did not remain empty for long. Insanely Creative Christy decorated the tree on one of my exhausted days then I started filling in with everything red and shiny and Christmasy. Plus my painted branches got a bit of play after their duty for Halloween and Thanksgiving. I like that!


Whoa, look at all the STUFF! "Less is more" went out the window and "let's cram everything in there" became the operative phrase. So much fun, so much to see! What you can't see on the book page gourds (another Christy creation) are the glittery bronze stems, they look amazing with the book pages and the scalloped wood bowl. I made the paper mache Santa and snowman and put the googly eyes on the bottle cork. Seemed like a good idea at the time and now he makes me smile.

Dollar Store candy canes in a fluted glass and an apothecary jar full of red potpourri and I laughed when I figured out that the satin ball fit perfectly into the tarnished brass doorknob. It's serendipity.

This is the counter area I pass by dozens of times a day, and it lifts my spirits with it's exuberance. It's the first thing you see when you come in from the deck, and it is amazingly colorful and charming. And it didn't cost a bundle, just a few Dollar Store items and lots of "let's put this up there and see how it looks." Win, win and win.

Ah yes, another wreath. This one is for my Etsy shop. Not quite done at this point...Christy and I added a big gossamer butterfly and more beads and a few more balls. Gorgeous nonetheless and NOT just for Christmas. Girly girly bedroom, baby shower, breast cancer warrior gift, pink and silver Christmas.....this pink wreath has lots of decor potential!

And finally, a gold wreath this time. I hung it over the window and am still considering it. It suffers from "big bow syndrome." Perhaps I'll deconstruct the bow and string it in and out of the balls? Add more balls? Add more snowflakes? This wreath, it mocks me. I will do something more to it as soon as I decide what it needs.

The next project is 25' of lighted garland for the ceiling beam in our livingroom. The Welding Man and I will be tackling that today! He is also building me a storage rack for my studio which will let me organize some of my fabric. Did I mention how much he "loves" my spiral notebook full of lists? LOL

Ladies, tomorrow is my last round of "hard" chemo. They tell me the next rounds of taxol will be easier. Let us hope. In the meantime, I'll be making Christmas gifts for the fam and also giving you guys a nice post and tute on yarn angels. Soon. Very soon. Keep in touch, I love your comments!

Bless you.

Book Page Christmas DIY

Most of you have figured out I am a color freak with an obsession  for turquoise, red and cobalt blue.  However, I also obsess about ...