Showing posts with label recycled books. Show all posts

Wednesday, December 6, 2023

Book Page Christmas DIY

Most of you have figured out I am a color freak with an obsession 
for turquoise, red and cobalt blue. 
However,
I also obsess about the beautiful neutral tones of natural muslin and old book pages. 
Especially book pages! Christmas is no exception.


Here is my bakers rack decked out in more book page covered decor than you can shake a stick at.
I love the pages with the grey boards and the white milk glass!

And below you can see a sweet ruffled muslin garland with a mini star 
book page garland, plus book page rosettes and book page covered balls, 
stars and even a pedestal cake stand.


I will cover practically anything in Mod Podge and old book pages. This way my old beloved books live on in my decor. I also make as much paper art as I can with book pages.

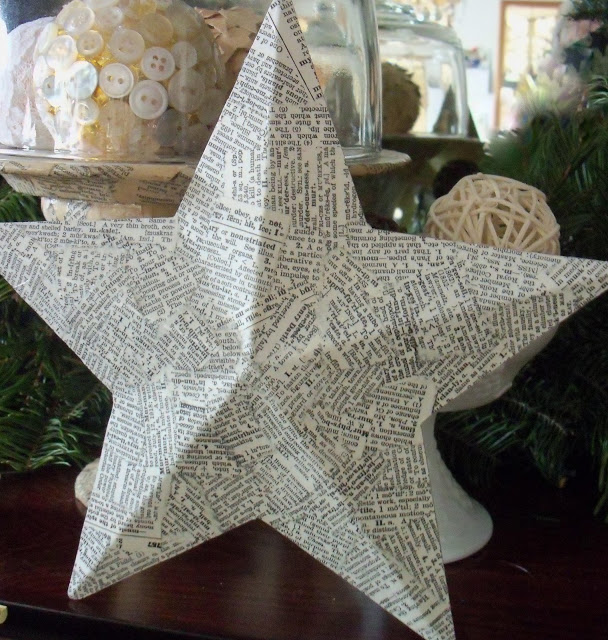
Per request, I am showing you the big stars covered with book pages in this post.


I just love how they come out!!


                             This is an example of the cardboard star patterns I found online. 
There are oodles I tell ya. LOTS. Google is your friend in this.


I like the old dictionaries with dense printing for these projects. I've used clean cut pieces with straight lines for this project plus loads of Mod Podge.

Simple and FAST, folks.

Once dry, sand the edge paper off with a nail file. Spray with clear acrylic to seal.


Book page stars and Christmas balls, oh my!!

                                     
There is no end of ideas using book pages and Mod Podge. 
Including the display stand made of a sundae glass, ceramic plate and book pages! 
And pinwheels and stars and, of course, book page stars.

Sometimes, even for me, a restful neutral look is just what I need during this busy season.


Merry Christmas, friends. Make it a good one!


Saturday, March 18, 2017

Book Page Decorating Obsession

When it comes to my favorite decor material, book pages are my number one go to  solution.

I hate to get rid of my old books so using them on projects to decorate and organize my home is a great solution for me!


In my craft room I've used book pages on bankers boxes and other containers to coordinate my storage. Whenever I run across black and white gift wrap or contact paper I use them on other boxes since I really like the way the book pages and the prints complement each other.


Insanely Creative Christy restyled this $1 bathroom cabinet using dictionary pages while I was laid low by chemo. This is still one of  my favorite book page projects ever!


Of course I had to try book pages for Christmas decor and I REALLY LOVE the way the recycled pages look on the balls, snowflake garlands and "post it note" origami flowers.


And, of course, I restyled/disguised the brass and glass dining room light that The Welding Man loves so much. I'm really liking the shapes and different layers of lights in this recycled chandelier.


The Welding Man made me a wrought iron bakers rack some years ago and I decorate it all year long for the seasons. This year I made this book page wreath with a little nest in the middle for the wall above the bakers rack. I added leaves from various books, the book page covered vase and also the long legged birds. Along the edge you can see the book page leaf garland I made for this display. I love how it all comes together!


My family knows I will restyle just about anything with old book pages. I am always on the look out for vintage dictionaries that are damaged beyond use that have some wonderfully aged paper.


Here's another close look at the book page leaf garland. I really like it! Now I'm thinking that if I dyed the pages in shades of green they would make a gorgeous leaf garland. I'll have to try it!


And here's a new project......art on a book page background. I used colored pencils, paint and ink to make this tattoo design which includes most of my creative tools plus a wonderful quote from my sister.


Friday, January 31, 2014

Make Vintage Style Books (Part 2) With Crackle Paint

Here is a row of my restyled books in my bookshelf. They aren't antique collectors' editions, they are all modern hardbacks that I've redone for a vintage look. Please note-no books are destroyed making them over like this. They are all still readable!


In Part One of this post I showed how I decoupaged pretty papers to hardback books using Mod Podge, hot glue and paint. Here's a link...


Here in Part Two I'll show you how to use a cheap and easy crackle technique with Elmer's school glue and craft paint. You can give your books a cool antique look and upstyle your bookcases and decor.


Here is a set of three books redone in black and red and a little bit of gold paint. See how cool they turned out? For these projects you will need hard back books, craft paint, hot glue, Elmer's school glue and paint brushes. You probably already have everything on hand in your stash!


 First, choose your book and paint the whole cover in the base color you want to show under the finished crackle. I used black craft paint on this book, then added fake "stitching" with hot glue. The ruler helps get the "stitching" straight and evenly spaced. Note-It took two more coats of black paint to cover the title on the spine.


Once the craft paint is dry I painted a coat of slightly watered down Elmer's school glue over the whole cover. Dollar Store school glue also works for this technique. Brush the glue on in an even layer then let it dry for a few minutes. For the next step the glue MUST BE TACKY. If it is NOT STICKY the top layer of paint will not crack!


Using a soft bristled brush and long strokes in one direction ONLY, add your top coat in your choice of color of acrylic latex craft paint. Do NOT brush back and forth or dab your paint. Use long even strokes going one way for an even crackle texture to form.

Within a few moments the cracks will start to show. I LOVE watching this part!


Once the crackled paint was dry, I added precut labels to two of my books and a skeleton key to the other. Then I dry brushed black paint over all the edges and the "stitched" spines to bring out the details. I also added gold metallic paint to one label.


Here's another look at the three finished red books. For additional texture on the bottom and top books, I first Mod Podged crinkled up tissue paper before painting the base color, then proceeded with the glue and paint crackling. The dry brushing at the end really highlights the crinkled paper, making it look like old leather.


My livingroom colors are turquoise, red and brown, so these books are PERFECT for making my livingroom pretty and colorful!


My books have never looked this GOOD! I did not spend any money on restyling these books since I had everything on hand in my stash. Mod Podge, hot glue, paint, tissue, Elmer's glue and pre cut labels.

I'm making them in sets of three in different colors and trying them out for wedding decor. We have three family weddings this year and these will look beautiful on the reception tables.


And more...


and even skeleton keys for Halloween!


And last but not least, turquoise with black patterned papers, including damask!


This is a fun and inexpensive way to add beautiful color and texture to your home's decor. Try it, you'll like it!

Friday, January 17, 2014

How to Restyle Books to Look Like Vintage Decor Part 1

Here's a phone photo of this project. Look how neat these old books are. But they're not old...I made them look this way. Read on!


I love books. My whole family loves books! I have 9 bookshelves full in my house and that's after I thinned them down! So I decided to take the situation in hand and make them a pretty part of my decor.

So here's what I did....I remade them with paper, paint, hot glue, Mod Podge and imagination. Now I can have the elegant vibe of beautiful vintage books on all my shelves. Not only was this inexpensive and clever but I can still read the books. Win win!

Look at these fine vintage volumes...they definitely look like some jewel toned editions from the library of an elegant estate, right?  


I don't know about you but these are reminding me of some collector's editions of the Harry Potter books, lol! But they all started out as ordinary hard back books of various ages and styles. I LOVE the way they look now!

Here's what you need to get started on restyling your own books.....

1. Various printed papers. I prefer tissue paper and printed napkins for their beautiful designs. Scrapbook paper works too although it is thicker and takes more time to dry.

2. Hot glue, Mod Podge and glue sticks. 

3. Acrylic craft paint in compatible colors to dry brush and "age" your books. You can also use scrapbook chalks to age the edges.

4. Small scrapbook embellishments, jewelry charms and stickers as you wish.

5. Clear acrylic sealer spray in matte. Gloss finish is too shiny for me but it is your choice.


Here is a collection of tissue papers and napkins I pulled out of my stash. I am ALWAYS on the lookout for beautiful printed paper for my projects. 


On some of my books I added several lines of hot glue to give the illusion of hand stitched bindings. This gives the spines a bit of character and adds fun detail. Don't worry if your hot glue isn't perfectly even since hand binding does not always appear perfect. You want the look of an antique, hand sewn book spine!


Here is a book with the first layer of paper. I will add more paper til I like the way it looks and the paper has totally hidden the color of the original cover. Note the margins of loose paper hanging over the edge. 


I tear the tissue in large pieces and keep the straight edges for the outside of the book. I crinkle it up tightly before Mod Podging it to the book cover, then I straighten it out. Smooth it over the Mod Podge leaving about 1" margin hanging off all the edges.The crinkled tissue gives a wonderful  texture like old leather to your upstyled book. I LOVE how it looks! The tissue and napkins I use are VERY fragile when wet so I only put the Mod Podge on the book and not on the paper. If you are using paper napkins, REMEMBER to peel off the plain paper backing and only use the printed layer. If you do not do this your napkin will peel off in an ugly way. Don't ask me how I know this.

IF you are using scrapbook paper you can brush the back of the paper with Mod Podge as well as the book cover. The scrapbook paper is thicker and not as fragile as the tissue and napkins I used in this post. The thicker paper will take longer to dry so take note.


Here is the same book shown above with multiple layers of paper.  I use the glue stick on the inside edges of the cover and fold the 1" margins over nice and neat. Then I use a complimentary color of craft paint and dry brush all the edges, spine and corners for a vintage finish. I faked in some binding lines, too, since I didn't use the hot glue trick on this book. Now this plain black book is a "hand bound antique" and it's looking good!


Here I've used tissue paper printed in gold damask and layered it with more tissue that is printed with cursive writing. Notice how authentic the hot glue "binding lines" look once they are covered with tissue. I have used metallic gold craft paint on all the edges and on the label. I followed up with a very light dry brush with black paint. So pretty!


Here is a combination of two damask print papers that I crumpled, Mod Podged and layered. Again, I used black craft paint to dry brush the spine and the edges. I love the drama of damask prints.


Here's a row of finished books. I had the labels on hand and I think now that some steam punk type embellishments would be perfect for this project. Miniature skeleton keys, gears, watch faces... I know I have some of them in my stash, I need to pull them out!


Here is a stack of books done with the blue printed napkins and damask printed tissue in the photo above. Just gorgeous! I use this color alot in my decor.

 See the plain blue books in the pile?


In part 2 I will show you how to make these "plain" painted books using tissue paper, Mod Podge, craft paint and Elmer's glue. This technique is also inexpensive, clever and easy and you can make your mismatched books look like collectible antiques in any color you desire. Stay tuned!

As promised, here is Part 2.

https://makethebestofthings.blogspot.com/2014/01/make-vintage-style-books-part-2-with.html

Have fun!

Sunday, December 11, 2011

Book Page Decor Featuring Stars

Here is the the mirror and bookshelf in my entry, all decked out in greens and lots of recycled book page ornaments. I have rosettes, balls, wreaths and stars.


I love the look of vintage books and typography and use old worn out books and music sheets whenever possible in my crafts and decor. It really couldn't be simpler....

Find a shape you like. In this case I used a 3D tin star from the Dollar Store and a worn out dictionary with densely printed pages. Even a flat star shape cut from thin cardboard (like cereal boxes) looks great covered in pieces of old book pages!

Sometimes I tear the pages up for nice ragged edges, but this time I cut them up into rectangles. A coat of Mod Podge (or plain school glue) adheres them to the shape easily. Once it is dry, a top coat of Mod Podge really seals the edges and gives it a nice sheen. You can also spray it with clear sealer for additional luster.

When your shape is dry, sand the edges with a downward stroke using an emery board or buffing sponge like you'd use on your fingernails. This trims the extra paper for a nice straight edge.

Can you tell one star is covered with pages from a different book? I just love the texture and interest the print gives to these simple shapes!

Posted by Picasa
Ornaments made with recycled book and music pages are a cheap and easy way to give your decor a bit of shabby chic style without too much effort. I love the way the recycled paper ornaments look with my ruffled muslin garland, such sweet contrast!

Soon I'll show you how to make the sweet zig zag wreaths and simple rosettes. They are so simple, inexpensive and very striking!

I'll be linking up to the parties in my sidebar. Come check out the wonderful Holiday creativity!

Saturday, November 12, 2011

Book Page Leaf Garlands


Here is an easy project that turns out great, and you can probably do it with stuff you have on hand. I use old book pages for alot of things but this is one of my favorites. I add leaf cutouts from old books to Dollar Store garlands and really kick up their style factor.

Using a leaf pattern traced from a real life, a fake leaf or online, simply trace the shape onto a printed page of an old book. With good, sharp scissors you can cut through about six pages at a time. Here you see one size leaf we cut to add to the garland.

And here's a smaller size. Please excuse the painty, gluey crafting hands! Use a glue stick on one leaf, add a length of florist or craft wire, then put another leaf on top. You can make as many as you like, it's easy peasy and they look so cool. I believe Pottery Barn had some similar leaves a few years back for a very pretty price.

Just use the wire to twist the leaves into the garland. Here is one garland we made last year. I love the way the book page leaves "cool down" the vibrant colors of the garland. You can add as many as you wish and the wires let you "fluff" them any way you want for a fuller look.


Here they are with another more muted garland. This was for the long stair banister in my daughter's country style house. I love the way they look!

Here is a garland of oak leaves hung on a muslin curtain. Such a complement to the colorful leaves and the creamy colored muslin.

Posted by Picasa
And here is one, paired with my primitive star garland, that I've looped around my entry way mirror. I really like the way the book page leaves look with all the vibrant hues!

And here's a shot of a garland used in a Thanksgiving tablescape. Add a few book paged balls and some glass ware and you have a stylish and colorful centerpiece.

Try it, you'll like it! If you make something using book page leaves, please let me know. Link back! Attach a pic! I'd love to see them.

Book Page Christmas DIY

Most of you have figured out I am a color freak with an obsession  for turquoise, red and cobalt blue.  However, I also obsess about ...