Showing posts with label cheap christmas decor. Show all posts

Wednesday, December 6, 2023

Book Page Christmas DIY

Most of you have figured out I am a color freak with an obsession 
for turquoise, red and cobalt blue. 
However,
I also obsess about the beautiful neutral tones of natural muslin and old book pages. 
Especially book pages! Christmas is no exception.


Here is my bakers rack decked out in more book page covered decor than you can shake a stick at.
I love the pages with the grey boards and the white milk glass!

And below you can see a sweet ruffled muslin garland with a mini star 
book page garland, plus book page rosettes and book page covered balls, 
stars and even a pedestal cake stand.


I will cover practically anything in Mod Podge and old book pages. This way my old beloved books live on in my decor. I also make as much paper art as I can with book pages.

Per request, I am showing you the big stars covered with book pages in this post.
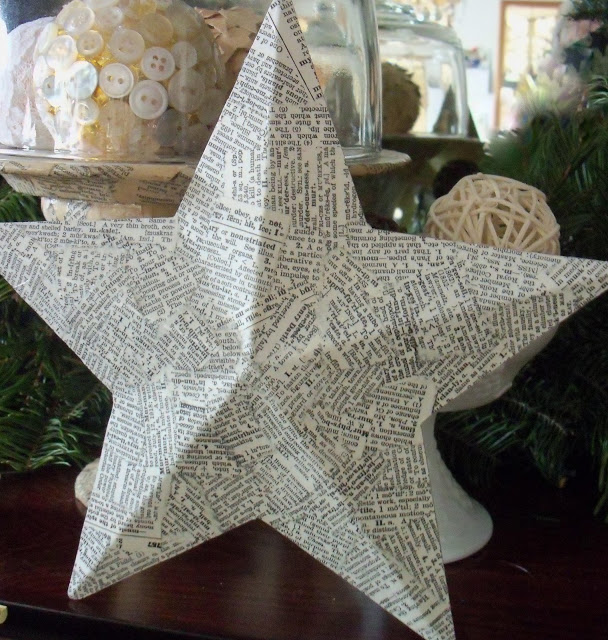

I just love how they come out!!


                             This is an example of the cardboard star patterns I found online. 
There are oodles I tell ya. LOTS. Google is your friend in this.


I like the old dictionaries with dense printing for these projects. I've used clean cut pieces with straight lines for this project plus loads of Mod Podge.

Simple and FAST, folks.

Once dry, sand the edge paper off with a nail file. Spray with clear acrylic to seal.


Book page stars and Christmas balls, oh my!!

                                     
There is no end of ideas using book pages and Mod Podge. 
Including the display stand made of a sundae glass, ceramic plate and book pages! 
And pinwheels and stars and, of course, book page stars.

Sometimes, even for me, a restful neutral look is just what I need during this busy season.


Merry Christmas, friends. Make it a good one!


Thursday, December 5, 2013

Black and White and Red Christmas

My girls and I will be at the Douglas County Christmas Fair in Roseburg, Oregon this weekend. FOUR big buildings full of Christmas goodness, what's not to love? Come see us if you are in the area! Just look for the "Make The Best of Things" booth.
***************************************************************************
Here's what my baker's rack looked like for November. Lots of vibrant autumn color with faux leaves, my fabric and lace pumpkins, garlands and a neat twig rosette wreath.

For October it looked like this, complete with spooky bats, a black dried vine wreath, scary cut outs and black netting. I loved the black and white theme so much I wanted to use it again for Christmas, maybe with a bit of silver.


So here was the start of the Christmas decorating and tho it's coming together, it just looked too "calm" for me. I love color and knew I had to add some to this display. I didn't go out and buy anything and knew I had to work with what I already had. The silver wreath is a great Dollar Store clearance buy after Christmas last year, it was twenty five cents!!

I looked in my Christmas storage; old balls, yarn and old silver decorations. I remade the silver tinsel wreath with lots of red in yarn and glass balls, plus silver balls and snowflakes and even a black and white ball to match the two cone trees. Hmmmm, looking better!


Here's how the rack looks now. I'm still tweaking that second shelf, perhaps adding a few more cone trees....and one wrapped with a red beaded garland...and maybe one with silver foil....thinking thinking.

This is the great fun of creating your own decor, when you get an idea you can work on it and modify it until you get the look you want. I'm not done with this design yet, but so far I'm liking the clean black and white and silver with pops of red, SO different from my normal cobalt blue, white and silver.

What about you, are you changing up your colors or style this year? It's your house, go for it!
Posted by Picasa

Saturday, October 27, 2012

Wax Paper Frosted Glass Twinkle Lantern

I named and renamed this post and finally settled on "Wax Paper Frosted Glass Twinkle Lantern," because nothing else was quite descriptive enough or told how easy this project turned out to be. Also, looks awesome!


Oooh aaaah!

I've seen lots of lights on Pinterest using garden lanterns and Christmas lights and they look deceptively simple. My first try was no good, with a snarl of wires and lights stuffed inside my Pier 1 lantern. I didn't like it. Looked messy.


I figured the light string needed some structure, so I wrapped it around a textured plastic water bottle and tried that. Twinkly, yes, but you can totally see the wires and lights and bottle. Me no like this, either!


I thought that crinkled plastic would diffuse the lights but that just looked dumb. Kind of like crinkled plastic stuffed inside a lantern. Nope.


Checking out my stash I found some pretty frosted sea glass and half marbles and my trusty E-6000 jewelry glue, but that would have taken too long to dry and the glue is smelly and the weather is too nasty to do it outside. No go.


Here's what I came up with. Good old Mod Podge and crinkled wax paper.


I did the first lantern pane and held it up to the window light. Score! A soft frosted glass look using stuff I already had in my stash. Plus, a little effort and time. Lickety split the whole lantern was done!


I added florist foam to fill up the bottom of the lantern then added a couple of handfuls of  half marbles and sea glass for weight. The water bottle wrapped with Christmas lights went in next. Now for the big unveiling......

'
I LOVE how this came out! A nice  twinkly glow that makes my Autumn baker's rack look pretty in the soft light. I added one of my primitive star garlands and just smiled and smiled. 


A quick, easy and CHEAP project that came in almost exactly like I'd envisioned it. That's a win win in my book! And the best part is that I have THREE more lanterns. So I'll be buying some of those cheap $1 strings of Christmas light strings at Wal mart and making more of these twinkly lanterns. I can use these all year long and if I invest in some outdoor Mod Podge, they can light up my front deck. Totally love that.

I'll be linking up to the parties in my side bar. Come visit and check out all the cleverness and creativity. See you there!

Wednesday, December 21, 2011

Yarn Angels (LOADS of pics)


I promised I would post this tutorial weeks ago, and I've finally got around to the pics this morning. I've been making and giving these angels away for 20 years and even sold them at craft fairs. They are cheap and easy to make and so much fun, plus they look so pretty on any style of tree.

This post is photo heavy, so please be patient. I'm trying to cover all the steps with pics and instructions.


I have made these angels using all types of yarns and fibers, including string, flat lace, ribbons, torn fabric and jute twine. Each material has its charms and the look of your angels will change with each different material.


BODY-I have used a paperback book for this demo. It is easy to use and the proportions are just right for the angels for most every fiber except for small string. Wrap your yarn about 50 times around the book, longways. Tie it at the top with a piece of yarn and cut the yarn through at the bottom of the book, so you have 50 long pieces of yarn tied at the top like the start of a tassel.


Tie the head off about 1" down from the top, forming a neck.


Now split the rest of the yarn approximately in half and separate as shown.


ARMS-Wrap yarn 25 to 30 times around the short side of the book. Tie off at one side. DO NOT CUT the looped yarn.


Slip the tied loops off the book and you will have a bundle that looks like this.


Put the tied loop bundle inside the divided angel body and pull one group of cut body yarn thru the arm loop. Adjust so the tie on the arm bundle is at the top.


Pull the body yarn down and tie off the waist of the angel just below the arms.


Pinch the arm bundle at the tie and twist it towards the angel body 2 or 3 times to get a nice bent arm shape.


Hot glue the tied arms to the waist of the angel body. I use the blunt end of a crochet hook to "comb" the skirt yarn. Anything smooth will work as long as it doesn't snag the yarn.


WINGS-I use lace for most of my angel wings. Wrap it around the short side of the paperback 6 to 8 times.


Slip the bundle of lace off the book and tie in the middle. DO NOT CUT ANY LOOPS of the wing bundle. Hot glue wings to back of angel, right below the where the neck is tied off.


Your yarn angel is taking shape!


HAIR WIG-The smallest hair bundle makes a wig with a bun and is best made by winding yarn around four of your fingers about 25 times. Tie off the bundle but do not cut the loops.


Slip the wig bundle off your fingers. It should look like this.


Tie the bundle close to one end to form a ponytail/bun. You want the head part of the wig to be larger and open to fit the angel's head.


Put hot glue on top of the head just a little forward of the center tie. Center your wig front over the glue and press down while the glue sets. Press and arrange the wig as you wish then hot glue the sides to the head right about where the ears would be.


Put another dab of hot glue at the back of the neck to secure the bun part of the wig in place.


Your angel's hair should look like this from the back. If you wind the wig yarn around the short side of the paper back and tie it off you will have a longer ponytail. If you wind the yarn around the long side of the paperback and tie it off you will have a nice long wig that looks awesome in a fat braid!


Here she is dressed up in white foofaraw. I love going into my stash and finding small embellishments for my angels. Scrap book gems, buttons, lace, beading, you name it, you can use them on these little angels!


Here is one done in chunky white yarn and gold embellishments. I made her wig out of thinner yarn so it wouldn't look so big. Once you get the basic steps down pat you can make these angels out of lots of different fibers. I've made them as small as 3" tall out of string and as large as 18" out of chunky yarn. They all look great!


Here is one made of lace with a dowel and thread spool base.

And here is one of my favorite style of angels, made out of crochet string.


Barely 3" tall, she has shaped wings made of sheet music with glittered edges and she carries a little book of the same paper. And here's the sweetest part.....
Posted by Picasa
Her extra long hair is tied into a thick braid down her back. Cute! I've started doing these long chunky braids on all of the angels I'm making this year, and I love the look.

I'll be posting this in the parties on my sidebar, starting Wednesday, so please come visit and join the fun. Lots of creative ideas are out in blogland!


Monday, December 19, 2011

Kitchen Christmas Tree

We were charmed with the bay window and breakfast nook at one end of the kitchen when we bought our house, but more and more it's become a backwater of stacks and storage. I decided at least for Christmas we needed to clear it out and make it work for our Holiday desserts and treats.


I threw red velvet over the oak table and added a lighted tree in a garden urn. For a kitchen theme I started pulling little kitchen items out of the drawers and red ornaments from the rest of the house. I also found a box of old salt dough stars that look like sugar cookies and some dark brown applesauce/cinnamon stars from way back. Score!

So this project cost nothing since everything we used was already on hand from years past.

Then I loaded it up with everything small, red and kitchenny I could put my hands on. Kitchenny. That's a word, isn't it? I tied red plaid Christmas ribbon to a bunch of utensils and made bows out of the rest of the ribbon and piled it on this little tree.

My grandson made the snowflake garland using a Martha Stewart punch and pages from an old dictionary and phone book. Glued from point to point they make a really pretty and easy garland.

See the little stars? They look like little bitty shortbread cookies but they are baked salt dough. I added measuring spoons, wooden spoons, tin cups, a flower sifter, silvery tart pans and twig wreaths, along with glittery glass hearts and rolled felt roses.

The applesauce/cinnamon stars still smell sweet and a group of fake gingerbread ornaments went up there too.

The snowflake garland is a nice white touch on the otherwise red and green tree. I just tied ribbons to ordinary flatware before hanging them up.

A tin cup, fork, tea ball, measuring spoon, fir cone and more stars mix with the snowflake garland.

Posted by Picasa
I added red plaid ribbons to a few wooden utensils and grouped them in a red container then put some treats on cake pedestals. The blue glass jars are a perfect counterpoint color. I've got my eyes open for more kitchen ornaments for this tree because I really like the way it's turned out!

And at night it sheds a pretty, glowing light in the kitchen instead of the light in the range hood. Much more festive, too. I love projects like this. Spur of the moment, done with items on hand, not a lot of time invested and a really nice result. What's not to love?


Book Page Christmas DIY

Most of you have figured out I am a color freak with an obsession  for turquoise, red and cobalt blue.  However, I also obsess about ...