Showing posts with label thrifty decor. Show all posts

Sunday, October 7, 2018

Book Page Leaf Garlands and Decor

I admit I am a color junky, but I've also have a serious love of books, and I hate to get rid of them. When they are beyond their useful life I use as many as I can in my projects
including recycling old book pages for all sorts of crafts and decor. 

Here's my latest...a garland made of book pages and I am smitten once again!


The Welding Man built me a wonderful bakers rack to hold my blue glassware, 
but that collection has grown quite large and moved to the kitchen bay windows
 So I decorate my backers rack seasonally with different looks. 

I am loving this combo of galvanized metals, grey barn "boards," natural wood tones 
and white pottery. I gathered a bunch of my book page projects and set them up.

But the leaf garlands really pulls everything together.


Yup, I will pretty much cover anything with old book pages to see how it looks. LOL.
My kids tell The Welding Man not to sit in one place too long because...wink wink nod...
Mom will cover you with book pages.

So far he hasn't sat still long enough. Just sayin'.


Thrift store vases...check.
Old Christmas balls...check.
Plastic clock...check.
Paper mache birds...check.
Cardboard letters...check.
Book page leaves on painted branches...check.
Pizza cardboard book page wreath?...check check check.


In my NEXT post I will show you how to make this very simple, very appealing garland. 
Stay tuned!I'll post a link at the bottom when that DIY post is active.

Thanks for stopping by. Please leave a comment, if you would. 
I enjoy reading what you have to say!


Saturday, March 12, 2016

Low Low Under $100 Budget Master Bath Redo

When I say LOW BUDGET I mean LOW BUDGET.

I love before and afters of beautiful bathrooms and kitchens but folks, please.
Your $10,000 remodel of one room is not low budget. 
It is a project with a $10,000 price tag.
 Yes, I know you replaced all the fixtures and
 moved the tub and tiled everything. It is beautiful. 

But..
it is all a matter of perspective and I know the internet needs 
some projects that are truly way down in price.

Forthwith, I give you the low low budget cosmetic bathroom redo/refresh/upstyle for under $100.

Here is the AFTER.


This bathroom in our old mobile home needed some serious help.

Below is the before showing the new wall medicine cabinet built by
The Welding Man and the existing vanity.

The vanity, shower, flooring and commode were still serviceable, but the whole room needed an update.

BEFORE-


I used the ivy stencil everywhere in that house. Kitchen. Hallway. Bathrooms. 
The mixed mirrors decor just wasn't cutting it anymore.

And below is the old medicine cabinet. Yowza, what a beast!

But hey, is that a cheap $3 golden oak light fixture? That's a good start!


Here's the new room, four days and less than $100 later.

Loving it!


Step by step, here's what we did and spent-

$16 vanilla white semi gloss latex bathroom paint for walls and ceiling. Just do it.
$10 chocolate brown semi gloss latex paint for the vanity and all the woodwork, including the light.
$4 for two pine boards that we used for the mirror shelf and the high wall shelf.
$2 for metal shelf brackets.
$8 plate glass mirror from a contractor friend. Four foot by two foot.Total score!  
$10 bulls eye corner trim and flat boards to frame mirror.  Four foot by two foot.Total score! 
$8 light bulbs
$4 gloss brown spray paint

Total cash outlaid was about $62.

Everything else we used was from our stash. Including the raspberry colored towels which were still in perfect shape and didn't need replaced. And the textured wallpaper on the door of the medicine cabinet and the tall vase holding drieds on the mirror shelf. Here's a link to the story behind that vase.


Below is another view of that wallpaper covered vase and
 the bulls eye corner blocks and framing around the mirror.


After all the painting was done and the shelving in place, it was fun to shop the house for all kinds of decor and knick knacks and baskets and art and STUFF. Glossy brown spray paint pulled it all together. 

Man, I LOVED the new look of that bathroom!

This is what I like...a project that comes together on a low budget
 with creative thinking and some clever restyles.

You know, until I can afford to spend thousands of dollars on a room project!

My next bathroom redo is in the works...with a vintage
 vacation/driftwood vibe and loads of fun details.
On a budget, of course!

Sunday, July 6, 2014

Ivy Vines Turned Summery Wreath DIY Garden Art

I am always on the lookout for ways to recycle what I have into something I want. In this case, I wanted a summery vine wreath for my front porch so I put it on my mental clipboard.

And as I've found time and again, the solution presents itself IF I'm paying attention.

This pile of needlepoint ivy trimmings gave me the first spark.


Did you know you can still buy metal coat hangers?  Yup! These "new" ones are plastic coated and still perfect for wire projects, like forming the base of my wreath.


I wrapped and tucked and wrapped and tucked all the way around. I didn't have to use the wire at all. After a few days drying time I retucked the loose ends.


I am always on the lookout for real looking greenery so I had a stash of beautiful fake foliage to choose from. But if you wanted to buy the garland to make this wreath it cost about $7 using a coupon at Michael's. I also used a few Dollar Store bunches to fill it in.


Oooh aaaaah!


  Now comes the fun part; hanging it on the porch and taking photos! I LOVE the way it looks so real even compared to the ivy tower and other plants close by!


Well now, that was fun and easy and CHEAP. Okay, thrifty and money saving. Projects like this boost my mood immediately!

I'll be posting at these fun blog parties this week. Come visit and enjoy the neat projects!


Thursday, June 20, 2013

Revive Old Planter Pots with Primer and Paint

. I have dozens of planters and containers on and around my front porch and yard.
Whoa.
But this spring, some of them definitely needed sprucing up.


This is just one side of the deck. I've since added MORE planters from yard sales and thrift stores but they were looking tired and tacky.

So I spent ZERO dollars by using what I had on hand and figured out the best way to refresh my plant pots.
I learned, the hard way, that you can paint exterior plastic surfaces with any kind of paint. IF you use primer first.


Here's what the tired pinkish railing planters look like now.

Yes, ladies, use primer first. Once you've primered your plastic you can use latex house paint, craft paint, oil enamel paint and even the cheapest grades of spray paint. The primer is the key! If you decide to go forward without using the primer your plastic pieces will look okay for a while and downright icky in a few week's/month's time.


I had all my succulents in these pinkish Dollar store planters before.....


And here they are after. Tada!!
The succulents needed repotted so while the pots were empty I redid them all with oil based primer and black spray paint. Begone, pink plastic! Love how they look!

But the planters don't have to be empty. Just take a bit of care with your plants. Be sure your surfaces are clean and dry.


Here's a huge used planter unpainted and it's sister, painted.


 Much better! I didn't go for complete and perfect coverage so the pots would look a bit like weathered pottery. I love how these look, too!


And if you want a nice, smooth finish, you can do that. Here's how my beat up square planter looks now.


I used cheap brushes to apply the primer paint and chucked them when I was done. It is a good idea to line up all your pots and primer them one at a time. By the time you are done with all of them the primer will be dry on the first ones and ready for the final coat of color. If the weather is warmish you can easily do lots of pots in an afternoon!

Cheap, easy and high impact. Gotta love it.

And now, excuse me, but I need to go plant shopping!

I'll be joining the parties on my sidebar, come check them out and find some wonderful ideas!


Saturday, July 14, 2012

Wind Chime Rescue

When we moved from our mountain side to our new home a year ago, the Mountain Man saved a few of our many wind chimes and brought them with us. I thought I would buy new wind chimes for our new yard but the prices shocked me! 

So, you know how I roll; I told him I was ready to take a look at repairing the old ones and he gave me this "wind chime stew" in an old canning kettle. (A wonderfully dented, chippy, rusty and blue enamel canning kettle which would look great holding a big bushy lavender plant and maybe some cascading petunias and alyssum....ahem, I digress. )


Whoa. What is in there? I see parts of four wind chimes! I sort of wondered if I'd really be able to salvage four complete sets out of this smorgasbord.


Here is my wind chime rescue kit...four and six pound clear fishing line, plastic beads, a yarn needle, split rings from 1/4" to 1", plastic rings, scissors, jewelry pliers, wire cutters and needle nose pliers. 

Just a note-Light fly fishing line is also excellent for wind chime repair and it is not expensive. It is very similar to the cord used in commercial wind chimes.One roll will give you enough to make/repair LOTS of wind chimes.

For these repairs, though,  I used clear fishing line and a 2" long yarn needle with a large eye. 


I set up on the front porch on a warm summer morning and got to work.


I had a gorgeous view of my 3 barrel fountain with ivy and flowers cascading around. It's just me and the hummingbirds and the butterflies out here. With a little Pandora on my Kindle and a big cup of coffee, it was a wonderful way to start the day.


So, DON'T do this first thing. Yeah, how pretty the shiny rings look against the porch boards! I couldn't believe I did this.  Moving on.....


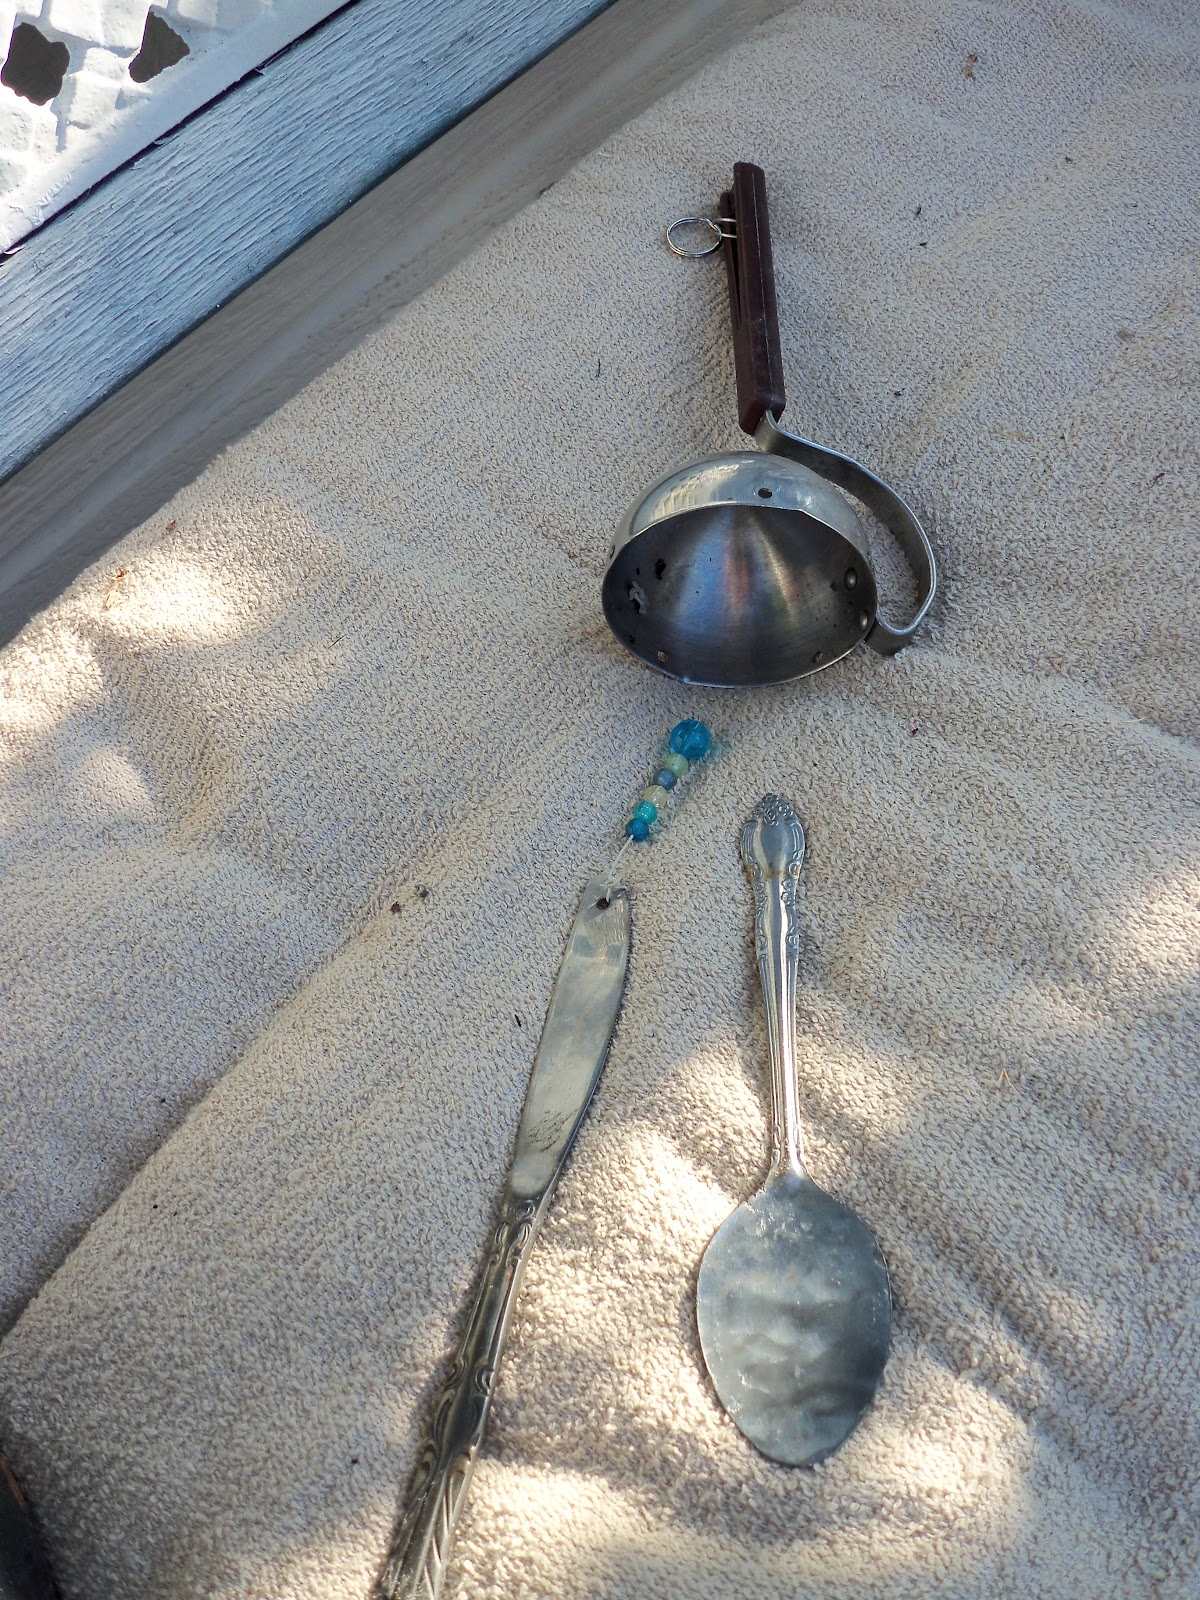
I untangled a surprisingly intact wind chime that we'd made out of flattened and drilled kitchen ware and some light metal rods. I hung it inside this trellis tower and went to work. The top is a soup ladle that the Welding Man drilled to hold everything in a balanced design. He also drilled a hole in the middle to hang the "clapper," which is a spoon. I added more beading to each peace and triple tied the fishing line back and forth thru the mounting holes. One down!


Here is a light and airy metal wind chime that I am surprised is still around. I reattached all the pagoda pieces and the hanging chimes with fishing line. If you are repairing a wind chime, take a close look at how the chimes are attached. The lines for the chimes should not be rigid and should let the pieces swing freely. When in doubt, tap your hanging chime parts and listen for the best tone. You will soon hear the difference that long or short lines make to the sound of your chimes.

Since both of these wind chimes sounded good but  still looked beat up, I hit them each with a coat of silver metallic spray paint. 

 Ooh aah!
The silvery paint made all the metal look just shiny enough and the colored plastic beads are a perfect blue touch. The flatware by itself is not too "chimey" so the addition of the metal rods gave this a beautiful, tinkly tone. I like this so much I think I'll have to make another!


And here is the "pagoda" wind chime after a shot of that silvery metallic spray paint. Pretty and delicate and perfect for a gentle tone when the wind blows.


Here is the largest wind chime, the parts of which you can see scrambled up in that canning kettle. I put it back together with fishing line and the Welding Man made a new "sail" for the bottom out of a scrap of wood and an eye bolt. The metal and wood were grungy so I primed it with white spray paint followed by a good coat of that same silver metallic spray paint. Now this wind chime looks almost brand new!


Here's what's left after all the other chimes were put back together. The soup ladle is already drilled and we saved two pieces from an old wind chime. I gave the Welding Man three pieces of yard sale flatware to drill so I can get this chime repaired and hung up. Since I don't have any small metal rods left I am thinking of using some old keys and other metal hardware. I hope it comes out as neat as my mental image!

I'll post pics on my blog if it looks good. And if it doesn't it will just quietly go away, never to be mentioned again. :o)

I'll be joining the parties in my sidebar, come visit and link up. You never know what cool, creative and interesting ideas you will find!

Thursday, April 26, 2012

Nightstands Turned Kitchen Island...Really!


Here it is, the latest project that's eaten my time between life's usual craziness and necessary business...a "new" kitchen island made from our old (circa 1971) nightstands.


Yup, we made this from two nightstands!

Inside I covered a wooden box and the inside of the island in red checked craft paper. The Welding Man installed the old drawer pulls for towel hangers on both sides. I love recycling the hardware from vintage furniture and these work great!We had a BBQ for over 2 dozen people this last weekend (plus a couple of big family dinners for 14 the week before) and this island has turned to be a most excellent addition to our busy kitchen.


Here's our messy kitchen with that big empty space between the sink and the stove. Additional work space is always good, and I wanted a serving bar for our buffet style family dinners.


I saw this photo of a dresser restyled into an island and the wheels in my head started turning....


So last Thanksgiving we put our two nightstands back to back, threw a tablecloth over them and called it good.  The two of them together gave me a lower work surface for hand mixing and bread kneading so I knew they would work with a bit of tweaking. We also figured if I wanted it higher we could put chunky wood bun legs at each corner, but we did not have to. The cost to build a brand new country style island chalked up to about $130 so we decided the nightstands it had to be!


The rainy, cold Oregon spring  made outdoor work uncomfortable/impossible, so we set up in the dining room. I used an old oilcloth tablecloth under the nightstands and painted them blue with a grey wash, after cleaning and sanding them thoroughly.


The Welding man cut MDF (medium density fiberboard)  to fit the top. It passed inspection by our chocolate lab, Molly Brown. She's actually checking for food, lol! The Welding Man also cut shelving for the inside.


For the top surface I wanted something close to the color of the still serviceable linoleum floor. I had already added book pages to the side of a kitchen shelf and since I am all about book page recycling, you know what's coming next. What better way to use a way out of date Betty Crocker paper back cook book?


Here The Welding Man is spreading the Envirotex resin, a two part mix which was really affordable with a 40% off coupon at Michael's.  It takes 72 hours to cure. We poured it on a Tuesday and by Saturday it was totally serviceable. The Envirotex is commonly used for bar tops and wood crafts. We used it way back when on walnut and myrtle wood burl clocks. Hello, 80s! It is water and alcohol proof and cleans up nice and shiny.


Here's another angle taken before we added the drawer pull/towel holders. I like it. I like it alot!


Here you can see how the book pages and the linoleum are totally compatible color wise. Serendipity!


 I LOVE how this came out! The actual cost on this project was less than $40, with the money going to Envirotex and paint. We already had the nightstands, MDF, sand paper and brushes.

Making do with what we've got never looked so good. Now I've just got to get to my other "blue" project, the bargain priced buffet I got for $20. Just as soon as the weather gets nicer so I can work outside, because it's too big to put up on the dining table.

This was an easy project with minimal skills required. You would be surprised how easy projects can be once you break them down to component parts and a step by step "battle plan." Got a project you're holding off on? You can do it!

I'll be linking up to the parties in my sidebar. Come visit and check out the creativity!


Friday, November 11, 2011

Lighted Autumn Hurricane

I scored this gigantic glass hurricane at a yard sale for $2. It is 20" tall and 8" across at the belly with a wooden base. I love it's size and how I can dress it up all year long. Plus, $2!! That still makes me grin.


Last spring I filled it with vine balls, book page decor balls, driftwood, monkey's knots, pine cones and my favorite green glitter dragonfly. I LOVE how it looked with a few of my cobalt glass pieces.


So this fall I restyled it for Autumn. Now it is a lighted accent to my Thanksgiving decorating. I like it. I like it alot!


I grabbed a garland and a short string of 50 lights from my stash....both Dollar Store buys from years past. I twined them together and stuffed them into the glass. The problem was, they all fell to the bottom and left the top of the glass empty.

The Welding Man suggested that I put a piece of dowel inside to support the garland, so here's what I came up with. To disguise the dowel I covered it with an Autumn leaf print napkin cut into strips. A bit of hot glue at the top and bottom kept the paper in place. We threaded it through the garland and used florist wire to hold it at the top. Then we plugged it in and I am pleased as punch at the way it looks!


Here it is at the corner of my "bookcase in lieu of a mantel" with my Thankful wreath, my faux stained glass mirror, my oak family tree painting and another, smaller, unlit hurricane. It really brightens up that corner and is a beautiful night light. I checked it often for too much heat from the lights and it is safe, just warm.

Now I'm thinking that smaller hurricane needs lights, too. I can put it in the corner of the living room with my Autumn tree branches. And for Christmas I'm thinking silver balls and ornaments and pine cones and a bit of greenery, all lit up!

I'll be joining the blog parties on my sidebar, come along and link up! There is a wealth of creative projects out there!

http://ivyandelephants.blogspot.com/2014/09/up-in-smoke-again.html?utm_source=Friends+of+Ivy+%26+Elephants&utm_campaign=c40032f638-Up+in+Smoke+Again&utm_medium=email&utm_term=0_a51593f650-c40032f638-42477

http://www.playpartypin.com/2014/09/weekend-re-treat-link-party-86.html
Posted by Picasa

Book Page Christmas DIY

Most of you have figured out I am a color freak with an obsession  for turquoise, red and cobalt blue.  However, I also obsess about ...