Showing posts with label christmas. Show all posts

Wednesday, December 6, 2023

Sweet Post It Note Flowers Tute


Here are the simple book page ornaments we've made for our little tabletop trees. 


 I call them Post It Note Flowers because they work up beautifully using a 3" x 3" square of paper,
 so in a leap of naming logic there ya go. 

 They are really origami kusadama flowers and they've been around forever.

 I'll give you a link to an origami website at the end of this post in case my instructions lead you hopelessly astray. ; 0 )

                     Start with a post it note or any size of paper as long as it is perfectly square. 

                 IF YOU USE post it notes, you will start with the gummy side at the bottom right
                                        and gently separate the layers if they become stuck.

Fold bottom to top, then sides in to form a diamond, then fold each side out from the middle.
Unfold each side "wing" so it looks like a kite, then fold the top of these side kites inwards so now you will have a middle kite shape with matching side triangles. Fold each triangle once inwards.
                                  Roll into a cone and hot glue the two folded sides in the middle. 
                   You need at least five to form a flower shape, tho I have seen them with more. 
               Hot glue all the cones together and don't worry if you have a little gap in the center, 
                                     even real flowers have a little opening in their middle.


We've made ours out of vintage dictionary pages to go along with our simple white Christmas theme.


And the Live, Laugh, Love ornaments?
 Simply book pages cut into small rectangles then Mod Podged onto Christmas balls.
 I hand wrote the words on each ball with a Pigma pen, then sealed them all with clear acrylic. 
 You could also use a Cricut or Silhouette for the words,
 or print them and cut them out to match the book pages and Mod Podge them on. 

 Simple, pretty and inexpensive. We like!

Here is a link to a real origami website with great instructions and lots of samples for these pretty flowers...


Wintry Snowflake Chandelier-Dollar Store Decor


!!!!!!


Okay, here is the early 90's brass and glass chandelier in my dining room. 
I'll give you a moment to bask in fond nostalgia.


Yeah, well, we're still living with this chandelier until I find exactly the right fixture and can wave a big ol' bag o' money at it, so right there it is going to stay. 
It's just so....brassy and perfectly functional and by the way, 
The Welding Man loves it just the way it is! 

So here are a couple of my ideas for coping with it's golden funkiness each season. 

Dollar Store to the rescue! 


Years ago I saw Martha Stewart's pretty hanging autumn wreath light and it stuck with me.
 So in October I decided to make my own version with several autumn leaf garlands around 
and around and around my light's brassy framework but
 without the candlelit mini pumpkins.
 
We tried it with and without the glass panes and the glass just 
gave it some extra shine at night, so they stayed. 


Ooh! I like it alot and it is a sure sign of Autumn in my house.

Come Christmas time and wintry weather,
 I hit my stash of Dollar Store decorations again and found 
many different styles and sizes of snowflakes. 

We took off the glass panes and hung the snowflakes willy nilly,
 just like they would be in a blustery winter storm.


With just a few icicle strands here and there and oooh! I like this alot, too! 

Even in the daytime in natural light the
 layered textures of silver, white, and glittery gold and 
silver pack a beautiful festive punch.

Even The Welding Man, who does not like it when I mess with "his" light, thinks that this is very pretty!


Note-If you hang enough Dollar Store snowflakes on a brass light fixture you can mostly hide it's golden shininess!


And kapow! Here she is all lit up! She is dazzling!


Ooh aah! So pretty! And with the cold, wet, rainy, snowy winter weather hanging on, I'm leaving these snowflakes on my chandelier at least until Easter!


Which version is better? Daytime or night time? I like them both but the daytime 
chandy looks more wintry to me. 

Go figure.

The Welding Man will be glad to know  I won't be replacing his chandelier anytime soon. 

But I can sure mess with it and make it pretty, can't I? 
 
And maybe I'll learn to appreciate it's brassy vintagey vibe? 

We'll just have to wait and see, lol!


Monday, December 4, 2023

Stinkin' Cute Wine Cork Reindeer DIY


Pin It

Here is an oldie from 2012, but it's a goodie and one of my top Pins on Pinterest ever. 
They've even been featured in an annual Sainsbury's Christmas flyer in England!


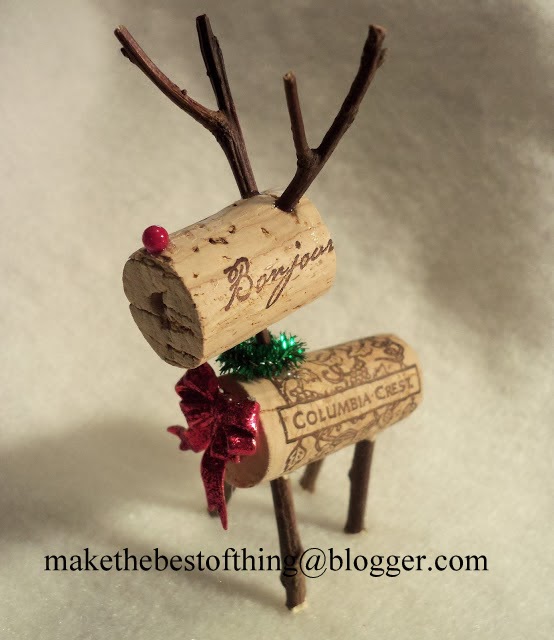
Look! A tiny reindeer made from wine corks and twigs for your Holiday decor!


If you accumulate a lot of wine corks or keep running across them at yard sales and thrift stores, here's a nifty little project for the holidays that is so stinkin' cute and sort of easy, plus cheap. I make these little guys to go with my Santa dolls and while making them today I went ahead and took pictures of the process.


Here he is surrounded by the supplies for his creation. Wine corks, little twigs (some with forks) and round headed pins. You will also need a tool for cutting like a razor craft knife and wire cutters.


Punch four leg holes at a slight outward angle in the bottom of one cork for the twig legs. Use a nail or ice pick or whatever gives you the right size holes. The holes need only be about 1/4" deep. Cut four sorta matching twigs for the legs, about 2" long, using a razor knife or wire cutters like those shown.


Put a bit of hot glue in the hole or on the twigs and insert the twigs into the holes. You can press the sticks in with gentle pressure against your work surface or use a pair of pliers. Stand the body up and if any leg is out of whack trim it JUST A LITTLE with a knife or the wire cutters. If you take off too much you'll have to trim the other legs and then the first leg again and it will only end in tears, trust me on this.

BUT, if this happens you can use a heat gun or blow dryer to soften the glue and remove the sticks so you can start over with 4 new twig legs.


If your chosen head cork is too large, trim one end straight off with a razor knife til the proportion seems right. Do the same same punch-holes-trim-twigs-glue-in-holes for the tiny forked antlers and the neck twig. Notice the neck twig is angled, so punch your holes with that in mind.


Look! Teeny tiny super cute wine cork reindeer!


LOVE these little guys!

But wait, what are the push pins for? This little guy needs a red nose, of course. I snipped the pin off short then painted the ball bright red.


Then I added a bit of tiny green tinsel around his neck. Perfect. You can add more tiny trims like the bow on his brother in the top pic, or a tiny star, or a little bell.

How cute would these be on your mantel or even marching across your desktop at work?  And with just a bit of twine or fishing line in a loop and hot glued to his back, you have a cute tree ornament. They are not strong enough to be used as toys but for your Christmas decor, what could be easier or cuter? And now you have a nifty project to use all those wine corks you have in that glass jar!

Try it, you'll like it and be sure to enjoy yourself. Every time I make one of these little guys they make me smile. You will smile, too!

Friday, September 19, 2014

Quick Change Wreath Decor

I had this idea to make wreath decor that was easy to change out on different kinds of wreaths and didn't require loads and loads of hot glue to hold them on.

Here's what I came up with.


I crashed my stash and found all kinds of colorful, glittery Autumn leaves, berries and twigs. Most of them are from the Dollar Store. That's a good start!


I wanted the backing to be sturdy enough to hold all the elements but also lightweight and thin enough so the design would blend with the types of wreaths I want to decorate. The Mountain Dew box was just the right weight. I hot glued all the leaves and rosettes and berries in place on the front then attached florist wire through several holes in the cardboard on the back. 


Voila! A pretty arch of autumn colors and elements ready to go on a wreath form. I added the glittered coppery butterfly for a perfect pop of shine.


Here it is on my coffee filter wreath. It looks great! I made the wreath with white coffee filters hot glued to a basic twig wreath. Even unadorned it is pretty but this added flair is just gorgeous!


And here is the same spray on a burlap wreath I made. Presto, change-o in just a few seconds! Wow, this is working out better than I'd hoped! I made the burlap wreath using hot glue on a straw wreath form. The mix of the plain burlap and the colorful arrangement really pops!


And here is a spray on a plain old twig wreath. The fancy and the plain really look good together. Again, it took mere seconds to switch from one wreath to another!


And here it is on a tan coffee filter wreath that I made using a Dollar Store hula hoop as a base. I really LOVE how this looks all together! Not only does it look good it is super simple to change over from one wreath to another. I think it would even look good over a round mirror for a neat accent!

I'm thinking of doing another arrangement with black and purple spray painted leaves for Halloween and then, of course, another one for Christmas. Those will both be fun projects, I'm looking forward to them!

Come link up at these parties and join the fun.


Sunday, April 27, 2014

No Mantel to Decorate...But I Do Have a Baker's Rack


(Copyrighted photos of gorgeous decorated mantels go here)
Truly, too many beautiful mantels to choose from! But you know what I'm talking about; totally swoonworthy mantels decorated to a "T" for every season, holiday and occasion.

 I have no such thing in my house. Sad.

But, making the best out of what I've got, I DO have a totally cool custom made wrought iron baker's rack made by The Welding Man. That's it in my header above at top left, loaded with gorgeous cobalt blue glassware. LOVE.

And here at our new home I've been decorating it for the seasons, holidays and special occasions. I'm nothing if not resourceful.


Here's the baker's rack today...but who knows for how long? lol!


I painted the Clason Mountain artwork to commemorate the beautiful view at our old house. I painted the middle piece because I wanted to use the same colors. So much BLUE, go figure. 

And then I started pulling things together from the rest of the house. As usual, I don't subscribe to the "less is more" school of decor. Load it up, baby!
                                 
I "frosted" the glass in the lantern for a soft glowing look, then added a string of Christmas lights. Go here for the details.


I still collect cobalt glass but I've slowed down and asked the fam to slow down also. But it's hard to resist that gorgeous color!  And yes, I collect the letter "A." I have over a dozen so far and I'm ready for more.


On the bottom shelf I added more blue glass and lots of vine balls and decor balls for texture. The silver blingy button decor ball is one of my favorite decor projects. Go here for the details....


I also made the glass marble decor ball out of a Dollar Store Christmas ball and half marbles. Yeah, there's a post on that, too.


Just a few short weeks ago the baker's rack looked like this....


.....loaded up with all the music themed, green and white decor for my sister's wedding. So who needs a fancy shmancy mantel? I've got these neat baker's rack to decorate and soon...it will be time for Mother's Day decor!

Friday, December 13, 2013

Popsicle Stick Snowmen-Fast and Easy

Ever keep hoarding something because you just KNOW that someday you will need it for a project? That is how I ended up with these cute little popsicle stick snowmen.

We enjoy the chocolate Skinny Cow popsicles and I always figured that the shapely little sticks were good for something. So I kept them. Dozens of them. As in, two quart mason jars filled with them!

I've been making little ornaments out of toilet paper rolls and using all the little things from my craft stash to decorate them. But I needed some small scale snow people and I was NOT about to buy any since I am cheap that way. Also, creative. Creative and cheap; that's my story.


I painted both sides white with two coats going on the side with no printing. I used the handle end of a small paintbrush dipped in black paint to dab on the eyes, mouths and buttons. On a few I used a Uniball gel pen to make different style smiles.

A bit of orange paint and a little brush gives them a crooked carrot nose.


Time to dress up! I made the scarves and hats out of scrap felt, fleece and fabric. I hot glued the hats directly to their round little heads and even hot glued some of the hats for a crooked look. Easy peasy!


These are fast and easy to do. I made dozens of them in one evening while watching West Wing on Netflix. I even had my grandkids help with the painting. As you can see, three of these little guys fit snugly into a toilet paper roll basket for a festive ornament that costs next to nothing. Now I'm looking at all the other supplies I've saved, looking for the next fast project. 

And yes, I'll be posting instructions on making the toilet paper roll ornies. By the time they are done you will wonder why you've been throwing those rolls away! 


Thursday, December 5, 2013

Black and White and Red Christmas

My girls and I will be at the Douglas County Christmas Fair in Roseburg, Oregon this weekend. FOUR big buildings full of Christmas goodness, what's not to love? Come see us if you are in the area! Just look for the "Make The Best of Things" booth.
***************************************************************************
Here's what my baker's rack looked like for November. Lots of vibrant autumn color with faux leaves, my fabric and lace pumpkins, garlands and a neat twig rosette wreath.

For October it looked like this, complete with spooky bats, a black dried vine wreath, scary cut outs and black netting. I loved the black and white theme so much I wanted to use it again for Christmas, maybe with a bit of silver.


So here was the start of the Christmas decorating and tho it's coming together, it just looked too "calm" for me. I love color and knew I had to add some to this display. I didn't go out and buy anything and knew I had to work with what I already had. The silver wreath is a great Dollar Store clearance buy after Christmas last year, it was twenty five cents!!

I looked in my Christmas storage; old balls, yarn and old silver decorations. I remade the silver tinsel wreath with lots of red in yarn and glass balls, plus silver balls and snowflakes and even a black and white ball to match the two cone trees. Hmmmm, looking better!


Here's how the rack looks now. I'm still tweaking that second shelf, perhaps adding a few more cone trees....and one wrapped with a red beaded garland...and maybe one with silver foil....thinking thinking.

This is the great fun of creating your own decor, when you get an idea you can work on it and modify it until you get the look you want. I'm not done with this design yet, but so far I'm liking the clean black and white and silver with pops of red, SO different from my normal cobalt blue, white and silver.

What about you, are you changing up your colors or style this year? It's your house, go for it!
Posted by Picasa

Book Page Christmas DIY

Most of you have figured out I am a color freak with an obsession  for turquoise, red and cobalt blue.  However, I also obsess about ...