Showing posts with label dollar store crafts. Show all posts

Wednesday, June 17, 2020

Wax Paper Capiz Shell Tabletop Chandelier

Pin ItI've been seeing lots of chandeliers made of faux capiz shells out in blogland
 with some made out of wax paper, plastic cups, laminated rice paper,
 even wax paper mod podged onto parchment paper.

I figured I can do that and so, I did!

 I chose a $2 thrist store tabletop lamp for the bookcase in our hallway.


And I love the way this came out!


It has a soft glow, great texture and a bit of movement when you walk by.
 Even The Welding Man likes it, he says it reminds him of a wedding dress. :o)


I took two lamp shades from my stash and removed the covers. I knew I wanted the rings to be larger at the top and smaller at the bottom. So I wired them together and even added another ring with craft wire secured with florist wire.

 What is needed is a sturdy shape with at least two different sized rings to hold your fake shells in layers.

After a coat of white spray paint I flipped it over and got all my fake capiz shell circles ready.


Dollar Store wax paper, baby!!

Next I made the wax paper "shells." I used a dry iron on cotton and put
 parchment paper on the bottom between the ironing board and wax paper.

Four sheets torn off close to the same size melt together nicely
and make a good, stiff 4 ply sheet. Let the wax paper cool then start punching.
 I found my punches did best with 4 sheets of 4 ply wax paper,
 your punch might do better with more or less.

I used a 2" and an 1 3/4" circle punch. I figured I needed about 400 circles total,
plus I cut a few extra in case of mistakes or design changes.

I sewed my circles together using my machine's longest stitch and placed 9 circles on each "run."
 I sewed several sets of nine together in a single sitting with about three inches
of thread between each set. I cut them apart into sets
 of nine and started assembling.

I wound the thread from one set of circles twice around the middle ring and put a dab of hot glue over the thread. I placed each string of circles about 1" apart.
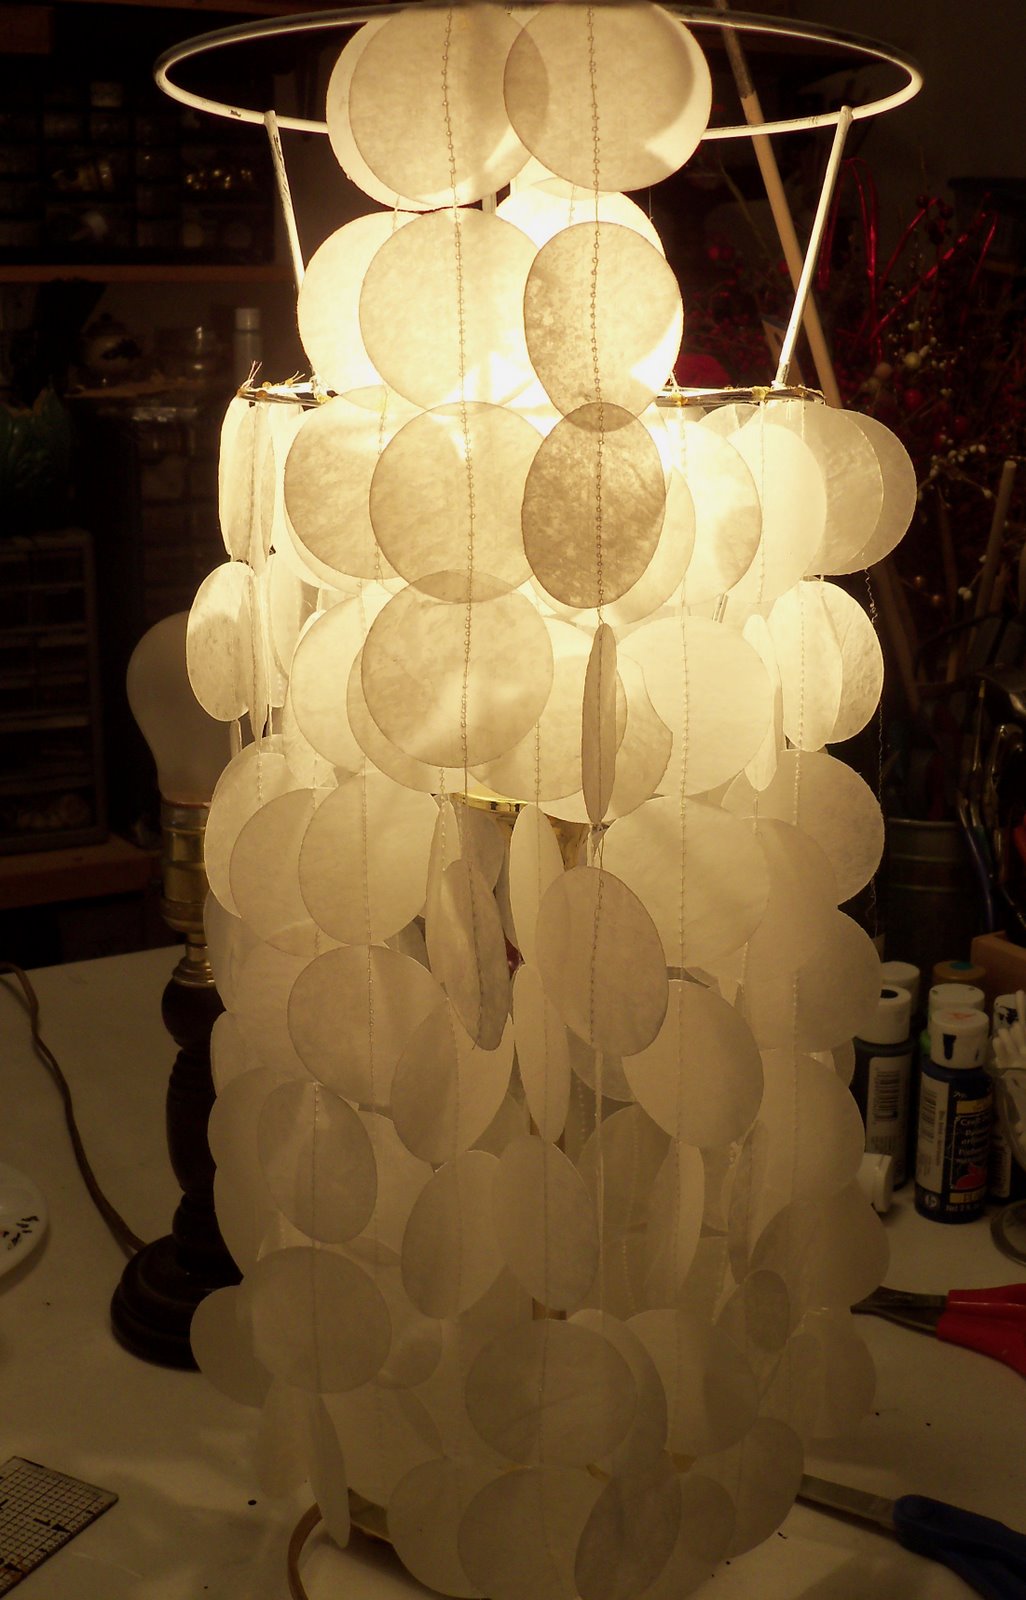
For the top ring I let six of the circles on a string hang down outside
and folded the other three over inside the frame, using a dab of hot glue
 on the thread at the top. This gave the upper half of the lamp a fluffier look
 and more visual "weight."


Extra circles folded in half and hot glued around the upper ring give the lamp a finished look.


As you can see, the stitched circles diffuse the light and overlap nicely, giving a nice soft glow to the evening. During the day they give that corner a bit of reflected light and nice texture.


I am already thinking ahead to doing this with my dining room light. Maybe with a little color and a bit of glitter? When I figure it out and make it I'll be posting right here.

Monday, December 30, 2013

Spring Wreath Redo....The 4th Look From The Same Wreath

Time to redo my wreath for spring. Easy and CHEAP and beautiful!


Ooh aah!

Back in the fall I started out with a Walmart twig wreath, some eucalyptus branches, mixed twigs, fake roses and gloss black spray paint. I added a Dollar Store haunted house cut-out and some ruffled streamers made from a cheap plastic table cloth. Spiderwebs and tiny little bat cut outs made this a fun wreath for my Halloween door.


This wreath is almost 24" across, so it is big enough for the arched windows in the door to fit right into the curve.


Next......
I added Dollar Store autumn leaves and flowers, plus some real mini pumpkins. The bright colors against the gloss black wreath and twigs really popped! This was a great look between Halloween and Thanksgiving.

Next...


I spray painted the wreath gloss white and really changed it's look. See how the roses stand out now? I added pretty shiny decorations in blue, silver, teal and white and LOVED the way it came out. I scored some teal foil twist at the Goodwill and used it for the curlicues and the rosettes on the little ball in the middle. I also crackle painted another teal ball with silver acrylic paint and Elmer's glue.

And now to that white wreath I'm adding all these springtime elements.....

Silk hydrangea leaves, plastic ferns, sticks from the yard, glitter and paint and pretty glittery butterflies. And, a mini vine wreath to remake into a bird's nest.

I painted some of the greenery with lime green Patio Paint for some color interest. The Patio Paint is specially formulated for use outdoors and I've had good luck with it holding up to bad weather.

I like it. I like it alot!


And here's a closeup....


I had most of these things in my stash and only bought the glittered eggs for the nest. The bronze glittered butterflies were on clearance after Christmas for 50 cents. I painted the curly wires with the Patio Paint and re used the tiny blue berry twigs from the Christmas wreath. I soaked the tiny vine wreath in hot water then unraveled it and spread it out to be less tight and more nest-like. Then I added twigs from the yard to make it a little shaggy.

I've had this project in mind for awhile and it was fun getting it finished and hung up. As wet and cold as the weather has been here, it's the only thing we've done outside so far this spring!

Join me at the linky parties in my sidebar, you never know what neat projects you will find.

Friday, October 25, 2013

DIY Oversize Acorns for Autumn Decor

Ah Pinterest, you font of ideas and things I MUST MAKE right now! LOL
I love the huge acorns I've been seeing  at some online shops but they are hugely expensive, so I was thrilled to find a way to make my own.

Here are my oversize burlap and twine acorns that were inspired by a Pin.


I like how they came out!

Here are the inspiration acorns.....


...posted by Dannyelle over at Life Is a Party.

Cute and clever, right? They are totally up my alley and I had everything I needed to do this on a Friday night. Here's a link to her DIY post for these neat acorns.


I spray painted some oversize plastic eggs brown and moved to the next step.

I hot glued the egg halves together, then glued on burlap circles to cover the pointy end. LOTS of pleating and glue makes this work. Then I took apart some pine cones and glued the bits around the top along with a twig stem to finish, just like Dannyelle.


Hmmmm. This resembles her acorns but not in a good way, LOL! She said in her post they were a bit fiddly and I agree. Plus my pine cone pieces did not give a neat look to the topper.
So, tweaking must occur.


I thought they looked a bit too long so I hot glued two of the fat ends together for a rounded shape. Already this looks more acorn-y. Is that a word? It is now. And instead of pine cone pieces I used twine. Lots and lots of twine, plus a shorter bit of stick for a stem.

Here's a shot of both kinds of my finished acorns....


I really like the short, round ones with a twine top. The other just does not look as good as Dannyelle's. Pinterest fail?


I used loads of wrapped twine for a fat top. Love it!


Ooh aah! It took me a little over an hour to make these, tweaking and all. And they were free since I crashed my stash for supplies. Love that!

I'll be joining the parties in my sidebar, come visit and have some fun.

Monday, October 14, 2013

Make Plastic Look Rusty This Easy Way

I like to use rusty accents for my primitive Santa dolls. The rusty look is perfect with the vintage quilts I use for their outfits. But it seems that anything rusty in the crafting world costs extra, so I came up with this easy, cheap and totally neat way to fake that old, rusty patina.

Here are some pastel plastic star buttons from The Dollar Store. Score! I knew I could work some rusty magic on these.


For this project I used spray paint in gloss brown and Dollar Store cinnamon. That's it!


We did this outside since the spray paint is stinky. I sprayed the buttons til the pastel colors were completely covered. While the paint was still tacky, my grandson and I sprinkled them  with cinnamon. Easy peasy! How wonderful authentic and rusty they look now! After the first few buttons we learned just how much cinnamon to dust on each one for this fabulous look. 


Next, I grabbed the favor star necklaces I'd found in the party section at Walmart. Four for ninety seven cents is a real deal! We hung them up and spray painted them brown, making sure we got all the  surfaces covered. Instead of sprinkling the cinnamon on each necklace, I put about two tablespoons of cinnamon in a plastic sandwich bag and dropped the sticky necklaces inside and shook them around thoroughly.


Then I took a bit of pumpkin orange craft paint and ran my paint brush down each string of stars, so the color hit the high spots. Ooh aah!

I also tried this with brown craft paint first and then the cinnamon, but it was too persnickety and slow for me. I love the convenience of the spray paint and it is much stickier for the cinnamon step. I call this a win win.

I spent $2 on the buttons and the cinnamon from the Dollar Store.
I already had the glossy brown spray paint in my stash.

And I am totally pleased with the way this come out! Now I'm considering a Christmas tree totally decked out in rusty, vintage style ornaments. How cool would a beaded garland look all rusted up like this? Gotta try it!

I'll be joining some link parties on my sidebar soon. Come visit and see where creativity reigns!

Monday, September 30, 2013

Add Book Page Leaves To Your Fall Garlands


Here is an easy project that turns out great, and you can probably do it with stuff you have on hand. I use old book pages for loads of things but this is one of my favorites. I add leaf cutouts from old books to Dollar Store garlands and really kick up their style factor.

Using a leaf pattern traced from a real life, a fake leaf or online, simply trace the shape onto a printed page of an old book. With good, sharp scissors you can cut through about six pages at a time. Here you see one size leaf we cut to add to the garland.

And here's a smaller size. Please excuse the painty, gluey crafting hands! Use a glue stick on one leaf, add a length of florist or craft wire, then put another leaf on top. You can make as many as you like, it's easy peasy and they look so cool. I believe Pottery Barn had some similar leaves a few years back for a very pretty price.

Just use the wire to twist the leaves into the garland. Here is one garland we made last year. I love the way the book page leaves "cool down" the vibrant colors of the garland. You can add as many as you wish and the wires let you "fluff" them any way you want for a fuller look.


Here they are with another more muted garland. This was for the long stair banister in my daughter's country style house. I love the way they look!

Here is a garland of oak leaves hung on a muslin curtain. Such a complement to the colorful leaves and the creamy colored muslin.

Posted by Picasa
And here is one, paired with my primitive star garland, that I've looped around my entry way mirror. I really like the way the book page leaves look with all the vibrant hues!

And here's a shot of a garland used in a Thanksgiving tablescape. Add a few book paged balls and some glass ware and you have a stylish and colorful centerpiece.

I've used book pages for years for so many projects that now it is my go to look when I style my house and studio. With the holidays coming on like a freight train it's time to style up some neat decor again.

I'll be linking to the parties in my sidebar. Come visit and join the fun!

Sunday, March 17, 2013

Spring Wreath from a Bath Scrubbie


I see lots of creative mesh wreaths online and in the craft stores and they are gorgeous! I have a bit of a wreath obsession and I've been studying how to make them without buying the rolls of decor mesh or special wreath forms. So I started with this simple wreath and I am quite pleased with the result.


When I found these bath pouf/scrubbies at The Dollar Store, I knew they'd make a great mesh wreath if I could figure out the logistics. I love the graduated green colors! I already have Dollar Store wreath forms in my studio (wreath obsession, as I said) and  I just had to put it all together.


First, I unstrung one scrubbie. Wow, there is alot of poufy fabric in  these! They are actually long mesh tubes, who knew? I figured I could utilize the tubes as is around an 8" diameter foam wreath form.


 I gathered the mesh tubes on my arm and then made a small cut to divide the form. Careful fitting and fiddling gave me this....


Hey, this might work! I like the simplicity and the fluffiness. A few quilting pins here and there to control the poufs and I'm on my way. I used hot glue and clear  tape to close the gap in the wreath form.


Then came the fun part. I crashed my stash for little decor items and kept dithering over an Easter theme or springtime or ???? THIS is when my work table gets covered with lots of stuff. Finally I settled on butterflies since I had some pretty ones in different styles in my stash AND I have these neat butterfly punches and glittery scrapbook paper.

And VOILA!


I could see this pretty wreath for a springtime door or a birthday party or even a baby shower. It is super easy to make and doesn't cost an arm and a leg for supplies. Glittery Easter eggs would look great on this wreath, as would a mini birdhouse and maybe a nest with a few fake eggs. Best of all, the Dollar Store is chock full of little decorative items to use on this wreath project all through the year.

I'll be making another one, and soon!

I'll be sharing this project at the blog parties listed on my sidebar. Come visit and check out all the creative projects!

Saturday, November 17, 2012

Burlap Acorns from Easter Eggs

Ah Pinterest, you font of ideas and things I MUST MAKE right now! LOL
I love the huge acorns I've been seeing at some online shops but they are hugely expensive, so I was thrilled to find a way to make my own.

Here are my oversize burlap and twine acorns that were inspired by a Pin.


I like how they came out!

Here are the inspiration acorns.....


...posted by Dannyelle over at Life Is a Party.

Cute and clever, right? They are totally up my alley and I had everything I needed to do this on a Friday night. Here's a link to her DIY post for these neat acorns.


I spray painted some oversize plastic eggs brown and moved to the next step.

I hot glued the egg halves together, then glued on burlap circles to cover the pointy end. LOTS of pleating and glue makes this work. Then I took apart some pine cones and glued the bits around the top along with a twig stem to finish, just like Dannyelle.

Hmmmm. This resembles her acorns but not in a good way, LOL! She said in her post they were a bit fiddly and I agree. Plus my pine cone pieces did not give a neat look to the topper.
So, tweaking must occur.


I thought they looked a bit too long so I hot glued two of the fat ends together for a rounded shape. Already this looks more acorn-y. Is that a word? It is now. And instead of pine cone pieces I used twine. Lots and lots of twine, plus a shorter bit of stick for a stem.

Here's a shot of both kinds of my finished acorns....


I really like the short, round ones with a twine top. The other just does not look as good as Dannyelle's. Pinterest fail!


I used loads of wrapped twine for a fat top. Love it!


Ooh aah! It took me a little over an hour to make these, tweaking and all. And they were free since I crashed my stash for supplies. Love that!

I'll be joining the parties in my sidebar, come visit and have some fun.

Book Page Christmas DIY

Most of you have figured out I am a color freak with an obsession  for turquoise, red and cobalt blue.  However, I also obsess about ...