Friday, November 11, 2011

Lighted Autumn Hurricane

I scored this gigantic glass hurricane at a yard sale for $2. It is 20" tall and 8" across at the belly with a wooden base. I love it's size and how I can dress it up all year long. Plus, $2!! That still makes me grin.


Last spring I filled it with vine balls, book page decor balls, driftwood, monkey's knots, pine cones and my favorite green glitter dragonfly. I LOVE how it looked with a few of my cobalt glass pieces.


So this fall I restyled it for Autumn. Now it is a lighted accent to my Thanksgiving decorating. I like it. I like it alot!


I grabbed a garland and a short string of 50 lights from my stash....both Dollar Store buys from years past. I twined them together and stuffed them into the glass. The problem was, they all fell to the bottom and left the top of the glass empty.

The Welding Man suggested that I put a piece of dowel inside to support the garland, so here's what I came up with. To disguise the dowel I covered it with an Autumn leaf print napkin cut into strips. A bit of hot glue at the top and bottom kept the paper in place. We threaded it through the garland and used florist wire to hold it at the top. Then we plugged it in and I am pleased as punch at the way it looks!


Here it is at the corner of my "bookcase in lieu of a mantel" with my Thankful wreath, my faux stained glass mirror, my oak family tree painting and another, smaller, unlit hurricane. It really brightens up that corner and is a beautiful night light. I checked it often for too much heat from the lights and it is safe, just warm.

Now I'm thinking that smaller hurricane needs lights, too. I can put it in the corner of the living room with my Autumn tree branches. And for Christmas I'm thinking silver balls and ornaments and pine cones and a bit of greenery, all lit up!

I'll be joining the blog parties on my sidebar, come along and link up! There is a wealth of creative projects out there!

http://ivyandelephants.blogspot.com/2014/09/up-in-smoke-again.html?utm_source=Friends+of+Ivy+%26+Elephants&utm_campaign=c40032f638-Up+in+Smoke+Again&utm_medium=email&utm_term=0_a51593f650-c40032f638-42477

http://www.playpartypin.com/2014/09/weekend-re-treat-link-party-86.html
Posted by Picasa

Sunday, November 6, 2011

Post It Note Christmas Flowers

Here are the simple book page ornaments we've made for our little tabletop trees, including a punched paper snowflake garland, Mod Podged balls and these pretty little origami flowers. I love the look of a vintage black and white Christmas with all these elements.


For cheap and easy Christmas decor, you can't go wrong with recycled book pages. One of my favorite projects are these book page flowers.

I call them Post It Note Flowers because they work up beautifully using a 3" x 3" square of paper, so in a leap of naming logic there ya go. They are really origami kusadama flowers and they've been around forever. I'll give you a link to an origami website at the end of this post in case my instructions lead you hopelessly astray. ; 0 )

Start with a post it note or any size of paper as long as it is perfectly square. IF YOU USE post it notes, you will start with the gummy side at the bottom right and gently separate the layers if they become stuck. I LOVE these in hot pink, but I don't have any paper that color right now.
Fold bottom to top, then sides in to form a diamond, then fold each side out from the middle.
Unfold each side "wing" so it looks like a kite, then fold the top of these side kites inwards so now you will have a middle kite shape with matching side triangles. Fold each triangle once inwards.
Roll into a cone and hot glue the two folded sides in the middle. You need at least five to form a flower shape, tho I have seen them with more. Hot glue all the cones together and don't worry if you have a little gap in the center, even real flowers have a little opening in their middle.


We've made ours out of vintage dictionary pages to go along with our simple white Christmas theme.

And the Live, Laugh, Love ornaments? Simply book pages cut into small rectangles then Mod Podged onto Christmas balls. I hand wrote the words on each ball with a Pigma pen, then sealed them all with clear acrylic. You could also use a Cricut or Silhouette for the words, or print them and cut them out to match the book pages and Mod Podge them on. Simple, pretty and inexpensive. We like!

Here is a link to a real origami website with great instructions and lots of samples for these pretty flowers...

http://www.cutoutandkeep.net/projects/origami_kusadama_flowers

I'll be joining the parties on my sidebar. Come join the fun and see the neat projects posted this week!

Friday, November 4, 2011

Recyled Halloween Wreath

Even as Halloween ended and the decorations came down, I knew I wanted a bit of color for the Thanksgiving season. I dove into my stash of autumn colored silks and took another look at the wreath I spray painted black for Halloween. I came up with this.....


I love how it looks on my blue door! The colors against the black really pop.

Here's how it looked for Halloween, properly dark and spooky and fun. Perfect for the season.

I took some real miniature pumpkins and put them on skewers, then hot glued them in place amongst the black roses. A few silk flowers and fall leaves later and voila, the finished wreath! I love the off center design with the "breathing room" on the rest of the unadorned wreath.


Not only do I love how it looks, it cost me nothing but a $1 for the 3 pumpkins and a few minutes' time. After Thanksgiving I'll switch it over to Christmas, still using the black wreath as a base. I've got some colorful ideas for THAT design and I'll post the finished wreath here.

And now I'm thinking....what could I do for Valentine's Day with that black wreath as a starting point? Easter? Mother's Day? Just what I love, a creative challenge. Check back to see this black wreath in all of it's disguises.

I'll be linking up to the parties on my sidebar. Come visit and be amazed at the creativity out there in blogland.

Tuesday, November 1, 2011

Muslin and Burlap Towel Decor

I've said before, I'll pretty much put rosettes on anything, and here I go again. I embellished this pretty blue guest towel and LOVE how it looks, especially with the sand colored towel hanging with it for subtle contrast.


I got this 2 pack of hand towels because the color is gorgeous. It is more blue than green, a really nice shade of turquoise. I knew that burlap and muslin would look great combined with this vivid color.

I like it. I like it alot!


And since God is in the details, here is the way I finished the trims on the back. Simple, clean, elegant.

I pulled out some rosettes and buttons, dug into my bead stash and started having fun.


How pretty is this? The towels cost $1.50 apiece and I already had all the other supplies. Breaking it down dollarwise, the muslin and burlap actual cost was about 15 cents and the buttons and fabric rosettes add maybe another 15 cents to the total...so about $1.80 for a whole lot of decorative bang. I still have one more towel left, should I make it complementary to this one or go in a completely different direction? OR, should I go get more towels and have some fun? Decisions decisions. ;0)

I'll be linking to the fun parties in my sidebar, come join the fun and see what creative bloggers are writing about this week. There are TONS of wonderful ideas out there!

And look, a WHOLE MONTH of burlap inspired projects. Come check them out at Whisperwood Cottage....

Friday, October 28, 2011

Sweet Muslin and Burlap Pillow Covers

Pin It


I have just relisted my handmade pillow covers in my Etsy shop. I LOVE the vintage, shabby chic look of these ruffled pillows trimmed with vintage style lace and rosettes. Just picture one of these as a ring pillow for a country, farm or barn wedding. Perfect!

The combination of the soft muslin with the texture of the burlap just gets to me. Love it!
They have envelope style closures on the back side, sewn of muslin. They are 12" square and fit a 12" pillow form, which is NOT included in the listings.

This is a pillow with a stuffed form inside since not everyone has a bolster shaped pillow form.

Ah, Rhett Butler's shirts had this kind of pin pleating and ruffled detail, don't you think?

This white burlap with a white muslin ruffle is pure prettiness. With the lace and buttons and my hand sewn rosettes, it's just so beautiful.


I'm thinking Scarlett O'Hara's trousseau had ruffled muslin detailing like this, don't you?

More burlap and ruffled muslin and french style rosettes. Gorgeous.

Now, this is the detail a pretty nightgown or shirtwaist used to have on it. I love the old dressmaker details!

Smocking gives a texture all it's own, and this pillow cover of burlap and denim is the perfect shabby chic combination.
More sweet ruffled goodness. Lovely! I hand sew each rosette. No glue is used in the construction of these pretty pillow covers.

They look stunning grouped together on my chocolate brown couch. If I had the courage to go with an all white living room, these pillows would be one of the anchors of my decor. Sigh, not with a chocolate lab in the house! But, maybe in our bedroom......

Stop by my Etsy shop and check out the details on these pretty pillow covers. And look at my other listings while you're there, you never know what you will find!

Americana....and a Rooster in my Etsy Shop


I love the look of vintage Americana and have come up with designs using the patriotic flag theme. I use a variety of techniques to make these paintings look old and vintage including crackling, dry brushing and lots of layering. I've sold many of these and have these few left for my Etsy shop.

They are painted on cabinet doors which have a natural "frame" so they don't need anything extra.

The accent stars and Liberty are painted with gold metallic paint. It looks like burnished vintage metallic brass to me.


Some have no lettering at all but have extra detail, like the gold stars and narrow gold stripe outline on this one.

I really like all the red on this one. I may pull it from my store and keep it for myself!


You can't have Liberty without Freedom, eh? I love the primitive vintage look of these paintings!

My favorite red one is getting the most looks, but not as much as this painting....

...yup, this colorful primitive style Rooster is getting ALOT of views. Who knew he'd be so popular? Lol. Maybe I should do a whole series of rooster and chicken paintings?

Check out my Etsy shop for details and while you're there take a look at all the muslin and burlap pillow covers I've listed. They're shabby chic, sweet and vintage style all together.


Monday, October 24, 2011

Video Tape and Trash Bags

Yeah, this year we've gone a bit overboard for Halloween. It is our first year in town after 25 years on a mountain. Plus our grandkids live close by, so we HAD to do this! But I didn't want to spend any cash so here's what I came up with....

Lots of creative thinking went into decorating. Let me break it down. First, get those old video tapes out and make.....

...a huge spiderweb in your yard! I love the way it shimmers and moves with the wind and you can make it as big as you want. We did two with one old video and could have made more. It's easy to work with looks fantastic. Of course, an oversize web calls for an oversize spider.....


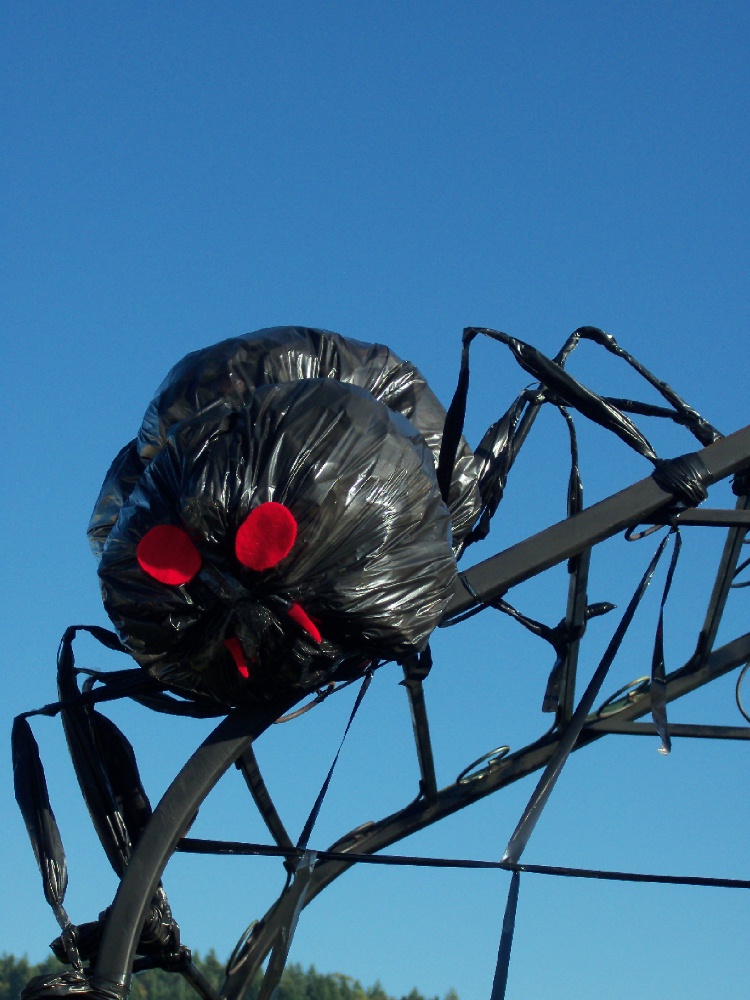
...made out of two trash bags. Insanely Creative Christy stuffed it with newspaper and used wire to give the legs some stability. She also knotted the legs to look like joints. Smart lady! We thought it looked dumb until we googled trash bag spiders. It doesn't look half bad compared to what we saw online!

Look! Trash bag curtains for the temporary arch on the deck. Just cut in strips, you don't have to be accurate at all. Staple it up and tie it back like this for a kind of Victorian Gothic drapery effect or.......

...cut 'em loose and let the wind blow them about like the torn sails on the Flying Dutchman or the tattered curtains in the Haunted Mansion. I like the windblown look, so spooky.


And just one more cheap and easy tip....use Dollar Store plastic tablecloths to make ruffly black garlands. They look great and they're weatherproof, too.

Here are some draped on my baker's rack. Just cut them in 2 or 3 inch wide strips and stretch the edges carefully a few inches at a time. Voila, ruffly black garlands, baby!


I attached a dozen strips to the bottom of my black wreath. The rain doesn't bother them and they blow around with every breath of wind. Love it! Don't let the plastic cockroach get ya.

The only thing I bought new this year was the tablecloth, and I still have plenty of it left to try out some other ideas. The trash bag pumpkins, pumpkin light string, and cat and bat signs were yard sale finds this last summer costing me less than $5 total.

So we're pleased with the way it's turned out. But come November 1st this will all come down and autumn decor will take it's place...in a more subtle, stylish way, of course.

I'm linking up to the parties on my sidebar. Come check them out and see all the creativity blogland has to offer.


Saturday, October 22, 2011

Black Halloween Wreath

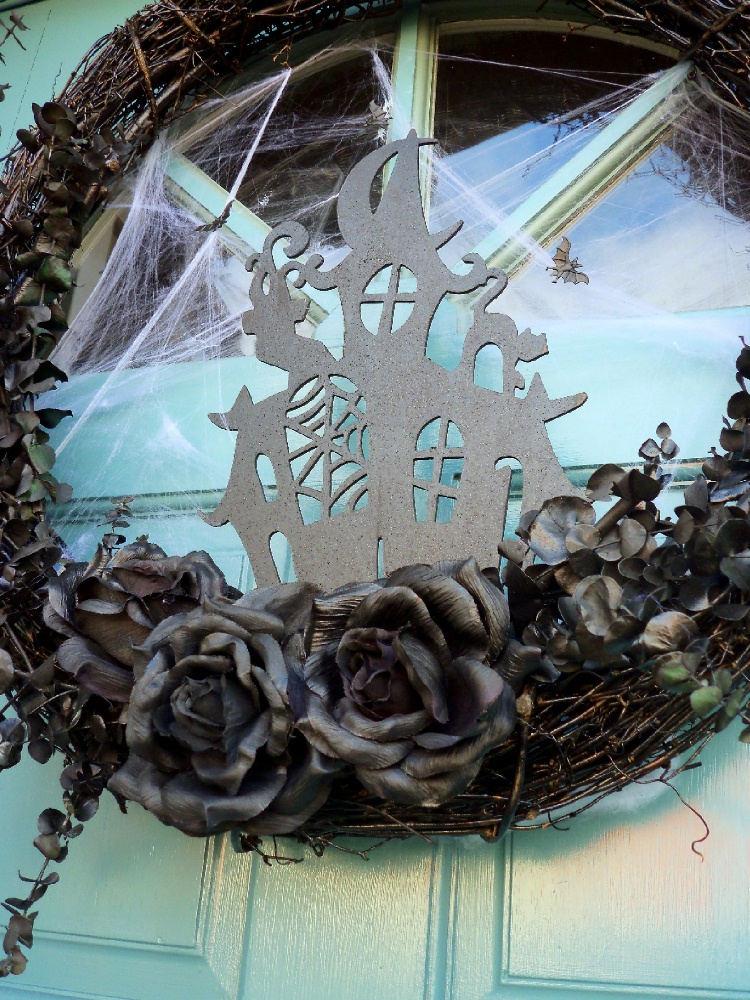
Gloss black spray paint is my new best friend this Halloween season. It brings different elements together with a spooky kind of glamorous vibe. For this wreath I started with a sparkly (yes, it was glittered) twig wreath and some fake roses that had seen better days.

Then I pulled some eucalyptus out of an old arrangement and hit them with the spray paint, too.

Not too many, I'm trying to go with the "less is more" trend. For me, that is hard!!

I added a bit of Dollar Store spiderweb and a cutout of a haunted house. It is also gloss black but the camera picks it up as dull. Trust me, it's black and shiny!


Here it is on our Navajo Blue door. I like the stark contrast of the black against that nice blue. I added some ruffled plastic streamers that blow in the wind.  Spooky!  It's not simple, visually, but it is simpler than my usual style.

Can you see the three tiny bats flying around the haunted house? They gave me a nice surprise...

..because from inside they look like this! Serendipity, baby! Maybe I CAN embrace the less is more design ethic, but after Halloween because you haven't seen the fully decorated front porch yet.

Is there such a thing as too much detail? We'll find out and I'll post it right here.

Book Page Christmas DIY

Most of you have figured out I am a color freak with an obsession  for turquoise, red and cobalt blue.  However, I also obsess about ...