Wednesday, October 19, 2011

Halloween Windows from Poster Board


On our last trip to the Dollar Store, Insanely Creative Christy and I got to brainstorming about cheap Halloween decor for my front windows. We thought of the silhouettes Martha Stewart showed on her website so we grabbed 6 sheets of black poster board at 2/$1 and came up with these decorations.

We did this in one afternoon and we got the giggles doing it. It was alot of fun.


Christy came up with the idea of the monster eyes and claws coming out of the louvres. They look awesome.


She added some crow cut outs and then she cut out the window shapes from my drawings on the poster boards. We used double stick tape and we impatiently waited for twilight to see how it all looked.


Hey, that looks pretty good with just the flash on my camera. But wait, there's more...

Here's how they look after dark. Pretty cool, huh? And we still had poster board left. So Christy cut these out and stuck them up in my kitchen windows. Forgive the fuzzy pics, I was laughing at the time....


So cool and so cheap. They will look great on Halloween night if we don't scare the neighborhood kids away!

Now we are thinking how we can use poster board for Christmas decor and other holidays. Hmmmm, when we come up with something I'll be sure to post it here.

I'll be posting this to the fun linky parties listed on my sidebar, come check them out for some great, creative projects.


Friday, October 14, 2011

Wonderful Turquoise Beachy Blue in my Etsy Shop

As you can tell from my blog header, I've always been a cobalt blue kind of a gal. But the beachy blue shades of turquoise, teal and sea blue are growing on me. I'm even redoing my craft studio in turquoise with cream and red for accents. My big ol' desk will soon sport the same finish as this glass pedestal, complete with the umber glaze.

I love the color and texture on this piece! Originally I was going for a perfectly smooth gloss finish, but I LOVE how this came out at the end. I've even set up a category in my shop for these beachy blue projects.


The leathery texture of the dried magnolia leaves really set this little vignette off. The driftwood is from the Oregon coast.

I remade this old wooden drawer into a small shelf. I love to recycle and restyle old pieces and this is one of my favorite projects. So far I've redone three drawers and I'm looking for more. The color and glaze and especially the script paper really make this one special.

Ah, see the turquoise glass pedestal on the shelf there? These pieces really do compliment each other so well, I can see them together in someone's vacation cabin or coastal home.

The script liner tells a tale of sorts and is fascinating to read. It says, "The Siren holds the key for She has the gift. A shimmer of something. Mysterious. Elusive. Hidden. Tissue and wrappings. Secrets and surprises. The unveiling of the unexpected."

The frame on the top holds a piece that says "She has a gift." See how the glaze picks out all the time worn goodness on this piece? Love it!


This vintage wooden bowl had seen better days. I had planned to refinish it and seal it with clear polyurethane but then tried the beachy turquoise color and I was hooked. It really came out great!

I used several shades of blue including turquoise, ocean blue, sky blue and teal. It is sealed with clear acrylic and looks like a well loved family heirloom.

It even looks time worn and gorgeous from beneath! Love the little ball feet and the center mark where it was hooked to a wood lathe for shaping. This bowl just makes me smile!

I have several projects in the works for more turquoise blue goodness. When I get a few more I'll post them right here. Please take a moment to check out my Etsy shop, you never know what you will find!

Black and White Halloween Decor

I love seeing all the creative ways bloggers decorate their fireplace mantels for each season. One smart lady even built a fireplace facade and mantel so she would have a focal point for decorating. Since I don't have a mantel, I utilize what I do have and that's a neat baker's rack The Welding Man made for our anniversary one year.

This year for Halloween I've shopped the house and the Dollar Store and loaded it up with all black and white decor. Though usually I am all about bright color, I really like this crisp combination.

I added some of my wired foam bats which I anchored in a bottle I spray painted gloss black. I made a wreath of the vines off our fence and once it dried painted it also. It looks great but it sheds ragged pieces of dried leaves EVERYWHERE, so it's not moving until after October 31st. A Dollar Store candelabra cutout and my silver decor ball are also on the top shelf, plus a couple of cloth pumpkins.

Fake cobwebs drape the bottom half over a bit of black fabric and lace scraps. The black netting fabric is from the Dollar Store. The jute wrapped apothecary jar is full of balls stamped with all the family's names. Insanely Creative Christy made it for my birthday and it looks great with this display.

Here's a shot showing the ruffled garland I made out of a Dollar Store plastic table cloth. So easy, and I'll be posting a how to on that soon. The square wrought iron piece usually hangs on the wall in my bedroom.

The bottom shelf has two Dollar Store cutouts which are really well done for the price. Fabric pumpkins sit on more glassware that I've spray painted gloss black. They look great! The little glass bell cloche sits over a plastic spider, you just can't see it in this pic.


Here's another look at the top shelf and my silver button decor ball draped with cobwebs next to my patchwork fabric pumpkin. The Dollar Store candelabra cut out will soon be on a door wreath, and I'll post pics when it is finished. Here also is another look at that dried vine wreath. I LOVE the spooky twisted vine look of it but Lord this thing sheds!

I've seen a few other black and white vignettes for Halloween and loved them, tho I have a tendency to LOAD THINGS UP. I understand the concept of less is more, but then I start putting things together and soon you have an eclectic mix with lots of visual appeal and interest. But hey, I like it.

I'll be posting on the linky parties on my sidebar. Take a moment to check them out, there are always some wonderfully creative projects to be found.


Wednesday, October 12, 2011

Spooky Floaty Bats

Last year I made these floaty, quivery bats out of crepe paper and curly wires.

On my Halloween decor tree inside they shook and floated and quivered every time we walked by. I loved how they came out!

So I thought that this year it would be neat to make a larger version for outdoors. Floaty black bats that would shiver in the wind.

Here is what I pictured in my mind and I am so jazzed this project came out exactly as I'd pictured!

I thought to use felt or craft foam but they are too floppy without a wire inside the wings. Then I found this bundle of foam packing scraps at St. Vincent's for fifty cents. Score!

I cut these out with scissors freehand since the scraps were an odd shape. I was able to finagle 3 or 4 bats out of each sheet.


This is concrete rebar wire which can be found at Lowe's for cheap. This roll cost $3.50 a while back and I use it alot.

Cutting a generous piece of wire and leaving the curls intact, I ran one end up inside the foam then crimped it over at the top.

Yikes, albino bat!
Time for the trusty cheap spray paint from Walmart in gloss black.

Ooh aah! EXACTLY what I had in mind! The gloss paint on the foam sparkles in the sunlight and every little breeze makes them float and quiver and shake. Here they are on a foggy morning, so spooky and cool.


They make me laugh! Love it! So now I have over 3 dozen of these black beauties ready to fly out of my deck planters. I'm putting some on tall wires over 4 foot long so they'll be even more quivery.

We plan to decorate the whole deck soon and I'll post pics when we do. For now I'm loving my floaty bats and the kids going to the bus stop do too. That's a win win!

I'll be posting to the fun parties in my sidebar. Take a moment to come check them out, you never know what clever projects you'd miss.

Saturday, October 8, 2011

New in my Etsy shop this week!

Rosette necklaces for Halloween and every occasion. All are about 5 1/2" wide by 3" tall.


Turquoise and silvery brooch nestled with ribbon rosettes. Love this color!

My newest "tiny nest" necklace. Perfect for weddings!

Ahoy! When I found these tiny skull and crossbones charms, I knew I had to build a necklace around them. Yar!

I call this the mocha combination. Yum, mocha latte.

Another tiny skull with crystal eyes. Perfect for that Steampunk-Goth-Lolita-Vampire- Victorian-Zombie-Halloween costume.


My new craft room colors....teal, sky blue, red, cream and silver. Love it.

More teal blue and turquoise loveliness. How I love these colors!


And this would be chocolate and toffee and french vanilla and coffee and amaretto and cream.
Would that be my new favorite ice cream flavor?

Blood red crystal eyes in this pewter colored skull make this the perfect necklace for a Pirate Wench, don't you think? You have to wear this to your Halloween Party!

I'll be listing more rosette necklaces for Christmas gifts and suitable for a wedding soon. Check back, wouldja?


Farewell To Summer

This was our pretty patio project at the height of summer. So colorful, lush and cool. The barrel fountain in the corner filled the space with the sound of falling water.


On a summer morning it was a delightful place to sit with a cup of coffee and read the newspaper or a good book.


So pretty.


And I finished a few projects out there, like this chair. It was also nice to paint outside on my broken mirror project.

Alas, cooler weather is shutting down the patio for the season. It's not warm enough to spend time out there any longer. The sun is at a different angle and the whole area is shady and cool.

Now our living shifts to our new front deck which we are still finishing. Molly Brown, our chocolate lab, likes it! It's big enough for seating the overflow from family dinners and with the sun's new angle, it gets the afternoon warmth.

And boy, do I have big plans for Halloween decorating! Picture those overflowing planter boxes filled with plants painted glossy black. And black garlands on the railing. And black urns with stacked pumpkins.

Can't wait to get started!

I'll be linking up to Funky Junks Farewell to Summer party. Come visit and join the fun!

Pretty Lace Pumpkins

Since we've moved I have not yet found all my holiday stuff, and I've been itching to get some things changed up. What to do? Why, make some decor with what I can find, of course.

So I shopped my stash and found scraps of black lace yardage, and fabric in white and rusty orange and some crochet thread.....and ta da! Lacy pumpkins to get me kick started.


Cut your lace and backing fabric the same size. Make the length twice as much as the width. This gives you pleasing pumpkin proportions.


Sew both pieces together on the long edge with your longest stitch. Or you can do this by hand with needle and thread. Pull your thread up tight and gather it and tie it off. I put a dab of hot glue on the thread ends to keep them taut. Then sew your short side seam.

Turn it inside out.

Stuff your pumpkin full with fiberfill or whatever you have at hand. I've even used plastic shopping bags in a pinch. Lord knows we have plenty of them!

After stuffing, pull thread on the top edge tightly to gather and tie your threads, then secure with a little bit of hot glue.


Thread a sturdy, long needle with black crochet thread or string. Tie a knot in one end and run it through your pumpkin, straight through the middle. Draw it tight. The tighter it is, the fatter your pumpkin will look. Do this about six times.

Look! Plump pumpkiny goodness!

Glue a stick and some fake leaves at the top for a bit of color. So cute! By this point you will be smiling and quite pleased with yourself. Or is that just me?


And here is the combination of black lace over orange fabric. Gorgeous! I'm thinking now I need to make some black ones with white lace, just to complete the lacy look. And the best part? These didn't cost me a dime since I made them with scraps from my stash. Win win!

Ooh aah. I love the look of the black lace over the solid colors. At the top left is a plain white pumpkin with no lace. I like the pure simplicity of it. Now to the fun part, putting this all together for a colorful display.

I'll be linking up to the fun parties in my sidebar plus The Fall Festival below.  Stop by and take a look, there are always tons of creative ideas out there.


 The DIY Show Off

Tuesday, October 4, 2011

Cozy Pillows From Sweaters

Here's a neat project that's low cost, easy to do and adds tons of coziness to your fall home.

In spring of 2010 I started seeing sweater pillows at upscale sites like Eddie Bauer and Anthropology. Too expensive for my tastes but I knew I could duplicate that Anthro look at Goodwill price. Wait, that's the story of my life, lol!
I found this creamy acrylic blend sweater at GW and snatched it up pronto. Visions of sweater pillows danced in my head!
No progress pics since I wasn't blogging then and the fam was already getting waaaay too many "look what I made" emails.
HERE'S A TIP-cut a fabric backing for each sweater piece to stabilize it. I used muslin. This will keep your pillow piece edges straight and eliminate bunching and distortion when you sew your pillow. I zigzagged the edges and top stitched over that to make sure every bit of yarn was stitched down. You do NOT want your lovely pillow unraveling after you're finished with it!
I was able to use the front and back of the sweater to make two pillows. I used muslin for the backing and stuffed them with fiberfill.
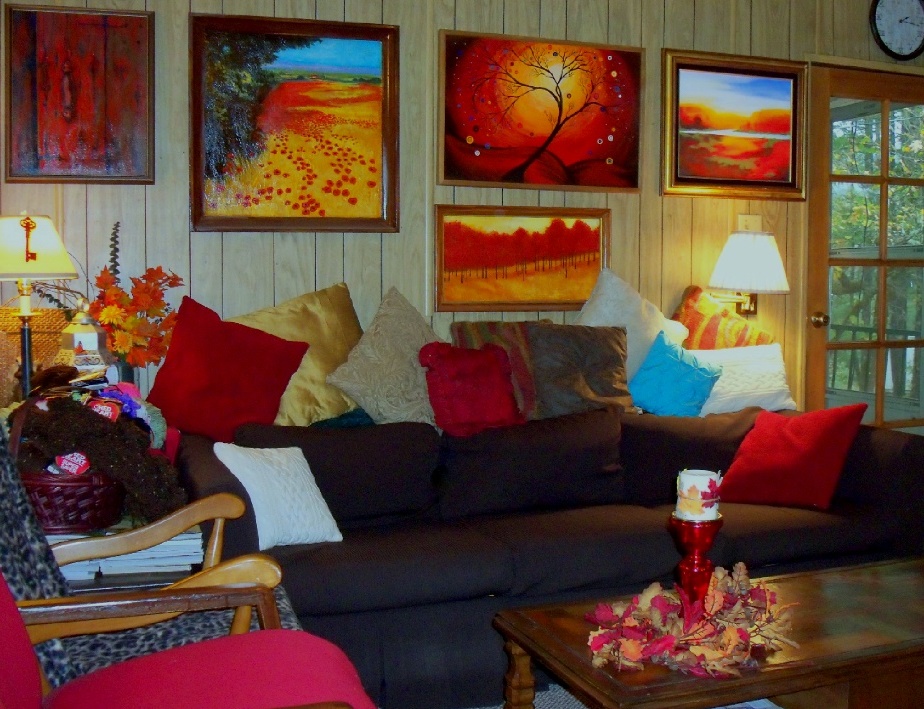
And here they are on my chocolate brown couch. I knew I wanted some vanilla/creamy pillows to offset the strong colors, and these pillows are perfect. And since the sweater was acrylic, the pillows are washable. Bonus points!
Then I added more of my artwork and put it all together.

Love the bright colors for coziness, but those sweater pillows give just the right touch of grounding white and texture. Cheap and easy to make, too. Win, win!
I'll be joining a few of the parties on my sidebar, come visit and link up, it's always fun and interesting!

Book Page Christmas DIY

Most of you have figured out I am a color freak with an obsession  for turquoise, red and cobalt blue.  However, I also obsess about ...