Saturday, March 30, 2019

Wax Paper Capiz Shells and a Tabletop Chandelier

Pin ItI LOVE the look of capiz shell chandeliers and lamps but they are always too expensive for my (non existent) decorating budget.

Then I saw some online made of wax paper and
 figured I can do that!

 I chose a tall brass tabletop lamp for the bookcase at the corner of our hallway.
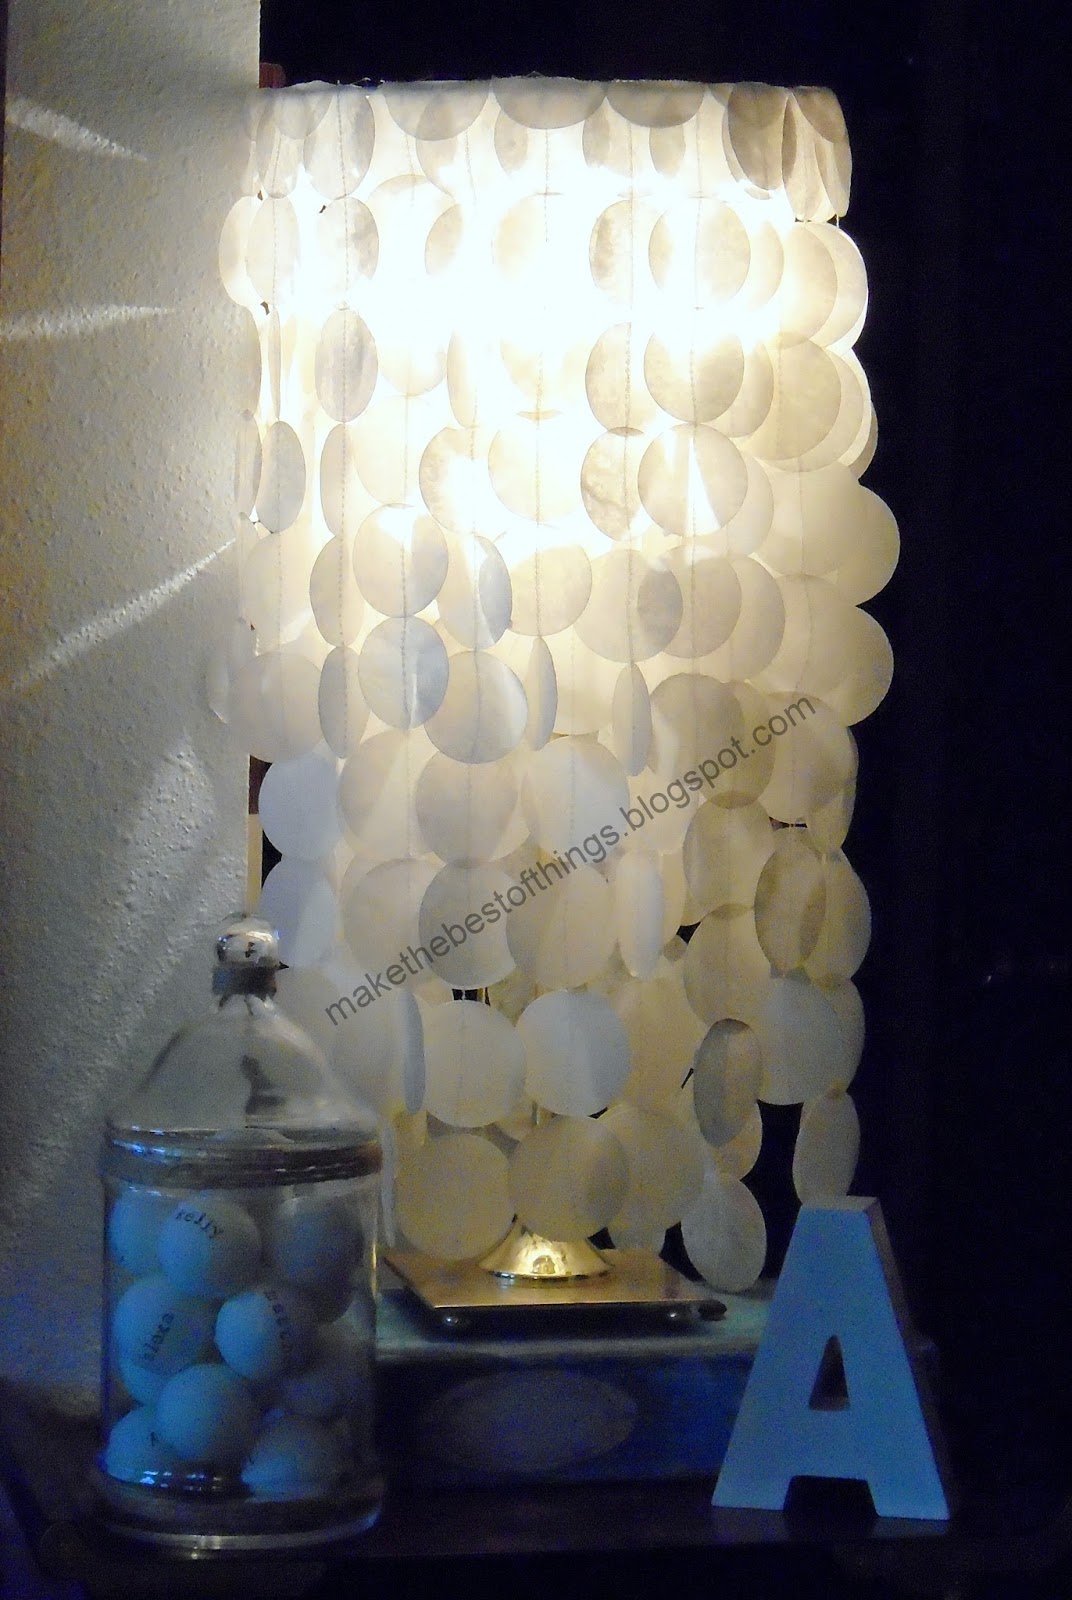

I like it! I like it alot!!


It has a soft glow, great texture and a bit of movement when you walk by.
Even The Welding Man likes it,
he says it reminds him of a wedding dress. :o)


I took a lamp shade from my stash and removed the old cover.
I knew I wanted the rings to be larger at the top and smaller at the bottom.
And I wanted two layers of hanging shells. So I added another ring halfway up
 with craft wire secured with more wire.

After a coat of white spray paint I FLIPPED IT OVER and got all
my fake capiz shell circles ready.


Dollar Store wax paper, baby!!

Next I made the wax paper "shells." I used a dry iron on the cotton setting and put
parchment paper on the bottom between the ironing board and wax paper.

Four sheets torn off close to the same size melt together nicely and make a good, stiff 4 ply sheet.
Let the wax paper cool then start the circle punching. I found my punches did best
 with 4 sheets of 4 ply wax paper, your punch might do better with more or less.

I used a 2" and an 1 3/4" circle punch. I figured I needed about 400 circles total, plus I cut a few extra in case of mistakes or design changes.


I sewed my circles together using my machine's longest stitch and placed 9 circles on each "run."
I sewed several sets of nine together in a single sitting with about three inches
 of thread between each set. I cut them apart into sets of nine and started assembling.


I wound the thread from one set of circles twice around the middle ring and put a dab of hot glue over the thread. I placed each string of circles about 1" apart.


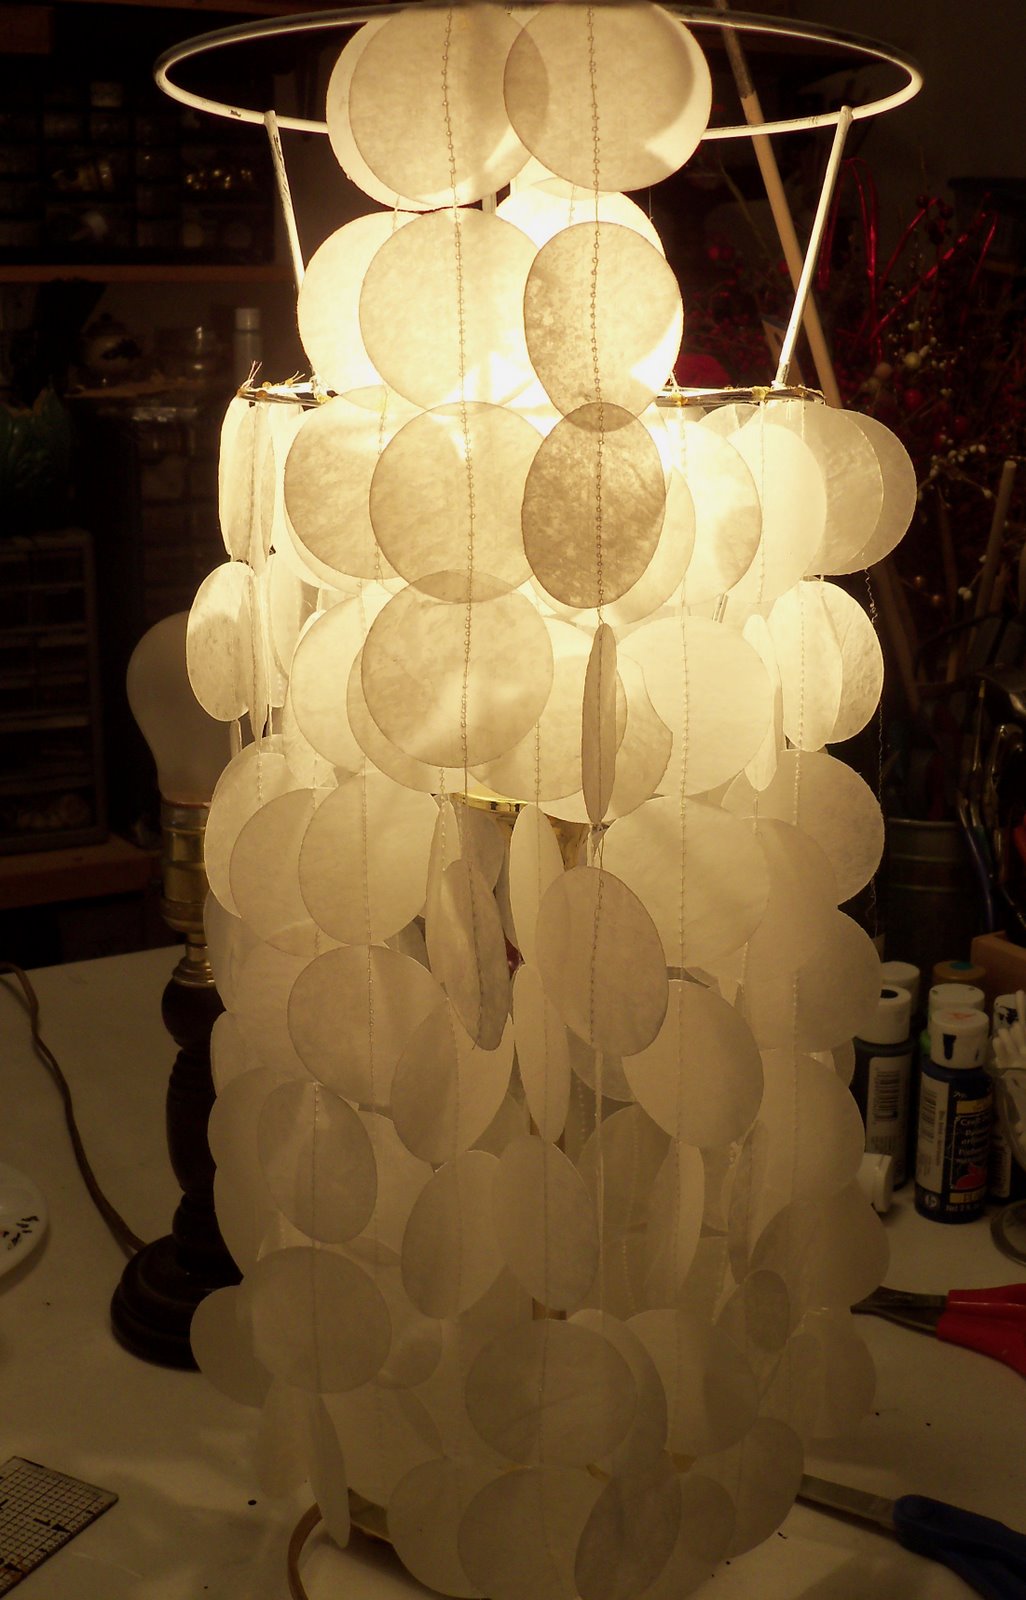
For the top ring I let six of the circles on a string hang down outside and folded the other three over inside the frame, using a dab of hot glue on the thread at the top. This gave the upper half of the lamp a fluffier look and more visual "weight."


Extra circles folded in half and hot glued around the upper ring give the lamp a finished look.


As you can see, the stitched circles diffuse the light and overlap nicely, giving a nice soft glow to the evening. During the day they give that corner a bit of reflected light and nice texture.


I am already thinking ahead to doing this with my dining room light.
Maybe with a little color and a bit of glitter?

When I figure it out and make it I'll be posting right here.
Hmmmm. Stay tuned.


Thursday, March 28, 2019

Part 2 Restyle Old Books into Vintage Style Decor

Here is a row of my restyled books in my bookshelf. They aren't antique collectors' editions, they are all modern hardbacks that I've redone for a vintage look. Please note-no books are destroyed making them over like this. They are all still readable!


In Part One of this post I showed how I decoupaged pretty papers to hardback books using Mod Podge, hot glue and paint. Here's a link...


Here in Part Two I'll show you how to use a cheap and easy crackle technique with Elmer's school glue and craft paint. You can give your books a cool antique look and upstyle your bookcases and decor.


Here is a set of three books redone in black and red and a little bit of gold paint. See how cool they turned out? For these projects you will need hard back books, craft paint, hot glue, Elmer's school glue and paint brushes. You probably already have everything on hand in your stash!


 First, choose your book and paint the whole cover in the base color you want to show under the finished crackle. I used black craft paint on this book, then added fake "stitching" with hot glue. The ruler helps get the "stitching" straight and evenly spaced. Note-It took two more coats of black paint to cover the title on the spine.


Once the craft paint is dry I painted a coat of slightly watered down Elmer's school glue over the whole cover. Dollar Store school glue also works for this technique. Brush the glue on in an even layer then let it dry for a few minutes. For the next step the glue MUST BE TACKY. If it is NOT STICKY the top layer of paint will not crack!


Using a soft bristled brush and long strokes in one direction ONLY, add your top coat in your choice of color of acrylic latex craft paint. Do NOT brush back and forth or dab your paint. Use long even strokes going one way for an even crackle texture to form.

Within a few moments the cracks will start to show. I LOVE watching this part!


Once the crackled paint was dry, I added precut labels to two of my books and a skeleton key to the other. Then I dry brushed black paint over all the edges and the "stitched" spines to bring out the details. I also added gold metallic paint to one label.


Here's another look at the three finished red books. For additional texture on the bottom and top books, I first Mod Podged crinkled up tissue paper before painting the base color, then proceeded with the glue and paint crackling. The dry brushing at the end really highlights the crinkled paper, making it look like old leather.


My livingroom colors are turquoise, red and brown, so these books are PERFECT for making my livingroom pretty and colorful!


My books have never looked this GOOD! I did not spend any money on restyling these books since I had everything on hand in my stash. Mod Podge, hot glue, paint, tissue, Elmer's glue and pre cut labels.

I'm making them in sets of three in different colors and trying them out for wedding decor. We have three family weddings this year and these will look beautiful on the reception tables.


And more...


and even skeleton keys for Halloween!


And last but not least, turquoise with black patterned papers, including damask!


This is a fun and inexpensive way to add beautiful color and texture to your home's decor. Try it, you'll like it!

Restyle Your Books to Look Vintage and Colorful #1

Here's a phone photo of this project. Look how neat these old books are. But they're not old...I made them look this way. Read on!


I love books. My whole family loves books! I have 9 bookshelves full in my house and that's after I thinned them down! So I decided to take the situation in hand and make them a pretty part of my decor.

So here's what I did....I remade them with paper, paint, hot glue, Mod Podge and imagination. Now I can have the elegant vibe of beautiful vintage books on all my shelves. Not only was this inexpensive and clever but I can still read the books. Win win!

Look at these fine vintage volumes...they definitely look like some jewel toned editions from the library of an elegant estate, right?  


I don't know about you but these are reminding me of some collector's editions of the Harry Potter books, lol! But they all started out as ordinary hard back books of various ages and styles. I LOVE the way they look now!

Here's what you need to get started on restyling your own books.....

1. Various printed papers. I prefer tissue paper and printed napkins for their beautiful designs. Scrapbook paper works too although it is thicker and takes more time to dry.

2. Hot glue, Mod Podge and glue sticks. 

3. Acrylic craft paint in compatible colors to dry brush and "age" your books. You can also use scrapbook chalks to age the edges.

4. Small scrapbook embellishments, jewelry charms and stickers as you wish.

5. Clear acrylic sealer spray in matte. Gloss finish is too shiny for me but it is your choice.


Here is a collection of tissue papers and napkins I pulled out of my stash. I am ALWAYS on the lookout for beautiful printed paper for my projects. 


On some of my books I added several lines of hot glue to give the illusion of hand stitched bindings. This gives the spines a bit of character and adds fun detail. Don't worry if your hot glue isn't perfectly even since hand binding does not always appear perfect. You want the look of an antique, hand sewn book spine!


Here is a book with the first layer of paper. I will add more paper til I like the way it looks and the paper has totally hidden the color of the original cover. Note the margins of loose paper hanging over the edge. 


I tear the tissue in large pieces and keep the straight edges for the outside of the book. I crinkle it up tightly before Mod Podging it to the book cover, then I straighten it out. Smooth it over the Mod Podge leaving about 1" margin hanging off all the edges.The crinkled tissue gives a wonderful  texture like old leather to your upstyled book. I LOVE how it looks! The tissue and napkins I use are VERY fragile when wet so I only put the Mod Podge on the book and not on the paper. If you are using paper napkins, REMEMBER to peel off the plain paper backing and only use the printed layer. If you do not do this your napkin will peel off in an ugly way. Don't ask me how I know this.

IF you are using scrapbook paper you can brush the back of the paper with Mod Podge as well as the book cover. The scrapbook paper is thicker and not as fragile as the tissue and napkins I used in this post. The thicker paper will take longer to dry so take note.


Here is the same book shown above with multiple layers of paper.  I use the glue stick on the inside edges of the cover and fold the 1" margins over nice and neat. Then I use a complimentary color of craft paint and dry brush all the edges, spine and corners for a vintage finish. I faked in some binding lines, too, since I didn't use the hot glue trick on this book. Now this plain black book is a "hand bound antique" and it's looking good!


Here I've used tissue paper printed in gold damask and layered it with more tissue that is printed with cursive writing. Notice how authentic the hot glue "binding lines" look once they are covered with tissue. I have used metallic gold craft paint on all the edges and on the label. I followed up with a very light dry brush with black paint. So pretty!


Here is a combination of two damask print papers that I crumpled, Mod Podged and layered. Again, I used black craft paint to dry brush the spine and the edges. I love the drama of damask prints.


Here's a row of finished books. I had the labels on hand and I think now that some steam punk type embellishments would be perfect for this project. Miniature skeleton keys, gears, watch faces... I know I have some of them in my stash, I need to pull them out!


Here is a stack of books done with the blue printed napkins and damask printed tissue in the photo above. Just gorgeous! I use this color alot in my decor.

 See the plain blue books in the pile?


In part 2 I will show you how to make these "plain" painted books using tissue paper, Mod Podge, craft paint and Elmer's glue. This technique is also inexpensive, clever and easy and you can make your mismatched books look like collectible antiques in any color you desire. Stay tuned!

https://makethebestofthings.blogspot.com/2019/03/part-2-restyle-old-books-into-vintage.html

Sunday, February 17, 2019

Huge Paper Flowers in My Master Bedroom

We made this backdrop out of recycled doors and HUGE flowers made
 out of poster board for a family wedding.

Here's a link to the DIY for the flowers....


Afterwards we did not want to throw them away and we didn't want to sell them. 
So I put them up in my master bedroom for a nice display.


I have a cherry wood sleigh bed and they look perfect in there!


I made a whole bunch of pillows for bring the decor together. 

From top left is a sweater pillow, a suede smocked pillow, an oversize muslin smocked pillow, a crushed velvet smocked pillow, a ruffled muslin pillow, a smocked muslin pillow, another sweater pillow, a smocked burlap pillow and a round crocheted doily pillow. 

Whew. 
That's alot of pillows, but I love them!


It's been three years since the wedding and the newlyweds have an 18 month old baby. 
Their wedding flowers aren't going anywhere for now. 
I like them alot!

Sunday, February 10, 2019

Tiny Nest HOME Sign


For this project I was looking for a neat little sign for our guest bathroom and I remembered these tiny wire nests.....

I've been making these nests for my rosette necklaces for a few years now. I love how they look with the sweet ribbon rosettes and beading. Making them isn't hard work since I enjoy them so much!


                        Here's a close up of the nest done in gold colored wire and the perfect 
                                                freshwater pearls shaped like eggs.


For this project I turned to my handy dandy pre cut letters. A pizza box is
 the perfect storage solution. 
I used letters in different fonts.....


I spray painted a frame from my stash gloss black, and also painted the mismatched letters. I tore card stock diagonally then inked and distressed the edges. I also grunged the corners and random areas for added texture.


A tiny nest of tarnished gold colored wire and three beads nestles at the bottom of the "O".


A wispy branch picked up from the yard adds a final touch.


I grunged the edges a bit more and also grunged around the branch to make it stand out a bit.

 I like it. I like it alot!


Insanely Creative Christy redid this little $1 thrift store cabinet with recycled
dictionary pages, paint and twine, and the cubby at the bottom is
perfect for this HOME sign. It is just the right spot!

Saturday, February 9, 2019

Quick Lamp Restyle with Tissue and Mod Podge

I've had this little uplight forever and the shade had yellowed and had little cracks all over. 

Time for a restyle!!


I hit my stash for Mod Podge and some pretty turquoise tissue paper. 
I crinkled the tissue up and tore it into postage stamp size pieces.


After cleaning the light shade I covered the whole thing with the crumpled tissue, 
including a generous border folded over the top. At this point I was 
really jazzed because this looks like burnished STONE.

I sealed it with clear acrylic spray.


Even during the day it lends a pop of the blue color I love to it's place on my shelf.


Oooh aaaah!

I like it even better when it's lit up!

It's the perfect light for the shelf at the end of my 
hallway and it highlights my painting so nicely!

Sometimes a project just comes together so quickly and 
easily that it makes me laugh out loud. This was one of them.
Now I'm looking at the other lamp right over there......


Saturday, January 5, 2019

Nightstands Turned Kitchen Island


Here's a shot of our kitchen when we first bought our mobile home several years ago.  
Well kept cabinets, lots of storage and quite roomy. 
The size of the kitchen and the master bath (both of which
 also have large skylights) clinched the deal for us.


It only took a few family potluck dinners to know we needed an island in our kitchen.
 At our first Thanksgiving here, we paired up some old, solid wood 
nightstands from a vintage 80s waterbed set.

We set them up back to back and threw a tablecloth over the whole shebang.
 They turned out to be the perfect height and heavy enough to withstand
 the traffic flow when dinner was served.

Hey!
 Why buy the lumber and build an island when 
we could restyle what we already had?

We took out the drawers and bolted the nightstands back to back
and painted the whole assembly a nice shade of blue with a grey wash.
We used acrylic paint sealed with clear acrylic spray.


For the top we had a precut piece of heavy duty masonite. 
I covered it with pages of an old cookbook using Mod Podge.

LOOK! 

The colors and tones complement the still serviceable vinyl floor.
We sealed the top with brushed on resin (two part Envirotex used for bar tops)
 and we are so excited with the great results!


Ta da!


For the final touch we used the pulls off the original drawers and
 attached them for towel holders.Then I refurbished the drawers for storage with 
red checked contact paper. They are perfect inside our 
brand new kitchen island made from our old nightstands.


This is one of our most popular projects and is a Pinterest favorite. 
It cost us nearly nothing save for the resin which I purchased
 from Michaels with a 50% coupon. I call this a win win!!

Paint Dye Your Pillows


There's a question. Paint your pillows or dye your pillows using paint? 
Whichever way you choose, it worked well for me!


I wanted all my pillows to match the turquoise color at the left 
using the other two patterned fabrics in the picture.


So I decided to just paint/dye them!
 I laid each remnant out and sprayed them with water until damp, 
straightening out any wrinkles at the same time. 

Then I diluted 3 or 4 drops of turquoise Craft Smart acrylic paint with water 
until it was quite runny. I dipped a soft paint brush in the watered down paint
 and touched it to the wet fabric.

 It was a real aha! moment for me as the damp fabric "grabbed" the color. 
Watching that turquoise spread across the fabric was almost magical. 
A spritz of water then a dab of color helped the process and in the end I was so pleased!


They turned out exactly the color I wanted! 
 I let both remnants air dry then ironed them to seal the color.
Here are the pillows on my bed with the original turquoise pillow.

So are they painted or dyed? 

This was a quick and thrifty DIY project for me. I had everything  in my stash.
Fabric remnants, pillow forms, craft paint, paint brushes and an iron. 
Plus a sewing machine, of course.

Altogether, not including drying time, this project took less than an hour from idea to pillows.
I call this one a win win!

Book Page Christmas DIY

Most of you have figured out I am a color freak with an obsession  for turquoise, red and cobalt blue.  However, I also obsess about ...